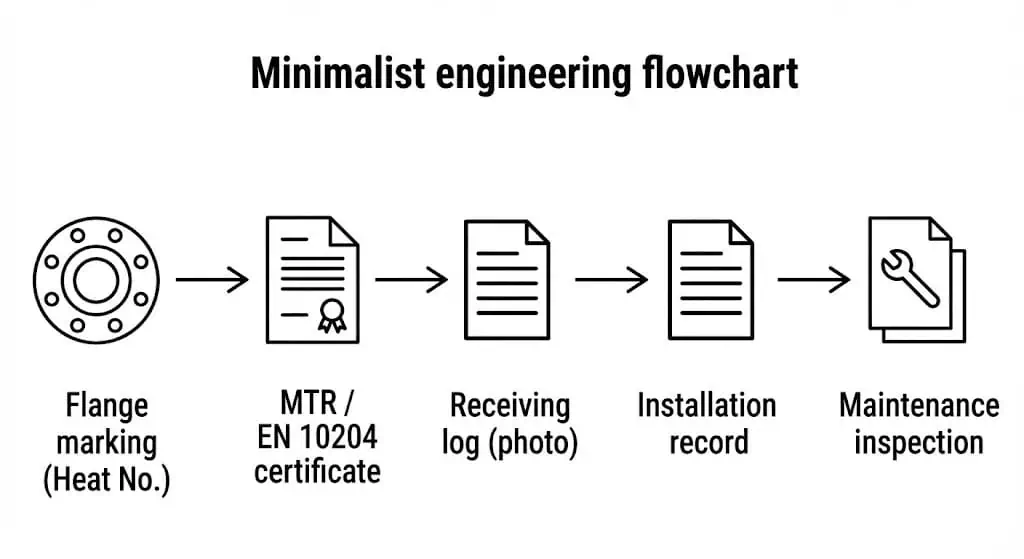
To read flange markings, start with the “identity chain” stamped on the flange: manufacturer mark → governing standard → size → pressure rating → material designation → heat/batch number. That sequence lets you confirm (1) the flange belongs to the right dimensional system (ASME “NPS/Class” vs EN “DN/PN”), and (2) it can be traced back to the correct heat on the Mill Test Report (MTR) or EN 10204 inspection certificate before the flange ever reaches a bolt-up. Markings matter because they support traceability, safety, and compliance; they also expose the most common field errors early—mixed-standard assemblies, wrong material, or paperwork that does not match the physical part.
| Requirement | Description |
|---|---|
| Manufacturer’s name or trade mark | Permanent identification of the producer (first check at receiving and before installation) |
| Standard | Standard reference stamped on the part (for example, EN 1092-1 for DN/PN flanges, or ASME B16.5 for NPS/Class flanges) |
| Flange type number | Specific identification of the flange type (EN “Type”/“Form” or project designation) |
| DN | Nominal diameter designation used in EN systems (do not treat it as a measured OD) |
| PN designation | Pressure nominal designation used in EN systems (verify limits at temperature per project spec) |
| Material grade | Material designation (ASTM/EN grade) that must match the certificate and the service environment |
| Heat number | Unique identification that links the flange to the original melt/heat for traceability |
What Are Flange Markings
Definition and Purpose
Flange markings are a set of symbols, numbers, and codes stamped or engraved on a flange to identify its essential characteristics. In practice, markings must let you answer three engineering questions quickly: “What dimensional system is this?” “What is it made from?” and “Can I trace it to the correct heat and certificate?” Standards and marking systems such as MSS SP-25 exist so that inspectors can identify the manufacturer, the rating designation, materials of construction, and any special limitations consistently.
A typical set of flange markings includes:
- Manufacturer identification or logo (who produced it, and who is accountable for the heat trace).
- Material designation (for example, ASTM A182 grade for stainless flanges) and any required heat treatment condition.
- Facing / sealing interface identification as required by the governing standard or project spec (for example, RF/RTJ or EN facing “Form”).
- Standard reference (for example, ASME B16.5 or EN 1092-1) so you do not mix drilling patterns or rating systems.
- Pipe-size designation (NPS for ASME systems, DN for EN systems) and any thickness/schedule requirement where applicable to the flange type.
- Pressure rating designation (ASME portable “Class” system or EN “PN” designation) that must be verified at design temperature.
- Batch or heat number that must match the MTR / inspection certificate before installation.
These markings allow engineers and inspectors to verify that each flange meets the required standard and the purchase order. In the field, the highest value of markings is not “identification for its own sake”—it is preventing wrong-part installation. If the markings do not reconcile with the certificate, treat the flange as nonconforming until the mismatch is resolved.
Importance for Safety and Compliance
Flange markings protect joint integrity because they stop preventable mismatches before bolt-up. Markings provide critical information about specifications such as material, rating designation, and standard reference. Those details are what you use to confirm: (1) gasket and bolting are compatible with the facing system, and (2) the flange belongs in the same standard family as the mating component.
- Flange markings ensure compatibility with other components by exposing “DN/PN vs NPS/Class” and drilling differences before assembly.
- They support compliance by linking the physical part to the project’s required standards and documentation (MTRs, inspection certificates, and purchase order requirements).
- Proper identification reduces risk of failures by preventing wrong material installation (for example, 304 used where chloride pitting risk demands 316/duplex).
- Markings enable traceability for audits, maintenance, and recalls—especially when the heat number is consistently carried through records.
Field reality: most flange incidents tied to “marking” start as logistics problems—mixed lots, swapped paperwork, or markings hidden by coating. If you do not resolve those issues at receiving, you are forced to troubleshoot them later under pressure, during commissioning, or after a leak.
Flange Marking Cheat Sheet (At a Glance)
Flange markings provide essential information for quick identification and traceability. Inspectors use markings to confirm the part matches the purchase order, then verify that the certificate matches the stamped heat number. Use the cheat sheet below as a “shop-floor” decoder—then validate against the governing standard tables and your project documents.
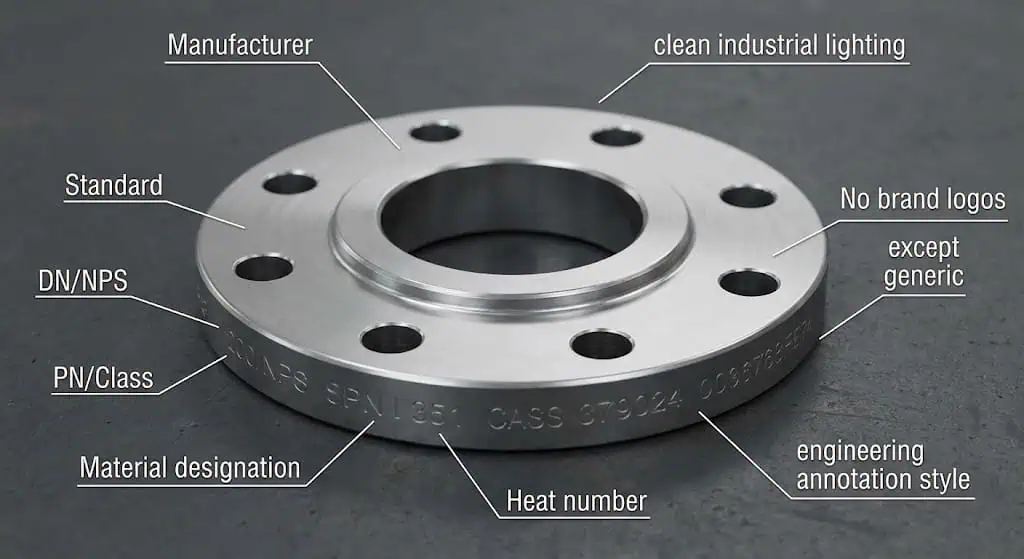
Table: Identifier / Meaning / Example / Corresponding Certificate
| Identifier | Meaning | Example | Corresponding Certificate |
|---|---|---|---|
| Manufacturer | Name or logo of the producer | SUNHY | Mill Test Report (MTR) / inspection certificate (links producer + heat) |
| DN (Nominal Diameter) | Nominal size designation used in EN systems | DN100 | Purchase order + dimensional inspection record (and referenced on certificate packages) |
| PN (Nominal Pressure) | Nominal pressure designation used in EN systems | PN16 | Purchase order + inspection record (verify rating at temperature per spec) |
| CLASS (ASME Rating) | Pressure-temperature rating designation used in ASME systems | Class 150 | Purchase order + standard reference; verify per ASME pressure-temperature tables |
| Material Grade | Material specification/grade that governs chemistry and properties | ASTM A182 F316/316L | Material certificate / MTR (chemistry + mechanicals tied to heat) |
| Standard Reference | Dimensional and marking standard family | EN 1092-1 / ASME B16.5 | Certificate package + project spec (do not mix standard families) |
| Heat Number | Unique heat/melt identifier for traceability | HN12345 | MTR / EN 10204 inspection certificate (must match stamp exactly) |
| Heat Treatment Symbol | Indicates specified heat treatment condition when required | SA (Solution Annealed) | Heat treatment record (when required by the material spec/project spec) |
Tip: Always cross-check the heat number and material designation with the certificate package before releasing the flange to fabrication or installation. If you cannot reconcile them, quarantine the part and escalate.
Common flange markings include DN, PN, CLASS, material designation, standard reference, and heat number. What matters is not recognizing the code—it is proving the code matches the documents that control your risk.
- DN (Nominal Diameter): identifies the EN nominal size family; confirm drilling and mating compatibility before fit-up.
- PN (Nominal Pressure): identifies the EN nominal pressure family; verify temperature limits per the applicable standard/spec.
- CLASS: an ASME rating designation; do not treat “Class 150” as a single psi number—pressure capability changes with temperature and material group.
- Material Grade: confirm the exact spec/grade format used for the project (for example, “A182 F316/316L” rather than generic “316”).
- Standard Reference: proves whether the flange is EN or ASME family; this prevents bolt-hole mismatch and “almost fits” assemblies.
- Heat Number: is the traceability anchor; if it is missing, unclear, or inconsistent, you cannot complete traceability.
- Heat Treatment Symbol: helps confirm condition (for example, solution annealed stainless) where required by specification.
Example flange marking interpretation:
A flange marked “SUNHY DN100 PN16 ASTM A182 F316/316L EN1092-1 HN12345” means the flange was produced by Sunhy, has a nominal diameter DN100 and PN16 rating designation in the EN system, is forged to ASTM A182 in a 316/316L grade, complies with EN 1092-1 dimensional family, and must be traceable to heat HN12345 on the MTR/inspection certificate package.
How to Read Flange Markings
Manufacturer Identification
Direct Answer: Manufacturer identification is the first marking to check when you read flange markings, because it anchors accountability and traceability.
- Look for the manufacturer’s name or trademark stamped on the flange (logo style should be consistent across the lot).
- This marking confirms the origin and supports traceability; it must reconcile with the supplier name shown on the certificate package.
- Inspectors compare the manufacturer mark on the flange with documentation (purchase order, packing list, and MTR/inspection certificate).
- If the manufacturer mark is missing, inconsistent, or appears “re-stamped,” treat the flange as nonconforming until verified.
| Step | What You Do |
|---|---|
| Documentation | Match PO, packing list, and certificate package to the heat numbers stamped on the flanges |
| Visual Inspection | Confirm markings are legible (not buried under coating) and check for damage at the sealing face and bolt holes |
| Quantity Check | Count items by size/rating and confirm mixed lots are segregated before storage |
| Detailed Inspection | Verify standard family (EN vs ASME), facing requirement, and material designation match the order |
| Reporting | Record any mismatch (photo + heat no.) and quarantine parts until disposition |
Material Grade and ASTM Code
Direct Answer: Material designation and the ASTM (or EN) material specification show the metallurgy you are installing—and they must match the certificate and service environment.
- Find the material designation, such as “ASTM A182 F316/316L,” on the flange markings, then confirm the same format appears on the MTR.
- These markings indicate the governing material specification (chemistry + mechanical requirements) and reduce the risk of mixed-grade installation.
- When service is corrosion-sensitive, the grade is not paperwork detail—it drives pitting/SCC risk and long-term maintenance cost.
| ASTM Code | Material Grade | Significance |
|---|---|---|
| ASTM A105 | Carbon Steel | Common for carbon steel flanges; verify impact requirements when low-temperature service applies. |
| ASTM A182 | Stainless / Alloy Steel | Stainless and alloy flanges to defined chemistry/mechanicals; common grades include F304/L and F316/L (confirm exact “F” grade format). |
| ASTM A350 | Low-Alloy Steel | Used where notch toughness/low-temperature requirements apply; confirm class/grade on MTR and project spec. |
Size and Thickness
Direct Answer: Size markings identify the nominal pipe size family (DN or NPS), and they must match the mating flange standard family and drilling.
- Check for DN (EN system) or NPS (ASME system) stamped on the flange; do not assume DN and NPS are interchangeable.
- Confirm the marking family matches the project drawings and the mating component standard (EN vs ASME).
- Where thickness/schedule is relevant to the flange design (for example, certain weld-end details), verify the required schedule from the drawings and the flange type.
| Element | Importance |
|---|---|
| Nominal Thickness of the Pipe | Controls fit-up for weld-end designs and supports joint integrity when the design requires schedule consistency. |
| Pressure Range and Diameter | Determines whether the flange family (DN/PN or NPS/Class) is correct for the mating parts and intended duty. |
- Verification of size family prevents bolt-hole mismatch, gasket misfit, and rework at installation.
- Size and rating must be validated together; “right size” with “wrong rating family” is a common field failure mode.
Pressure Rating
Direct Answer: Pressure rating markings indicate the rating designation (PN or Class) used by the governing standard family, and you must verify the allowable pressure at design temperature.
- Look for codes such as PN (EN) or CLASS (ASME) on the flange markings; treat them as “standard families,” not generic strength labels.
- Common ASME pressure classes include 150, 300, 400, 600, 900, 1500, and 2500 (availability depends on NPS and the standard tables).
- Inspectors use these markings to verify the flange meets system requirements, then cross-check pressure-temperature capability using the governing standard tables.
- The ASME B16.5 standard family defines pressure class frameworks and dimensional rules for NPS-range flanges; selection must still consider temperature and material group.
- Higher designations generally support higher duty, but only when the correct material group, temperature, bolting, and gasket strategy are applied.
- Pressure ratings must be treated as part of the complete joint design (facing, gasket, bolting, and assembly method), not as a standalone stamp.
Standard Reference
Direct Answer: Standard reference markings tell you which dimensional/rating family the flange belongs to—this is the fastest way to prevent mixed-standard assemblies.
- Find the standard code, such as EN 1092-1 or ASME B16.5, stamped on the flange.
- These markings confirm the dimensional family used for drilling, facing conventions, and rating designation; they are not interchangeable across families.
- Inspectors check that the standard reference matches project specifications and the mating flange/equipment standard.
| Standard | Application Description |
|---|---|
| ANSI/ASME | Defines NPS/Class families, drilling, facing conventions, and dimensional rules used widely in process industries. |
| DIN | Historically German standardization; in practice many projects reference EN 1092-1 PN/DN families with metric drilling. |
| EN | EN 1092-1 applies to circular steel flanges using DN/PN families; confirm PN/DN drilling and facing “Forms” per spec. |
| API | Used where oil & gas equipment standards apply; verify project scope and the required documentation and traceability rules. |
- ASME B16.5: Core ASME dimensional and marking family for NPS-range flanges (do not assume compatibility with EN drilling).
- EN 1092-1: Core EN dimensional family for DN/PN flanges (verify drilling and PN series against the mating component).
Heat or Batch Number
Direct Answer: Heat or batch number markings provide the traceability link between the flange in your hand and the certificate package on file.
- Look for a unique heat number or batch code stamped on the flange; it should be legible after handling and before coating.
- This marking links the flange to its production heat and the original melt; it must match the certificate exactly (no missing digits, no transposed characters).
- Inspectors use the heat number to trace the flange back to chemistry/mechanical results on the MTR and to the lot-level inspection records.
- Heat numbers enable targeted disposition if a nonconformance or recall is issued; without a heat number, your traceability becomes guesswork.
- Batch-level control also supports segregation by size/rating/material so mixed lots do not migrate into fabrication.
- These identifiers support quality verification, accountability, and compliance throughout the supply chain.
Tip: Before you install, do a two-person verification: one reads the heat number from the flange, the other reads it from the MTR/inspection certificate. If they differ, stop.
To read flange markings, follow these steps for each marking:
- Identify the manufacturer’s name or trademark and confirm it matches the supplier identity in your documents.
- Check the material designation and material specification format (ASTM/EN) and reconcile it with the MTR.
- Confirm the size family (DN vs NPS) and drilling compatibility with the mating flange/equipment.
- Verify the rating designation (PN or Class) and validate the allowable pressure at design temperature.
- Ensure the standard reference aligns with project standards and the mating component standard family.
- Locate the heat or batch number and match it to the certificate package exactly.
- Record the verification (photo + heat number) for auditability before releasing for installation.
By following these steps, inspectors and engineers can read flange markings accurately and maintain traceability from receiving to bolt-up.
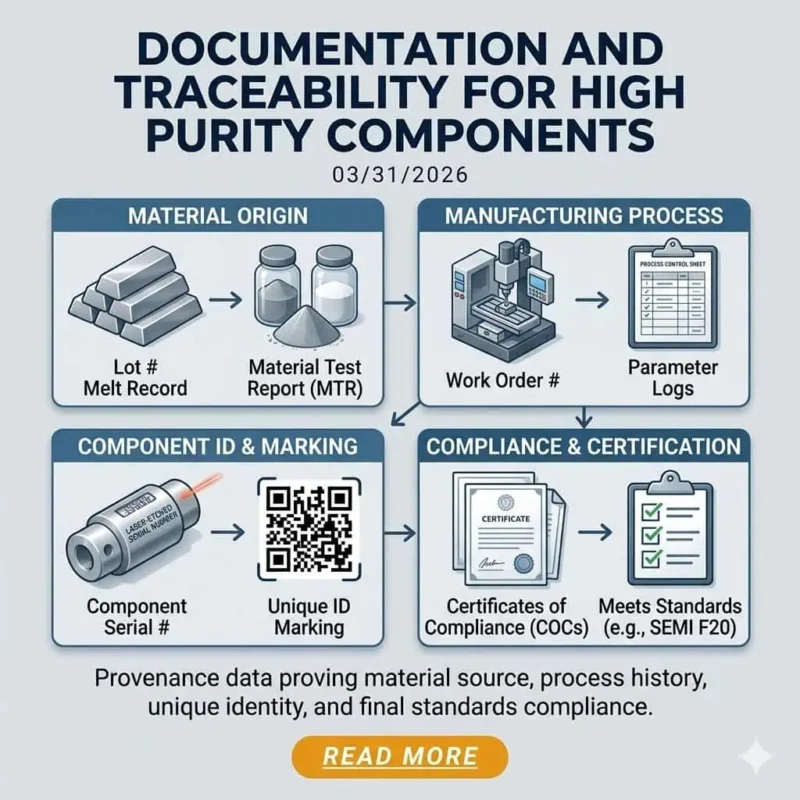
Flange Traceability Explained
Role of Markings in Traceability
Markings on a flange create the physical “pointer” to records that prove origin, material, and compliance. In a controlled traceability system, the heat number stamped on the flange is the anchor that links the part to material test results, inspection records, and release documentation. Without that anchor, you can store paperwork—but you cannot prove it belongs to the flange you installed.
A typical traceability process includes several key steps:
- Manufacturer’s mark identifies the company responsible for producing the flange and supports accountability.
- Material designation links the part to chemistry/mechanical properties recorded on the MTR/inspection certificate.
- Heat number links the flange to the original melt/heat and the certificate package stored for the project.
- NPS/DN and rating designation (Class/PN) confirm the flange belongs to the correct dimensional family for the mating component.
- Facing/feature identification supports gasket selection and joint assembly method (project-dependent, but critical for leak performance).
- Where required by project risk, unique serial identifiers improve traceability for safety-critical joints and audits.
- Special markings confirm inspection and compliance workflow was applied and documented.
Note: Traceability is only complete when the markings, certificates, and receiving/installation records all reconcile. If one element is missing (for example, unreadable heat number), the chain is broken.
Markings support ongoing inspection and maintenance because they let teams tie inspection findings back to a specific heat and certificate package. In modern projects, digital tagging (QR/serial) can speed record retrieval, but the physical stamp still matters—tags can be removed or replaced, while a controlled mark on the flange remains.
Practical Traceability Examples
A structured flange traceability system prevents safety incidents and protects schedule by catching wrong-part risks at receiving. The examples below reflect common field realities: mixed lots, swapped paperwork, and standard-family mismatches that are easy to miss when crews are under time pressure.
The following table highlights practical outcomes of traceability controls:
| Evidence Description | Impact on Safety/Compliance |
|---|---|
| Heat number on flange matches the MTR/inspection certificate package stored for the project. | Enables auditable traceability and targeted disposition if a nonconformance is discovered. |
| Certificate package exists, but heat number on flange is missing/illegible after coating or blasting. | Traceability chain breaks; flange should not be installed until identity is restored or replaced. |
| Standard reference shows EN family on one side and ASME family on the other (mixed lot). | High risk of bolt-hole mismatch, gasket misfit, and forced assembly; isolate and re-verify before fit-up. |
Sunhy’s traceability protocols include:
- Stamping each flange with a unique heat number and manufacturer’s mark, then keeping those identifiers consistent across documents.
- Maintaining batch records, including MTRs/inspection certificates and dimensional/visual inspection results for the order.
- Supporting record retrieval so inspectors can reconcile markings to documents before installation.
This level of traceability reduces rework: if a mismatch is detected, teams can isolate only the affected heat/lot instead of stopping the entire line. It also supports long-term maintenance because you can tie a joint issue back to a specific heat, certificate, and installation record.
Tip: At receiving, take a clear photo of the marking set (including heat number) and file it with the certificate package. That one habit solves many audit and dispute problems later.
Buyer Inspection Checklist
A thorough buyer inspection checklist helps verify flange marking accuracy and protects traceability. Receiving is where you can stop wrong-part risk at the lowest cost—before fabrication, before installation, and before pressure testing.
The following table outlines key items to review during inspection:
| Checklist Item | Description |
|---|---|
| Marking Methods | Confirm markings are permanent and legible (stamp, dot-peen, or laser) and will remain readable after normal handling/coating processes. |
| Compliance | Verify standard family on the flange (ASME vs EN) matches the purchase order and the mating component standard family. |
| Repair Marking | Check for any repair/rework indicators required by the project QC plan; confirm documentation exists for any dispositioned nonconformance. |
| Readability | Ensure all markings (especially heat number) can be read without guesswork; if unclear, quarantine and request resolution before release. |
Buyers should also follow these steps during inspection:
- Compare all markings on the flange with the purchase order and certificate package; verify size family and rating family match the order.
- Verify that the heat number links directly to the MTR/inspection certificate; treat any mismatch as a stop-work item.
- Check that the material designation and standard reference match project specifications before releasing for installation.
Tip: If markings are hard to read, clean the area (without removing material), then photograph the stamp under angled light. If you still cannot read the heat number confidently, do not install the flange.
A careful inspection process reduces installation errors and supports long-term safety. In practice, this checklist prevents the two most expensive outcomes: rework during fit-up and troubleshooting after a leak during commissioning.
Common Problems & How to Handle Them
Missing/unclear markings
Missing or unclear markings are not a “cosmetic” issue—they block traceability and can stop installation. Inspectors typically see three root causes: markings lost to corrosion/abrasion, markings covered by coating, or markings that were never applied consistently. The table below shows common field problems:
| Problem Type | Description |
|---|---|
| Marking Wear or Loss | Markings fade due to corrosion, blasting, or abrasion; verify readability at receiving and before coating/installation. |
| Misinterpretation | Different standards use different conventions (DN/PN vs NPS/Class); wrong interpretation leads to wrong-part installation. |
| Incomplete Markings | Critical identifiers (especially heat number or standard reference) are missing; you cannot complete traceability without them. |
Field Example: a batch of flanges arrived legible, but after blasting + primer the heat number became unreadable. The crew could not reconcile certificates to physical parts during bolt-up, so the line was stopped, flanges were quarantined, and replacement parts were required. Prevention is simple: verify readability at receiving, photograph markings, and protect the stamp area during coating when the QC plan allows it.
Mixed-standard risk
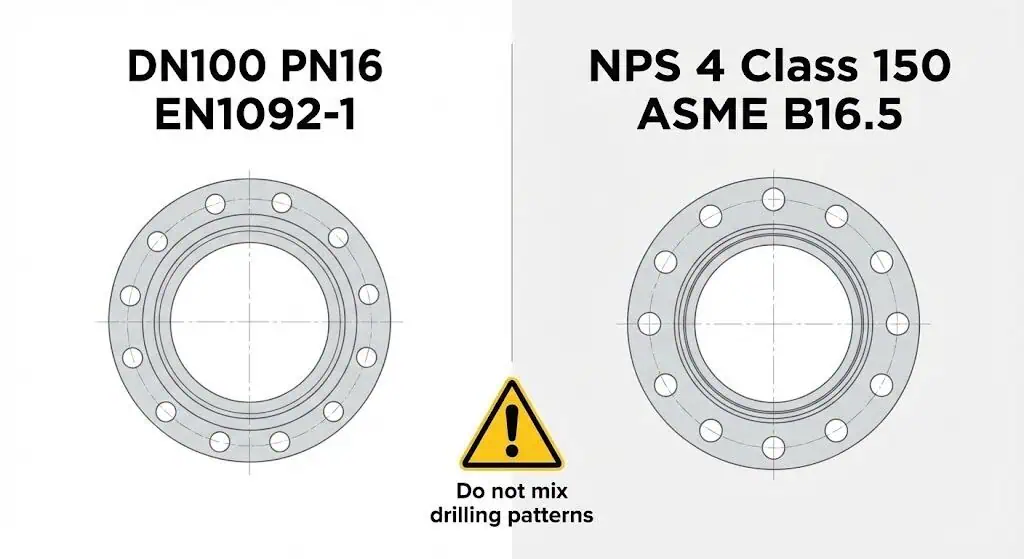
Using flanges from mixed standard families causes bolt-hole mismatch and “forced fit” assemblies that damage faces and gaskets. Mixed-standard risk usually enters through storage and logistics—DN/PN flanges stored next to NPS/Class flanges of a similar approximate size, then picked under schedule pressure. To prevent it, inspectors should:
- Review all markings for standard references (EN 1092-1 vs ASME B16.5) and segregate inventory physically by standard family.
- Match each flange to the project’s required standard family before it reaches the workfront.
- Separate flanges by standard during storage, kitting, and installation; do not rely on “visual similarity.”
Field Example: DN100 PN16 was mistaken for NPS 4 Class 150 during kitting because they are commonly treated as “close enough.” The flange would not align on the bolt circle; rework followed, and the face was damaged by repeated trial assembly. Markings would have prevented the attempt.
Counterfeit/false certificates warning
Counterfeit or mismatched certificates are a real failure mode in multi-tier supply chains. The practical control is not “trust” but verification: the heat number and material designation on the flange must match the certificate package, and the certificate type must meet the project requirement. Failure to verify can lead to serious consequences:
- Wrong material or wrong heat can be installed, creating corrosion, cracking, or strength risks that may not show up until service.
- Downtime and schedule impact increase when parts must be quarantined late (after fabrication or during commissioning).
- Compromised safety puts personnel and equipment at risk, especially in hazardous or high-energy services.
Field Example: a lot of “316” flanges arrived with certificates showing 316, but PMI screening flagged chemistry inconsistent with 316/Mo content. The heat number on the flange did not match the certificate. The lot was rejected before installation—exactly the outcome you want from a traceability system.
Tip: Verify markings and certificates at receiving, then re-verify heat number and standard family at installation. Two checkpoints catch most failures.
Flange Marking Technologies
Stamping and Engraving
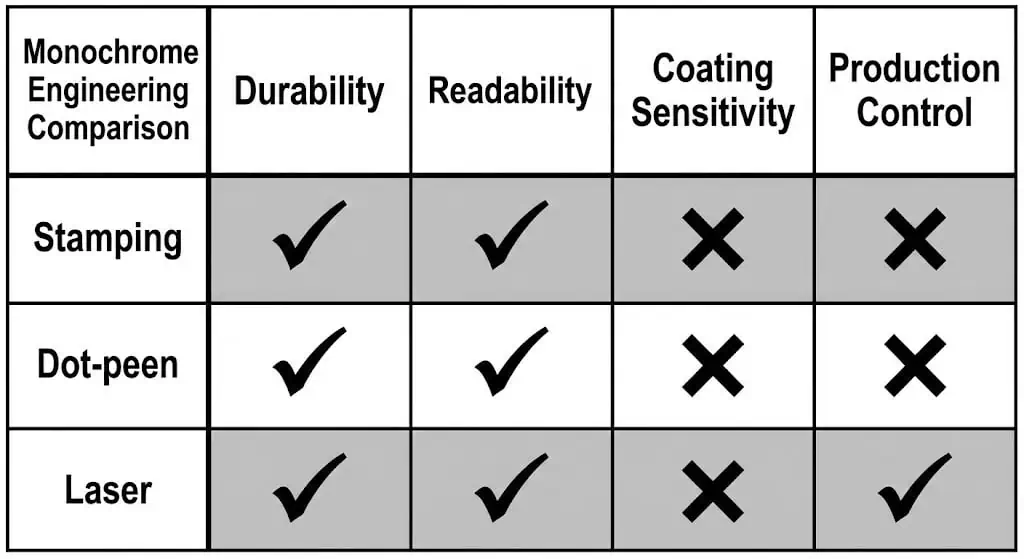
Stamping, dot-peen, and laser marking are used to create identification that remains readable throughout the flange’s life. Your engineering concern is durability in the actual environment: corrosion exposure, handling damage, coating, and cleaning. Manufacturers select a method based on required permanence, readability, and production control.
The table below compares common flange marking technology options:
| Marking Method | Pros | Cons |
|---|---|---|
| Manual Engraving | Minimal investment, flexible marking | Slow, labor-intensive, inconsistent depth |
| Stamping with Molds | Deep, permanent marks, low cost per mark | Limited character options, can distort thin areas if applied improperly |
| Dot Peen Marking | Durable marks, suitable for harsh environments, fast for text | Noise, and readability depends on dot density and surface condition |
| Laser Marking | High speed and precision, consistent, supports data-matrix/QR | Higher initial investment, requires safety controls |
Dot-peen and laser marking are widely used for consistency and legibility on stainless flanges. For inspection, the “best” method is the one that remains readable after your real handling and coating processes.
Advances in Marking Methods
Modern marking integrates IDs (serial/QR) to speed record retrieval and discourage counterfeiting. Manufacturers can apply unique IDs early in manufacturing, allowing inspection results and certificate records to be linked to the part while it is still under controlled custody.
Key advances include:
- Unique IDs and serial numbers applied early in manufacturing for controlled traceability and lot segregation.
- Barcodes and QR codes embedded on each flange, linking to traceability databases.
- Integration of digital systems to monitor marking quality and production data in real time.
Marking system expectations still depend on the governing standards and the project QC plan. Digital features help, but they do not replace the core stamp set (manufacturer, standard family, size/rating, material designation, heat number) that supports traceability in the field.
Tip: If your project relies on digital IDs, confirm the database and retrieval process before parts arrive on site. A QR code that nobody can access is not traceability.
Accurate flange marking and traceability protect safety, support audits, and reduce rework. Inspectors read markings by checking manufacturer, material designation, size family, rating family, standard reference, and heat number—then reconciling them with certificates and records.
| Aspect | Contribution to Safety and Compliance |
|---|---|
| Compatibility Verification | Prevents mixed-standard assemblies and bolt-hole mismatch before fit-up |
| Material Identification | Confirms chemistry/mechanical intent through the correct material designation and certificate linkage |
| Compliance with Standards | Supports standard-family selection (EN vs ASME) and auditability |
| Traceability and Maintenance | Enables targeted disposition and record-based maintenance decisions |
Best practices for verifying flange markings include:
- Segregate inventory by standard family, size family, and material designation
- Photograph marking sets (including heat number) and file them with the certificate package
- Verify heat number and material designation at receiving and again at installation
Proper verification during procurement and installation prevents the most common traceability failures.
FAQ
What do the numbers and letters on a flange mean?
They identify the flange’s standard family, size/rating designation, material designation, and traceability ID.
- Manufacturer mark (who produced it)
- Material designation (spec + grade, tied to chemistry/mechanicals)
- Size family (DN or NPS)
- Rating designation (PN or Class)
- Standard reference (EN 1092-1 or ASME B16.5 family)
- Heat/batch number (traceability anchor to the certificate package)
How can someone verify flange traceability?
Verify that the stamped heat number and material designation match the certificate package, then confirm the standard family matches the order.
- Match the heat number on the flange to the MTR / inspection certificate package
- Confirm material designation and standard family match the purchase order and drawings
- Record the verification (photo + heat number) at receiving and before installation
Why is proper flange marking important?
It prevents wrong-part installation and enables auditable traceability for safety and compliance.
- Stops mixed-standard bolt-hole mismatch and gasket misfit before assembly
- Supports quality control by linking the physical part to test results and inspection records
- Enables traceable maintenance decisions and targeted disposition if issues are discovered
What should a buyer do if a marking is unclear?
Quarantine the flange and resolve identity before installation.
- Contact the supplier and request clarification with evidence (photos of the stamp area)
- Ask for supporting documentation tied to the suspected heat/lot
- Do not install until heat number, material designation, and standard family are verified
Which marking methods last the longest?
Deep stamping, dot-peen, and controlled laser marking can all be durable when applied correctly; the “best” method is the one that stays readable after your handling and coating process.
| Method | Durability |
|---|---|
| Laser Marking | High (consistent and readable when surface condition is controlled) |
| Deep Stamping | High (very durable, but must avoid distortion on thin areas) |
| Manual Engraving | Medium (depends on depth, consistency, and exposure conditions) |