








Technischer Leitfaden für Sauerstoffsensoren
Verstehen Sie die Kostentreiber für den Austausch von Sauerstoffsensoren, Arbeitsfaktoren, sichere Installationsschritte und die erforderlichen Passformprüfungen vor der Bestellung.

Kurze Antwort
Der Austausch eines Sauerstoffsensors umfasst mehr als das Entfernen eines Gewindeteils. Bestätigen Sie zuerst den defekten Stromkreis und die genaue Position, gleichen Sie dann die OE-Referenz, die Sensortechnologie, den Stecker und die Kabelverlegung ab. Die Gesamtkosten variieren je nach Fahrzeugzugang, Sensortyp, Korrosion, örtlichen Arbeitskosten und ob ein zugrunde liegender Fehler in der Verkabelung, Abgasanlage, Kraftstoffregelung oder am Katalysator ebenfalls repariert werden muss.
Vor dem Austausch: Reparaturrichtung prüfen
Fehlercodes und Freeze-Frame-Daten aufzeichnen, Bank 1 oder Bank 2 und Sensor 1 oder Sensor 2 identifizieren, den Kabelbaum prüfen und auf Abgaslecks achten. Bei Heizungsfehlern die fahrzeugseitige Stromversorgung, Masse und den Steuerkreis testen. Bei Reaktions- oder Gemischcodes die Kraftstofftrimms und das Sensorverhalten mit den Serviceinformationen vergleichen. Ein Austausch des Sensors ohne diese Prüfungen kann den ursprünglichen Fehler unverändert lassen.
Was ändert die Kosten für den Austausch des Sauerstoffsensors?
| Kostentreiber | Warum es wichtig ist |
|---|---|
| Sensortechnik | Breitband-/A/F-Sensoren und anwendungsspezifische Direkteinbau-Baugruppen können teurer sein als einfache Schmalbandausführungen. |
| Zugangsposition | Ein erreichbarer Krümmersensor und ein Sensor hinter Abschirmungen oder Unterbodenkomponenten erfordern unterschiedliche Arbeitszeiten. |
| Korrosion und Gewindezustand | Wärmezyklen und Korrosion können den Ausbau erschweren oder eine Gewindereparatur erforderlich machen. |
| Fahrzeugdiagnose | Tests an Elektrik, Abgas oder Kraftstoffsystem erhöhen den Zeitaufwand, verhindern jedoch einen unbegründeten Teileaustausch. |
| Folgeschäden | Ein geschmolzener Kabelbaum, ein Abgasleck oder ein verunreinigter Katalysator können zusätzliche Arbeiten erforderlich machen. |
| Markt und Arbeitslohn | Teilekanäle, Steuern und Werkstattsätze variieren je nach Region. |
Verwenden Sie Online-Kostenspannen nur als Planungsreferenz. Ein brauchbarer Kostenvoranschlag sollte die genaue Sensorposition, die Teilebasis, den Diagnoseaufwand und etwaige Bedingungen, die die Arbeitszeit ändern könnten, angeben.
Wie lange dauert der Austausch?
Es gibt keine verlässliche universelle Arbeitszeit. Zugänglichkeit, Korrosion, Abgastemperatur, Fahrzeughebeanforderungen und Steckerverlegung sind alle relevant. Der Servicevorgang kann das Entfernen von Abschirmungen oder anderen Komponenten erfordern. Diagnose und Überprüfung der Nachreparatur-Überwachung sollten beim Vergleich von Kostenvoranschlägen berücksichtigt werden.
Sichere Einbaureihenfolge
- Lassen Sie das Abgas abkühlen und stützen Sie das Fahrzeug mit zugelassener Ausrüstung.
- Trennen Sie den richtigen Stecker, ohne an den Kabeln zu ziehen.
- Entfernen Sie den Sensor mit dem vorgeschriebenen Werkzeug, während Sie die Abgasgewinde schützen.
- Vergleichen Sie das alte und das Ersatzteil: Gewinde, Sechskant, Abschirmung, Stecker, Kodierung und Kabellänge.
- Verlegen Sie den Kabelbaum fern von Hitze, scharfen Kanten und beweglichen Teilen.
- Verwenden Sie die Drehmomentvorschrift des Produkts oder Fahrzeugs. Erfinden Sie keinen universellen Drehmomentwert.
- Befolgen Sie die Anweisung des Lieferanten zur Verwendung von Anti-Seize-Mittel; viele Sensoren werden mit behandelten Gewinden geliefert.
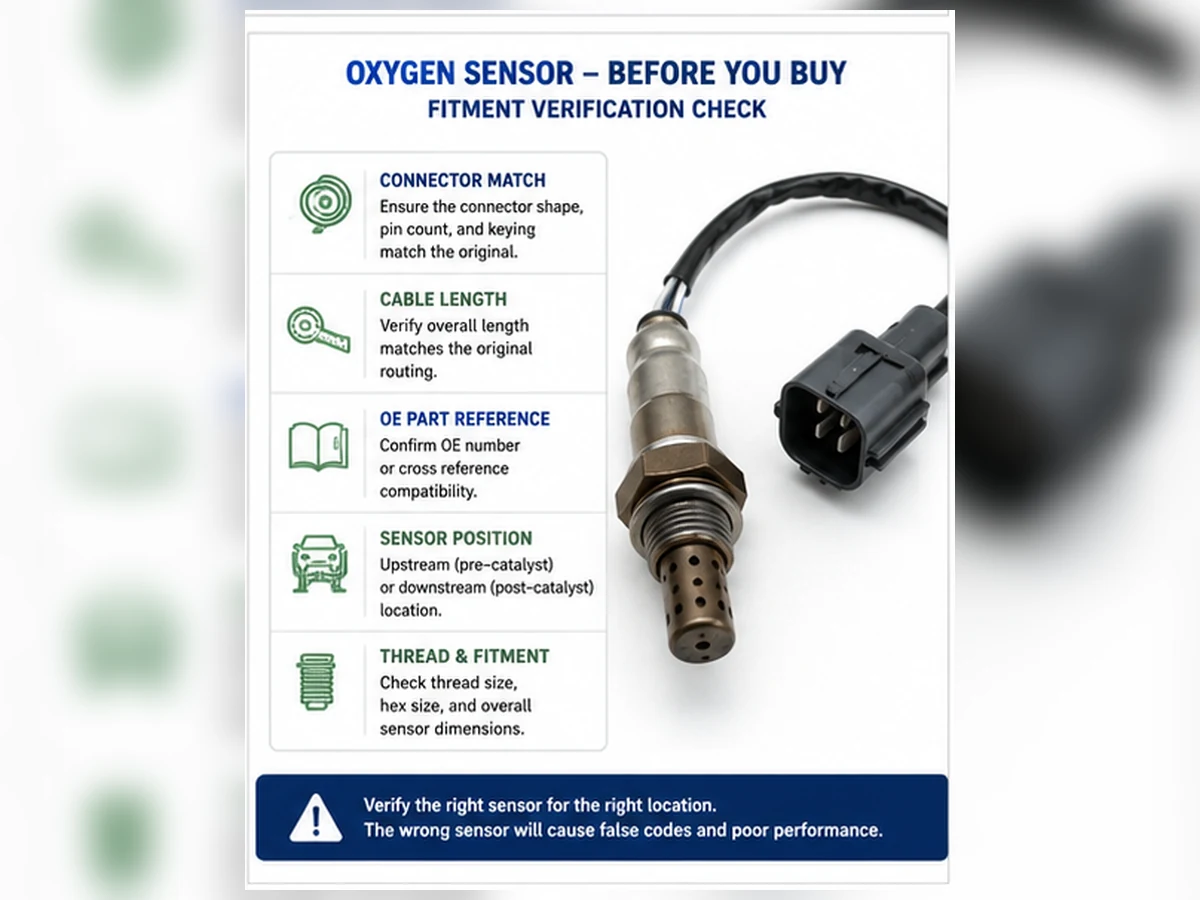
Überprüfung nach der Reparatur
Alle zurückgehaltenen Clips wieder anschließen, auf Abgaslecks prüfen, Sensor- und Heizungsdaten bestätigen und das gesetzlich vorgeschriebene Überprüfungsverfahren des Herstellers abschließen. Gehen Sie nicht davon aus, dass das Löschen des Fehlercodes die Reparatur bestätigt. Bereitschaftsmonitore benötigen möglicherweise definierte Betriebsbedingungen, bevor ein Ergebnis verfügbar ist.
Wann der professionelle Austausch die bessere Wahl ist
Beauftragen Sie einen qualifizierten Reparaturbetrieb, wenn keine sichere Hebeausrüstung verfügbar ist, der Sensor festsitzt, eine Verkabelungsdiagnose erforderlich ist, der Katalysator überhitzen könnte oder die Serviceinformationen spezielle Tests vorschreiben. Abgasbezogene Fehler sollten repariert und nicht mit einem Distanzstück, Simulator oder einer Softwareänderung verdeckt werden.
Entscheiden, was tatsächlich ausgetauscht wird
Ein Lambdasonde-Fehlercode kann den Messkreis, den Heizkreis, die Ansprechzeit oder ein unplausibles Signal beschreiben. Die Reparatur kann die Sonde selbst betreffen, aber auch einen Stecker, Kabelbaum, eine Sicherung, ein Abgasleck oder einen zugrunde liegenden Gemischfehler. Notieren Sie vor der Bestellung die vorgeschlagene Reparaturrichtung: genaue Bank und Position, Nachweis, dass der fahrzeugseitige Stromkreis funktioniert, Nachweis, dass der Auspuff dicht ist, und den Test, den die Sonde nicht bestanden hat. Diese Aufzeichnung verhindert, dass eine Diagnoseannahme zu einer unbegründeten Teilebestellung wird.
| Feststellung | Wahrscheinliche Reparaturrichtung | Nachweise noch erforderlich |
|---|---|---|
| Heizung hat keine fahrzeugseitige Versorgung | Sicherungs-, Verkabelungs- oder Steuergerätediagnose | Korrektes Schaltbild, anliegende Spannung und Masse-/Steuertest |
| Signal bleibt nach Gemisch- und Stromkreisprüfung verfälscht | Sensorwechsel kann gerechtfertigt sein | Technologiespezifisches Reaktionsverfahren und Betriebsbedingungen |
| Mageranzeige ändert sich nach Reparatur eines Ansauglecks | Reparatur eines Luftlecks | Kraftstofftrim- und Sensorreaktionsüberprüfung |
| P0420/P0430 mit plausibler Sensorfunktion | Fortsetzung der Katalysatorsystemdiagnose | Bewertung von Fehlzündungen, Kraftstoffregelung, Abgasleckage und Katalysator |
Wie man Austauschkostenvoranschläge vergleicht
Ein niedriger Kostenvoranschlag und ein hoher Kostenvoranschlag beschreiben möglicherweise nicht die gleiche Arbeit. Fragen Sie, ob der Kostenvoranschlag die Diagnose, den genauen direkt passenden Sensor, Zugangsarbeiten, das Risiko der Gewindewiederherstellung, die Korrektur von Auspuffleckagen und die Überprüfung nach der Reparatur umfasst. Steuern und örtliche Sätze variieren ebenfalls. Diese Seite gibt keinen universellen Preisbereich an, da ein Bereich ohne Angabe von Fahrzeug, Position und Markt eher irreführend als nützlich sein kann.
Teileidentifikation im Kostenvoranschlag
Der Kostenvoranschlag sollte die Teilenummernbasis angeben und ob es sich um einen vorgeschalteten oder nachgeschalteten, schmalbandigen oder breitbandigen, direkt passenden oder universellen Sensor handelt. Eine OE-Referenz ist eine mögliche Zuordnung, kein Nachweis der Passgenauigkeit, bis sie mit vollständigen Fahrzeug- und Emissionsdaten abgeglichen wurde. Wenn der Kostenvoranschlag nur “O2-Sensor” sagt, ist der Umfang unvollständig.
Diagnose- und Zugangsarbeit
Die Diagnosezeit stellt fest, ob ein Austausch gerechtfertigt ist. Die Zugangsarbeit kann Schutzbleche, Unterbodenverkleidungen oder andere anwendungsspezifische Arbeiten umfassen. Ein festsitzender Sensor kann die Ausbauzeit verlängern und die Notwendigkeit einer Gewindewiederherstellung schaffen. Der Reparateur sollte Eventualitäten erklären, ohne zu versprechen, dass jedes korrodierte Teil normal gelöst wird.
Überprüfung nach der Installation
Ein vollständiger Kostenvoranschlag umfasst eine Dichtigkeitsprüfung, Schaltkreis- und Live-Daten-Checks sowie das entsprechende Monitorverfahren. Eine manuell gelöschte Warnleuchte ist kein Nachweis dafür, dass der Monitor bestanden wurde. Permanente Fehlercodes können bestehen bleiben, bis das Steuergerät ein erfolgreiches Monitorergebnis feststellt.
Direkt passende und universelle Installationswege
| Entscheidungspunkt | Direktanschluss-Sensor | Universeller Zwischensteck-Sensor |
|---|---|---|
| Stecker | Anwendungsstecker wird mitgeliefert | Zugelassene Steckerübertragung oder -abschlussverfahren erforderlich |
| Hauptrisiko | Falsche Anwendung, Position oder Kabelverlegung | Falsche Stromkreisidentifikation, Spleißqualität oder Umgebungsabdichtung |
| Installationsregel | Das Direktanschluss-Kabel nicht kürzen oder verändern | Die Anweisungen des Sensorherstellers genau befolgen |
| Auswahlnachweis | Verifizierter Katalogabgleich und OE-/Anwendungsdaten | Verifizierte Technologie, Schaltungskompatibilität und zugelassene Spleißmethode |
Universal bedeutet nicht kompatibel mit jedem Fahrzeug. Drahtfarben sind kein universeller Pinout-Standard. Wenn die Schaltung nicht eindeutig aus zuverlässigen Anweisungen identifiziert werden kann, anhalten und nicht an einer Abgasregelungsschaltung experimentieren.
Ausbau- und Gewinderisiken managen
Fahrzeug abkühlen lassen und abstützen
Abgaskomponenten können schwere Verbrennungen verursachen. Ausreichende Abkühlung abwarten und zugelassene Hebepunkte, Stützen oder professionelle Hebegeräte verwenden. Ein Wagenheber allein ist keine Arbeitsunterstützung. Beleuchtung und Werkzeugzugang vor dem Kraftaufwand arrangieren, sodass Kabelbaum, nahe Leitungen und der Sensorstecker geschützt bleiben.
Die Einspritzstelle und das umgebende Abgasrohr schützen
Verwenden Sie das für die Anwendung vorgeschriebene Werkzeug und die Zugriffsmethode. Übermäßige Kraft, Schlag oder unkontrollierte Hitze können den Bung, Verteiler, Katalysatormantel oder benachbarte Komponenten beschädigen. Wenn die Gewinde zu fressen beginnen oder sich der Bung bewegt, hat sich die Aufgabe von einem routinemäßigen Austausch zu einer Abgasreparatur geändert und sollte neu bewertet werden.
Befolgen Sie die Produktanweisungen für Gewindedichtmittel und Drehmoment.
Einige Ersatzsensoren werden mit behandelten Gewinden geliefert. Das Hinzufügen von weiterem Dichtmittel kann das Sensorelement verunreinigen oder das Anzugsverhalten verändern. Das Drehmoment hängt vom Sensor und der Anwendung ab; verwenden Sie die Produkt- oder Fahrzeugspezifikation, nicht einen von einem anderen Teil übernommenen Wert.
Die Kabelverlegung ist Teil der Reparatur
Stimmen Sie die ursprünglichen Clip-Positionen und die Zugentlastung ab. Das Kabel muss während des gesamten Bewegungsbereichs frei von Abgasen, Wellen, Lenkung, Aufhängung und scharfen Kanten bleiben. Dehnen Sie kein kurzes Kabel und lassen Sie keine lange Kabelschlaufe ungestützt. Bestätigen Sie die Steckerverriegelung und den Kontaktsitz, anstatt sich nur auf ein hörbares Einrasten zu verlassen.
Matrix zur Überprüfung nach dem Austausch
| Prüfen | Bestanden-Nachweis | Was ein Ausfall vermuten lässt |
|---|---|---|
| Physische Installation | Kein Leck, sicherer Stecker, korrekte Clips und Wärmeabstand | Problem mit Gewinde, Dichtung, Verlegung oder Stecker |
| Heizkreis | Angegebene Versorgung/Steuerung und plausibler Strom oder Widerstand | Fahrzeugstromkreis, Steckverbinder oder Neuteilproblem |
| Sensorreaktion | Technologiespezifische Reaktion unter gültigen Betriebsbedingungen | Falsches Teil, ungelöster Gemischfehler, Leckage oder Sensorproblem |
| Kraftstoffregelung | Kraftstoffkorrekturwerte und Sollzustand sind plausibel | Luft-, Kraftstoff-, Zünd- oder mechanische Ursache bleibt bestehen |
| Überwachungsergebnis | Anwendbare Überwachung wird abgeschlossen, ohne dass der Fehler zurückkehrt | Diagnose oder Reparatur erfordert weitere Prüfung |
Notieren Sie die Werte vor und nach dem Eingriff. Wenn derselbe Code zurückkehrt, tauschen Sie Teile nicht wiederholt aus. Öffnen Sie den ursprünglichen Testpfad erneut, überprüfen Sie die physische Position und prüfen Sie, ob ein gemeinsamer Stromkreis oder ein ungelöster Systemzustand übersehen wurde.
Komplexes Szenario: Austausch behebt fehlende Heizleistung nicht
Komplexes technisches Szenario: Ein Heizungscode eines nachgeschalteten Sensors führt zu einem sofortigen Sensortausch. Der Code kehrt zurück, weil ein beschädigter Kabelbaum die geschützte Versorgung unterbrochen hatte. Ein Lastkreistest, die Reparatur des Kabelbaums und die Wiederherstellung der wärmegeschützten Verlegung beheben den Zustand. Dieses Szenario kombiniert gängige Diagnosemuster; es handelt sich nicht um einen Sunhyings-Kundenfall oder Produkttest.
Untersuchung von Verunreinigung und wiederholtem Ausfall
Ein entfernter Sensor kann Hinweise auf ein anderes Systemproblem tragen. Starke Rußablagerungen können auf ein fettes Gemisch oder Fehlzündungen hindeuten; ölige Ablagerungen können auf Ölverbrauch hinweisen; kühlmittelbedingte Ablagerungen können auf ein internes Leck hindeuten; ungeeignete Silikonprodukte können einige Sensorelemente vergiften. Das Aussehen allein ist keine vollständige Diagnose, aber der Austausch eines kontaminierten Sensors ohne Auffinden der Ursache kann das neue Teil und den Katalysator demselben Zustand aussetzen.
Dokumentieren Sie Ablagerungen mit klaren Fotos, überprüfen Sie Öl- und Kühlmittelverbrauch, inspizieren Sie Kraftstoff- und Zündungsbetrieb und befolgen Sie das Fahrzeugverfahren. Reinigen Sie ein Sensorelement nicht mit Lösungsmitteln oder Schleifmitteln, es sei denn, der Hersteller gibt eine solche Methode ausdrücklich vor. Die meisten Feldreinigungsversuche können eine kalibrierte Reaktion nicht wiederherstellen und können zu irreführendem Kurzzeitverhalten führen.
Erstellen Sie einen Austausch-Arbeitsplan, bevor Sie den Sensor lösen
Ein hochwertiger Austauschplan identifiziert, warum das Teil gewechselt wird, wo es eingebaut ist, wie der Zugang geschaffen wird, was beim Ausbau beschädigt werden könnte und wie die Reparatur verifiziert wird. Dies verhindert die häufige Situation, dass der alte Sensor entfernt wird, bevor der neue Stecker, die Leitungslänge oder die Technologie abgeglichen wurde.
| Planungspunkt | Erforderliche Informationen | Warum es Kosten oder Risiko verändert |
|---|---|---|
| Diagnosegrundlage | Fehlgeschlagener Schaltkreis- oder Reaktionstest und geprüfte konkurrierende Ursachen | Eine falsche Diagnose verursacht wiederholte Arbeit und kann den Katalysator beschädigen |
| Exakte Position | Bank, Sensornummer und Position im Abgasstrom | Zugang und Bauteilkennung können am selben Fahrzeug unterschiedlich sein |
| Sensortechnik | Schmalband-, Titan- oder Breitband-/Luft-Kraftstoff-System | Steuert die elektrische Kompatibilität und das Prüfverfahren |
| Zugriffsmethode | Anschlagpunkte, Abschirmungen, Unterwannen und nahegelegene Komponenten | Arbeitsaufwand und Sicherheit hängen vom tatsächlichen Zugang ab |
| Korrosionszustand | Zustand von Gewinde, Verschluss, Verteiler und umgebendem Auspuff | Festgefressene Gewinde können den Austausch zu einer Auspuffreparatur machen |
| Kabelbaumverlauf | Position des Steckers, Clips, Wärmeabstand und Bewegung | Ein Kabel mit falscher Länge kann schmelzen, sich dehnen oder bewegliche Teile berühren |
| Überwachung nach der Reparatur | Erforderliche Betriebsbedingungen und rechtliches Prüfverfahren | Gelöschte Fehlercodes allein belegen keine erfolgreiche Reparatur |
Ein nützliches Kostenmodell umfasst mehr als Teile und Arbeit
Die veröffentlichten Preisspannen sind breit, da sie verschiedene Fahrzeuge, Positionen, Sensortechnologien, Arbeitsmärkte und Reparaturumfänge kombinieren. Ein direkt verbauter vorgeschalteter Breitbandsensor in einem beengten Motorraum ist nicht dasselbe wie ein zugänglicher nachgeschalteter Schmalbandsensor. Anstatt einen universellen Gesamtpreis zu nennen, vergleichen Sie Kostenvoranschläge mit demselben Umfang.
| Kostenbestandteil | Zu stellende Fragen | Ausschlussrisiko-Warnung |
|---|---|---|
| Diagnose | Welche Tests unterstützen den Austausch und werden die Ergebnisse dokumentiert? | Ein kostenloser Code-Auslesevorgang ist keine abgeschlossene Diagnose |
| Ersatzteil | Welche OE-Referenz, Position, Technologie und Garantiebasis? | “O2-Sensor” definiert das Teil nicht |
| Zugangsarbeit | Sind Schutzbleche, Unterbodenverkleidungen oder anwendungsspezifische Ausbauten enthalten? | Niedriger Kostenvoranschlag kann idealen Zugang voraussetzen |
| Korrosionszuschlag | Wie werden festgefressene Gewinde oder ein beschädigter Bung behandelt? | Keine Werkstatt kann versprechen, dass jeder korrodierte Sensor sauber freikommt. |
| Verwandte Reparatur | Sind Verkabelung, Abgaslecks oder Grundursachenfehler getrennt? | Ein Sensorwechsel kann diese Zustände nicht beheben. |
| Verifizierung | Sind Live-Daten, Leckprüfungen und Überwachungsabschluss enthalten? | Das Ausschalten der Kontrollleuchte ist nicht dasselbe wie das Bestehen der Überwachung. |
| Steuern und Logistik | Sind Steuern, Fracht, mobiler Service oder Fahrzeugbergung enthalten? | Der Online-Teilepreis entspricht selten den Gesamtkosten der Arbeit |
Überprüfen Sie das Ersatzteil, bevor das alte Teil zur Vorlage wird
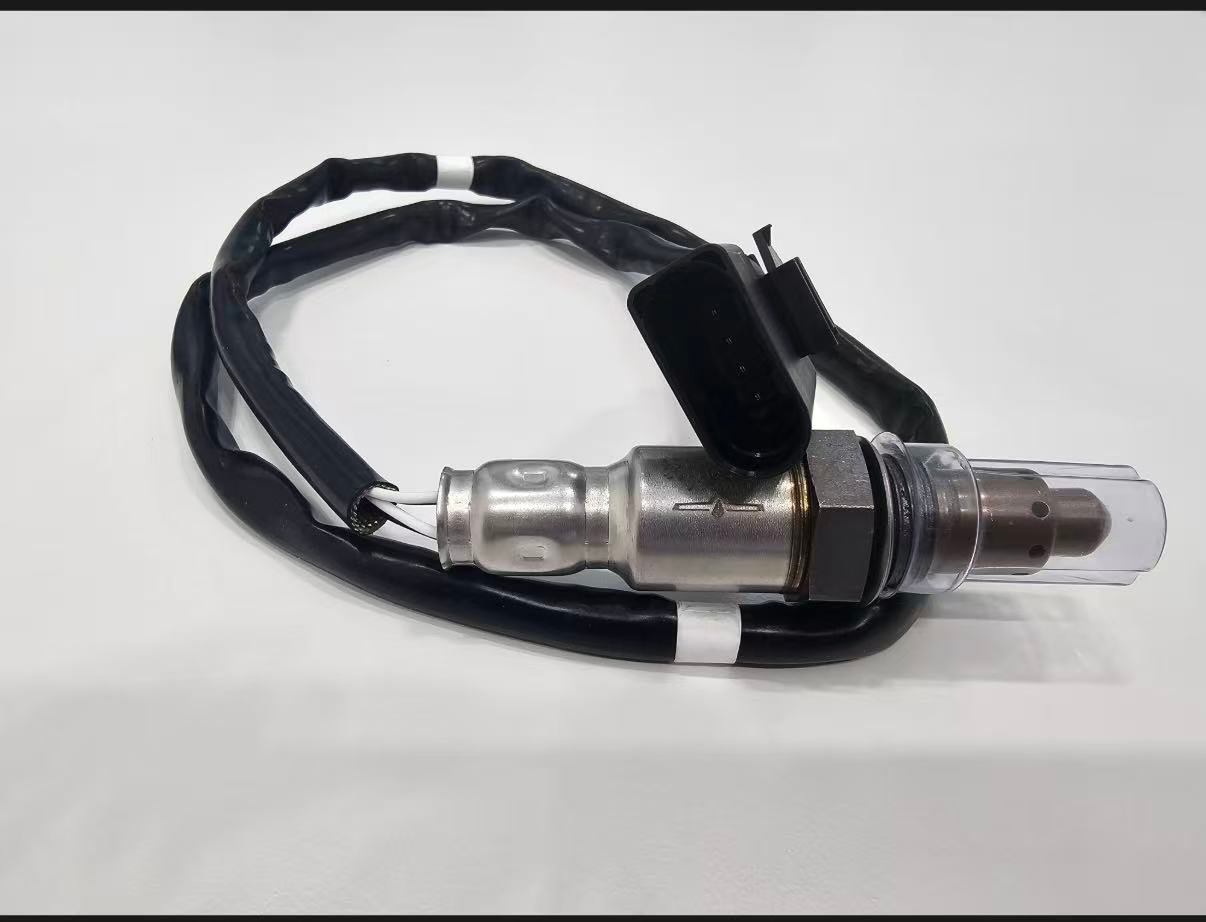
Halten Sie beide Teile sauber und vergleichen Sie sie vor dem Einbau. Verwenden Sie den verifizierten Anwendungsdatensatz als maßgebliche Quelle und nutzen Sie den physischen Vergleich, um einen Katalog- oder Verpackungskonflikt zu erkennen. Gehen Sie nicht davon aus, dass ein neuer Sensor korrekt ist, nur weil das Gewinde beginnt oder die Steckerhülle ähnlich aussieht.
| Merkmal | Vergleich | Ablehnungs- oder Stoppbedingung |
|---|---|---|
| Teil- und Etikettenidentität | Lieferantenteil, OE-Referenzkandidat, Revision und Verpackung | Loses, nicht markiertes Teil oder Etikettenkonflikt |
| Sensortechnik | Katalog und elektrische Spezifikation | Nur nach Drahtanzahl oder Aussehen ausgewählt |
| Gewinde und Sitzfläche | Durchmesser, Steigung, Sitz und eingebaute Schnittstelle | Widerstand, falsche Schulter oder Dichtungskonflikt |
| Schirmgeometrie | Länge, Öffnungen und Freiraum | Kontakt mit Abgas oder Anwendungskonflikt |
| Stecker | Gehäuse, Schlüssel, Schloss, Stifte und Anschlussanordnung | Erzwungener Eingriff, geänderte Schlüssel oder Stiftkonflikt |
| Kabel | Länge, Isolierung, Zugentlastung und Clips | Dehnung, ungestützte Schleife oder Wärme-/Bewegungsstörung |
| Gewindebehandlung | Produktanweisungen und Lieferzustand | Hinzufügen von Compound entgegen den Anweisungen oder Verschmutzung des Schirms |
Ausbaureihenfolge und Entscheidungspunkte
- Beweise sichern. Codes, Freeze Frame, Bereitschaft, Live-Daten und die identifizierte Position vor Stromausfall oder Löschen aufzeichnen.
- Kühlen und abstützen. Lassen Sie den Auspuff abkühlen und stützen Sie das Fahrzeug an zugelassenen Stellen mit für das Fahrzeug geeigneten Hebevorrichtungen ab.
- Trennen, ohne am Kabel zu ziehen. Lösen Sie die Steckersicherung und Clips gemäß der Servicemethode. Prüfen Sie die Kontakte und notieren Sie die Verlegung.
- Kontrollierten Zugang wählen. Verwenden Sie die korrekte Sensorsteckdose oder den korrekten Schlüssel und vermeiden Sie unkontrollierte Krafteinwirkung auf Krümmer, Katalysatorgehäuse oder Lambdasonde.
- Stoppen, wenn sich die Verbindung verändert. Wenn sich der Stopfen bewegt, die Gewinde verschleißen oder das umgebende Abgasrohr Risse bekommt, bewerten Sie die Reparatur neu, anstatt sie zu erzwingen.
- Entfernte Teile inspizieren. Ablagerungen fotografieren und Identität vergleichen, aber nicht behaupten, dass das Aussehen allein die Ursache beweist.
- Gemäß genauer Anleitung montieren. Befolgen Sie die Drehmoment- und Gewindecompound-Vorgaben des Produkts oder OEM; hier wird kein universeller Wert angegeben.
- Leitungsführung wiederherstellen. Jede Hitzeschutzabdeckung und Schelle wieder anbringen, Zugentlastung erhalten und Spielraum durch Bauteilbewegung prüfen.
Überprüfung nach der Installation ist Teil des Austauschs
| Verifizierungsschritt | Bestanden-Nachweis | Wenn dies fehlschlägt |
|---|---|---|
| Sicht- und Dichtheitsprüfung | Korrekte Position, sicherer Steckverbinder, wiederhergestellte Clips und abgedichteter Auspuff | Korrekte Installation vor der Dateninterpretation |
| Heizkreis | Spezifizierte Versorgung/Steuerung und plausibles Aufwärmverhalten | Fahrzeugstromkreis, Steckverbinder und Teileidentität erneut prüfen |
| Sensorreaktion | Technologisch korrekte Reaktion unter gültigen Bedingungen | Falsches Teil, ungelöstes Gemisch, Leck oder Stromkreisfehler prüfen |
| Kraftstoffregelung | Abstimmung und Sollzustand sind für den Betriebszustand plausibel | Fahren Sie mit der Diagnose von Luft, Kraftstoff, Zündung oder Mechanik fort |
| Überwachung abschließen | Anwendbare Überwachung läuft, ohne dass der Fehler zurückkehrt | Überprüfen Sie den ursprünglichen Testpfad; Teile nicht wiederholt wechseln |
| Straßen- und Sicherheitsprüfung | Kein Kabelkontakt, keine Abgasgeräusche oder neues Fahrverhaltensproblem | Stoppen und korrigieren Sie die physische Installation oder den ungelösten Fehler |
Fall Verbundteile: richtige Familie, falsche Abgasposition
Komplexes technisches Szenario: Ein Online-Eintrag fasst zwei Sensoren unter einem Modell und Jahr zusammen. Das bestellte Teil hat die gleiche Gewindegröße und einen ähnlichen Stecker, aber ein kürzeres Kabel und andere Clip-Positionen. Anstatt das Kabel zu verlängern, prüft der Installateur Motor, Abgas-Konfiguration und Bank-/Sensorposition und stellt fest, dass der Eintrag die andere Abgasposition zugeordnet hat. Die Bestellung wird vor der Installation korrigiert.
Die vermiedenen Kosten sind nicht quantifiziert, da keine echten Bestelldaten vorlagen. Die Entscheidungslektion ist konkret: Katalogpassung, physische Schnittstelle und exakte Position müssen übereinstimmen. Dies ist ein zusammengesetztes Szenario, keine Aussage über eine Sunhyings-Lieferung.
Fall wiederholte Reparatur bei Verbundteilen: Kontaminationsquelle bleibt aktiv
Komplexes technisches Szenario: Ein Sensor mit langsamer Reaktionszeit wird ersetzt, aber das neue Teil entwickelt später ähnliche Ablagerungen und Reaktionsprobleme. Die Überprüfung ergibt einen anhaltenden Kühlmittelverbrauch, der nicht im ursprünglichen Reparaturumfang enthalten war. Der Motorzustand wird diagnostiziert und korrigiert, bevor eine weitere Sensor- und Katalysatorentscheidung getroffen wird.
Ein ausgebauter Sensor kann einen Hinweis liefern, aber die Ablagerungsfarbe ist keine vollständige chemische Analyse. Öl, Kühlmittel, fettes Gemisch und ungeeignete Dichtmittel können Sensoren und Katalysatoren beeinträchtigen. Dokumentieren Sie Verbrauch und Motoranzeichen, beheben Sie die Ursache und befolgen Sie die Servicehinweise. Dieses Szenario ist zusammengesetzt und impliziert kein universelles Ausfallintervall.
Reparatur dokumentieren, damit ein zukünftiger Anspruch untersucht werden kann
- VIN oder vollständige YMME, Motor- und Abgaskonfiguration für die Auswahl
- Exakte Bank-/Sensorposition und verifizierte OE- oder kontrollierte Querverweisbasis
- Lieferantenteilenummer, Paketetikett, Charge/Datum und Kaufbeleg
- Fehlercodes, Freeze-Frame und Diagnosetests vor dem Austausch
- Fotos von Steckverbinder, Altteil, Neuteil und verlegter Verkabelung
- Drehmoment-/Gewindebehandlungsquelle und etwaige Zugangs- oder Gewindeproblematik
- Ergebnisse nach Reparatur: Stromkreis, Ansprechverhalten, Kraftstoffregelung und Überwachung
Entscheidung zwischen Direkteinbau und Universalersatz
Ein Direkteinbausensor verfügt über einen fahrzeugspezifischen Stecker und sollte anhand verifizierter Anwendungsdaten ausgewählt werden. Schneiden Sie nicht seinen Kabelbaum durch, um einen falschen Stecker oder eine falsche Leitungslänge zu überbrücken. Ein Universalsensor erfordert eine vom Hersteller freigegebene Methode zur Identifizierung und Verbindung der korrekten Stromkreise unter Beibehaltung der Umgebungsabdichtung und Hitzebeständigkeit. Universal bedeutet nicht, dass eine Kalibrierung oder Pinbelegung für jedes Fahrzeug passt.
| Entscheidungsbereich | Direkteinbau-Pfad | Universal-Pfad | Stoppbedingung |
|---|---|---|---|
| Anwendungsnachweis | Aktueller Katalogabgleich für Fahrzeug und exakte Position | Verifizierte Technologie und Schaltkreis-Kompatibilität | Nur Drahtanzahl oder Gewinde bekannt |
| Stecker | Mitgelieferter codierter Stecker rastet ohne Änderung ein | Zugelassene Anschluss- oder Steckerübertragungsanweisungen | Erzwungener Schlüssel, erratener Pinbelegung oder verdrillte/geklebte Verbindung |
| Leitung | Korrekte Länge und Führung im Originalstil vorgesehen | Länge und Isolierung für zugelassene Route geeignet | Blei gedehnt oder ungestützt in der Nähe von Abgas/Bewegung |
| Installationsprotokoll | Teile- und Anwendungsprotokoll | Protokoll für Teile, Schaltplan, Spleißmethode und Abdichtung | Keine nachvollziehbare Anweisungsquelle |
| Regulatorische Prüfung | Vorgesehene Emissionsfunktion beibehalten | Vorgesehene Funktion unter geltenden Regeln beibehalten | Jegliche Umgehung, Simulation oder Überwachungsabschaltung |
Wiederholungscode analysieren, ohne anzunehmen, dass das neue Teil defekt ist
Wenn derselbe Code zurückkehrt, vergleichen Sie die Vorher-Nachher-Beweise. Eine sofortige Rückkehr des Heizkreislaufs deutet stärker auf einen ungelösten Stromkreis, ein falsches Teil oder ein Steckerproblem hin als normale Sensoralterung. Ein Reaktions- oder Gemischcode, der nur unter bestimmter Last zurückkehrt, kann erneute Leck-, Kraftstoff- oder Motortests erfordern. Ein anderer Code kann auf einen geänderten Zustand hinweisen und nicht auf denselben Reparaturfehler.
| Rückmuster | Erste Bewertung | Produktnachweise zur Aufbewahrung |
|---|---|---|
| Code kehrt sofort bei Zündung oder kalt zurück | Teileidentität, Pinbelegung, offener/kurzgeschlossener und Heizkreis | Fotos von Verpackung, Charge, Widerstand/Strom und Stecker |
| Code kehrt nur heiß zurück | Wärmebedingte Kabelbaumbewegung, Abgasleck und Schaltkreisverhalten | Installierte Verlegung, Freiraum- und Heißzustandswerte |
| Kraftstoffregelungsbeschwerde bleibt bestehen | Ursprüngliche Luft-/Kraftstoff-/Zünd-/mechanische Diagnose | Antwortdaten und Kraftstofftrimmwerte vorher/nachher |
| Neuer Katalysatorcode erscheint | Gemisch, Fehlzündung, Verunreinigung, Abgas- und Katalysatorpfad | Korrekte Identität von stromaufwärts-/stromabwärtsliegendem Teil und Position |
| Physischer Schaden oder geschmolzenes Blei | Verlegung, Klemmen, Abgasbewegung und Einbaulänge | Vollständige Installationsfotos, nicht nur der beschädigte Abschnitt |
Austausch muss die Emissionsüberwachung erhalten
Ein Sensortausch ist nicht vollständig, wenn der Kabelbaum verändert wird, um ein Signal zu verbergen, der Sensor aus dem Abgasstrom entfernt wird oder Software zur Deaktivierung des Monitors verwendet wird. Abstandshalter, Entstörer, Simulatoren und Deletes können Beweise verschleiern, ohne den Motor, den Stromkreis oder den Katalysator zu korrigieren, und können gegen das Emissionsgesetz verstoßen. Verwenden Sie ein zulässiges Teil und stellen Sie die vorgesehene Konfiguration wieder her.
Versprechen Sie nicht, dass ein einzelner Sensor ein Fahrzeug durch die Prüfung bringt. Das Prüfergebnis hängt vom gesamten Fahrzeug, der Bereitschaft, der geltenden Vorschrift und dem Prüfverfahren ab. Das vertretbare Versprechen ist enger gefasst: Liefern Sie die verifizierte Teileidentität, installieren Sie sie korrekt, beheben Sie die diagnostizierte Ursache und dokumentieren Sie die Überprüfung auf Monitorebene.
Drei Kostenvoranschlagsbereiche, die nicht als gleiche Arbeit verglichen werden sollten
Die folgenden Beispiele sind Umfangsvergleiche, keine Preisangebote und keine Serviceaufzeichnungen von Sunhyings. Sie zeigen, warum ein Online-Sensorpreis nicht in einen zuverlässigen Installationspreis umgerechnet werden kann.
Zugänglicher Downstream-Direktersatz
Die Diagnose identifiziert ein offenes Heizelement im genauen Downstream-Sensor, nachdem die belasteten Versorgungs- und Steuerprüfungen bestanden sind. Stecker und Einschraubgewinde sind zugänglich, die Korrosion ist begrenzt und das Ersatzteil ist ein verifiziertes Direktersatzteil. Der Kostenvoranschlag kann eng gefasst sein, sollte aber dennoch sichere Abstützung, Wiederherstellung der Verlegung, Leckprüfung und Heizungs-/Monitorprüfung umfassen.
Eingeschränkter Upstream-Breitbandsensor-Ersatz
Der stromaufwärtige Luft-Kraftstoff-Verhältnissensor sitzt hinter Abschirmungen mit begrenztem Steckverbinderzugang. Die Diagnose erfordert technologiespezifische Daten, und der Zugang kann den Ausbau von anwendungsspezifischen Komponenten erfordern. Teilepreis, Diagnosezeit und Zugangsarbeitszeit können sich selbst beim gleichen Fahrzeug von der stromabwärtigen Arbeit unterscheiden. Eine allgemeine Annahme von “einer Stunde für den O2-Sensor” ist kein Nachweis.
Korrodierter Sensor mit Bung-Risiko
Der Sensor und die umgebende Abgasanlage zeigen starke Korrosion. Die Werkstatt definiert, was der routinemäßige Ausbau umfasst und was passiert, wenn Gewinde ausreißen, sich der Bung bewegt oder der Auspuff reißt. Diese Eventualität ist keine automatische Gebühr; sie ist ein offengelegter Zweig im Arbeitsumfang. Die Autorisierung des Zweigs vor unkontrollierter Krafteinwirkung schützt beide Parteien.
Was ein professioneller Käufer von der Ersatzquelle anfordern sollte
| Nachweisebene | Nützlicher Datensatz | Behauptet, es zu unterstützen | Behauptet, es nicht allein zu unterstützen |
|---|---|---|---|
| Anwendungsdaten | Kontrollierte OE/YMME/Motor/Emissions/Positionszuordnung mit Revision | Katalogauswahlbasis | Fahrzeugdiagnose oder universelle Austauschbarkeit |
| Produktidentität | Zeichnung/Spezifikation für Technologie, Anschluss, Leitung, Gewinde und Abschirmung | Definierte Austauschschnittstelle | Leistung in jedem referenzierten Fahrzeug |
| Validierung | Definierte elektrische, Ansprech-, thermische, Vibrations- und Dichtungsergebnisse | Geprüfte Eigenschaften für identifizierte Muster | Alle zukünftige Produktion ohne Änderungskontrolle |
| Produktionskontrolle | Prüfplan, End-of-Line-Tests und Messaufzeichnungen | Wie festgelegte Merkmale kontrolliert werden | Null Fehler oder eine erfundene Ausfallrate |
| Rückverfolgbarkeit | Verknüpfung von Teileversion, Charge/Datum und Lieferung | Fähigkeit, eine Reklamation zu untersuchen | Ursache einer Feldreklamation ohne Fahrzeugnachweis |
| Qualitätszertifikat | Aussteller, juristische Person, Standort, Geltungsbereich, Norm und Gültigkeit | Geltungsbereich des Managementsystems im Zertifikat angegeben | Teilefreigabe, OEM-Beziehung oder exakte Passgenauigkeit |
Sunhyings kann eingereichte OE-/Anwendungsdaten, Position, Menge und Freigabeanforderungen im Hinblick auf die Beschaffungsmachbarkeit prüfen. Die genaue Verfügbarkeit, Passgenauigkeit, Preis, Mindestbestellmenge, Lieferzeit und Zertifizierung bleiben projektspezifisch, bis sie bestätigt sind. Diese Abgrenzung ermöglicht es der Seite, eine kommerzielle Anfrage zu unterstützen, ohne interne Lieferantennachweise in ein unbegründetes öffentliches Versprechen umzuwandeln.
Bereiten Sie eine Montage- oder Beschaffungsanfrage vor
Senden Sie die OE-Nummer, Baujahr/Marke/Modell, Motor- oder Fahrgestelldaten, Markt- und Emissionspaket, genaue Bank-/Sensorposition, Stecker- und Altteilfotos, Menge sowie etwaige Verpackungs- oder Zulassungsanforderungen. Sunhyings prüft die gelieferten Daten auf Eignung und Beschaffungsmöglichkeit; die Passgenauigkeit wird erst bestätigt, wenn die Anwendungsnachweise übereinstimmen.
Häufig gestellte Fragen
Was kostet der Austausch des Sauerstoffsensors?
Der Gesamtpreis hängt vom genauen Sensor, der Technologie, dem Zugang, der Korrosion, der Diagnose, den lokalen Arbeitskosten und damit verbundenen Fehlern ab. Holen Sie einen Kostenvoranschlag ein, der auf das Fahrzeug und die Sensorposition abgestimmt ist.
Wie lange dauert der Austausch eines O2-Sensors?
Zugänglichkeit und Korrosion verursachen große Unterschiede. Diagnose und Überprüfung nach der Reparatur einbeziehen, anstatt nur die Ausbauzeit zu vergleichen.
Muss ich die Batterie abklemmen?
Befolgen Sie die Fahrzeugwartungsanleitung. Die Anforderungen sind unterschiedlich, und das Trennen der Stromversorgung kann gelernte Werte löschen oder andere Rücksetzverfahren erfordern.
Sollte ein neuer Sensor mit Anti-Seize-Mittel behandelt werden?
Befolgen Sie die Anweisungen für Sensor und Fahrzeug. Viele neue Sensoren werden mit behandelten Gewinden geliefert, und überschüssiges Compound kann das Sensorelement verunreinigen.
Erlischt die Motorkontrollleuchte sofort?
Nicht immer. Der Fehler muss behoben werden und der Monitor muss unter den erforderlichen Bedingungen laufen. Das alleinige Löschen eines Codes bestätigt keine Reparatur.