This is the engineering Standard Operating Procedure (SOP) for the tube fitting installation procedure of Sunhy Dual Ferrule Fittings. Unlike tapered pipe threads (NPT) that rely on thread deformation, compression fittings rely on precise geometric swaging. The goal of this procedure is to achieve a gas-tight seal rated to the burst pressure of the tubing, compliant with ASME B31.3 process piping standards.
Why Method Discipline Matters: Field data indicates that 85% of fitting failures are due to variance in the tube fitting installation process—specifically under-tightening (blowout risk), using torque instead of turns, or improper tube prep. This guide standardizes the process to ensure every technician achieves the same result, regardless of strength or tool brand.
Before you start your installation, verify the following Critical Process Inputs:
- Tubing Spec: Use fully annealed seamless stainless steel tubing (ASTM A269/A213). Hardness must be Rb < 90.
- Assembly Method: This SOP uses the “Turns of the Nut” method. Do not use a torque wrench.
- System Risk: If you have toxic, flammable, or oxygen service, cleanliness and inspection are mandatory hold points.
The table below defines the failure modes associated with common deviations from this SOP:
| Installation Deviation | Engineering Consequence |
|---|---|
| Using Torque instead of Turns | Unpredictable swaging due to friction variables. Result: Leaks. |
| Failure to Bottom Out | Short grip length. Under vibration, the tube can eject from the fitting. |
| Tube Not Deburred | The burr scratches the sealing zone of the ferrule, causing micro-leaks. |
| Intermixing Brands | Dimensional mismatch. Sunhy ferrules are engineered specifically for Sunhy body tapers. |
If you are looking for repair guides rather than a new installation SOP, please refer to our internal guide on Troubleshooting Fitting Leaks.
Phase 1: Material Selection & Tube Fitting Installation Prep
Material Compatibility Check
Verify compatibility before assembly. Ensure the fitting material matches the tubing. A mismatch in hardness leads to failure—the ferrule must be harder than the tube to “bite” effectively. For a full list of compatible alloys, see our Material Grades & Applications.
| Fitting Material | Allowed Tubing | Forbidden Tubing |
|---|---|---|
| 316 Stainless Steel | 304/316 SS (Annealed) | Brass or Copper (Galvanic corrosion risk) |
| Brass | Copper, soft plastic | Stainless Steel (Tube is too hard for brass ferrules) |
| Monel / Duplex | Matched Alloy | Dissimilar metals without engineering review |
Inspection and Cleaning (ASTM G93 Level)
You cannot seal on a scratch. Gas molecules (Helium/Hydrogen) will find escape paths through surface imperfections that liquids might not.
- Visual Check: Inspect the last 1 inch (25mm) of the tube. If there is a longitudinal scratch visible to the naked eye, cut it off.
- Handling: Do not drag tubing across concrete. This creates flat spots.
- Cleaning: For oxygen service, clean per CGA G-4.1. For general industrial air, wipe with a lint-free cloth and solvent.
Cutting and Deburring (Mandatory)

A hacksaw is the enemy of a clean seal. Hacksaws leave jagged edges and metal filings that can damage downstream valves.
- Cutting: Use a sharp wheel cutter designed for stainless steel. Cut as close to 90° as practical.
- OD Deburring: Use a file to chamfer the Outer Diameter. If you skip this, the burr will scratch the ferrule during insertion.
- ID Deburring: Ream the Inner Diameter to prevent turbulence.
SOP Step: After deburring, tap the tube end downwards on a clean surface to dislodge chips. Do not blow into the tube with shop air (it often contains moisture/oil).
Phase 2: Tube Fitting Installation SOP (The 1-1/4 Turn Rule)
This is the critical procedure for Sunhy Dual Ferrule Fittings. Follow these steps exactly. Do not rely on “feel.”

Step 1: Insert and Seat
- Insert the prepared tube into the Sunhy fitting.
- Critical Action: Push the tube until it firmly hits the internal shoulder of the fitting body.
- If the tube is not bottomed out, the ferrules will grip the very end of the tube, creating a weak joint that will fail under pressure.
Step 2: Finger-Tighten
- Tighten the nut by hand until you cannot turn it further.
- This is the “Zero Position.” It ensures the ferrules are in contact with the tube and the body.
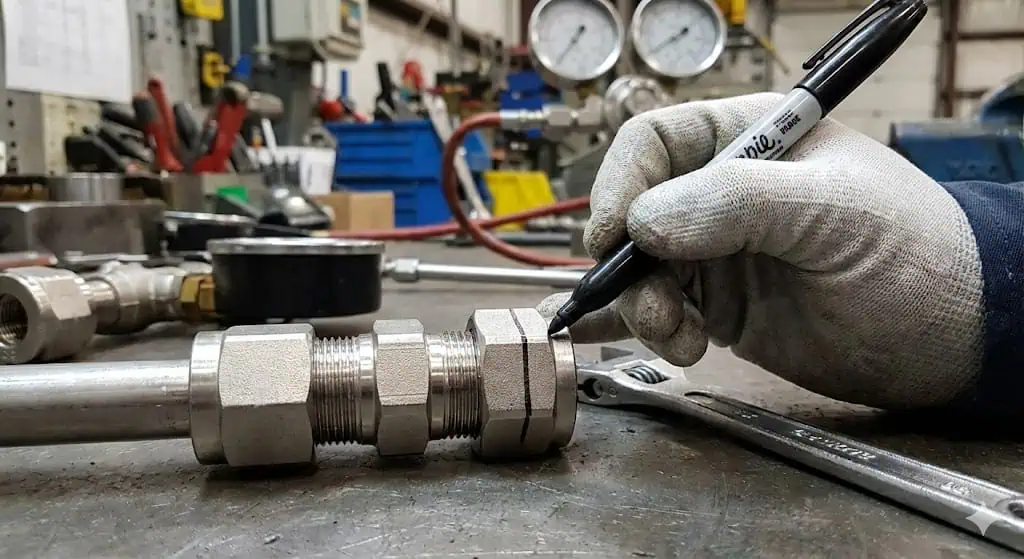
Step 3: Mark the Nut (SOP Mandatory)
- Use a permanent marker to draw a line on the nut at the 6 o’clock position.
- Mark the body directly below it. This creates a visual reference for rotation. Without this mark, you are guessing.
Step 4: Wrench Tightening (The Rule)
Hold the fitting body steady with a backup wrench. Rotate the nut according to the size rule below:
| Tube Size (OD) | Turns Required | Final Position (Clock Face) |
|---|---|---|
| 1/4″ to 1″ (6mm – 25mm) | 1-1/4 Turns | Mark moves from 6 o’clock → 9 o’clock (one full circle + 90°) |
| 1/16″ to 3/16″ (1mm – 4mm) | 3/4 Turn | Mark moves from 6 o’clock → 3 o’clock |
Engineering Focus: Why We Use Turns, Not Torque
“What is the torque spec for a 1/2 inch fitting?” We get this question daily. The engineering answer is: There is no torque spec.
Using a torque wrench on compression fittings is dangerous for two reasons:
- Friction Variance: Stainless steel threads have high friction variability. A dry thread might read 50 Nm of torque before the ferrules are even set. A lubricated thread might read 20 Nm when over-tightened. Torque measures friction, not ferrule travel.
- Material Hardness: A slightly harder tube requires more force to swage. The “Turns” method ensures the ferrules travel the required distance regardless of how much force is needed to get them there.
Rule of Thumb: If you see a technician using a torque wrench on a Sunhy/Swagelok style fitting, stop the work immediately. They are following the wrong procedure.
Tube Fitting Installation for Adapters & Specialty Items
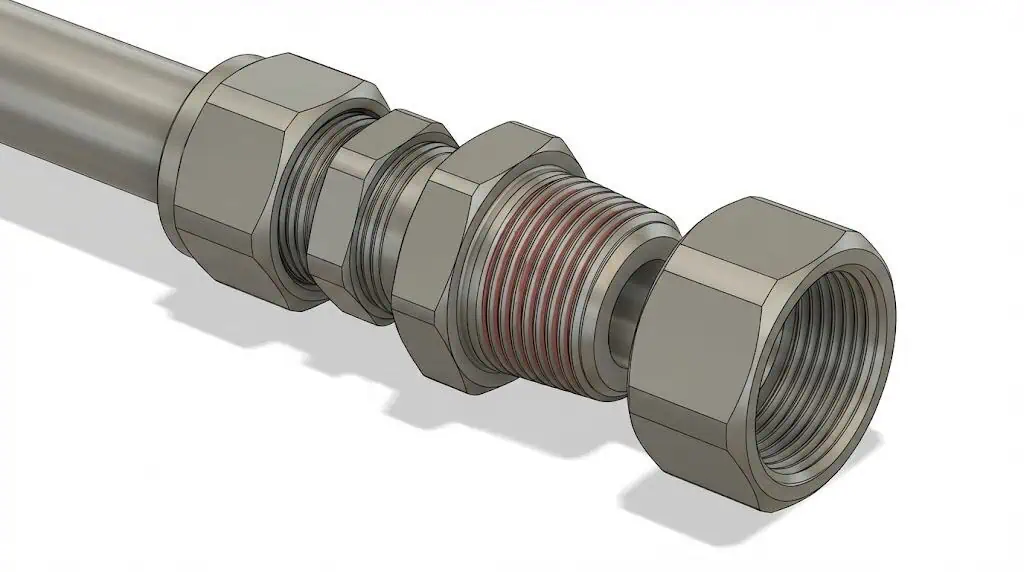
Adapters introduce two extra failure risks: misalignment load and mixed-connection assumptions.
Tube-to-NPT Adapters
- Two Sealing Methods: This component has two ends. The compression end (ferrules) needs NO sealant. The NPT end (tapered thread) DOES need sealant.
- Sealant SOP: Use PTFE tape or anaerobic pipe dope on the NPT threads only. Keep the first thread bare to prevent tape shreds from entering the system.
- Assembly Order: Ideally, tighten the NPT end into the process port first, then install the tubing into the compression end. This prevents twisting the tubing.
Elbows and Tees (Routing)
Routing problems show up as fitting problems. If the tube wants to spring away from the fitting, you have a routing issue.
- Neutral Alignment: Do not “pull” misaligned tubing into a fitting with wrench force; that creates bending stress at the ferrules.
- Support: Support the tubing so the elbow/tee is not acting as a structural support point.
- Branch Clamping: For Tees, clamp all branches to prevent cyclic loading at the body.
Phase 3: Verification & QC Rejection Criteria
Trust, but verify. For the initial tube fitting installation, the most reliable QC tool is a Gap Inspection Gauge (often called a Go/No-Go gauge).
Gap Gauge Inspection SOP
- How to use: Try to slide the gauge into the gap between the nut and the body hex.
- Pass (Good): The gauge does NOT fit. This means you have tightened enough to close the gap to the design spec.
- Fail (Bad): The gauge slides in. This means the nut has not advanced enough. Tighten slightly more until the gauge is refused.
QC Rejection Criteria (When to Stop)
Do not accept a fitting if any of the following are observed:
| Defect | Reject Reason |
|---|---|
| Tube bottoms out after 1/2 turn | Tube was not fully seated to the shoulder during finger-tightening. Ferrule grip is compromised. |
| Nut spins freely after pull-up | Threads are stripped or ferrule was missing. Disassemble immediately. |
| Visible tube scratch | If you can see a scratch entering the nut, the seal is likely compromised. |
| Mixed components | A Swagelok nut on a Sunhy body is a “Non-Conforming Part.” |
Safety Protocols for Tube Fitting Installation
Personal Protective Equipment (PPE)
PPE selection should follow a hazard assessment.
| PPE Type | Purpose |
|---|---|
| Safety Glasses | Mandatory. Protects against metal chips during cutting and fluid spray during leak testing. |
| Gloves (Cut Resistant) | Stainless steel tubing edges are razor sharp after cutting. |
| Positioning | Keep body parts out of the “line of fire” (potential tube ejection path) during initial pressurization. |
Reassembly SOP
Sunhy fittings are reusable. Maintenance often requires disconnecting lines. You do not need to cut the tube and start over every time.
- Insert the tube with pre-swaged ferrules into the fitting body.
- Rotate the nut by hand until you feel a sudden rise in resistance. This is the ferrules contacting the seat.
- Use a wrench to snug the nut slightly past this resistance point (typically 1/8 to 1/4 turn). Do NOT apply 1-1/4 turns again—you will destroy the seal.
FAQ: Installation & Standards
What tools are strictly required for tube fitting installation?
The “Holy Trinity” of installation: 1. Correct Tube Cutter (sharp wheel), 2. Deburring Tool, 3. Two Wrenches (one for nut, one for backup). A Gap Gauge is highly recommended for QC.
Do I need to use Teflon tape or pipe dope?
NO. Never put Teflon tape or sealant on the ferrules or the nut threads of a compression fitting. Sealant is only for tapered pipe threads (NPT) on the adapter end. Putting tape on ferrules prevents them from sealing and causes leaks.
Can I mix Sunhy nuts with Swagelok or Parker bodies?
Engineering Answer: No. While they may thread together, the internal taper angles and ferrule hardening processes differ between manufacturers. Intermixing voids all pressure ratings and safety warranties. Keep the assembly brand-consistent.
How do I fix a leak after installation?
Do not just tighten it more. First, depressurize the system. Disconnect the fitting and check: Is the tube fully bottomed out? Are the ferrules damaged? If the tube was not bottomed out, no amount of tightening will fix it—you must cut and re-install. If it looks good, reassemble and tighten slightly (1/8 turn) past the original position.
What is the pressure rating of the fitting?
The fitting is rated to the working pressure of the tubing. Sunhy fittings are stronger than the tubing itself. If you use 316SS tubing rated for 3000 PSI, the assembly is rated for 3000 PSI (with a 4:1 safety factor per ASME B31.3).