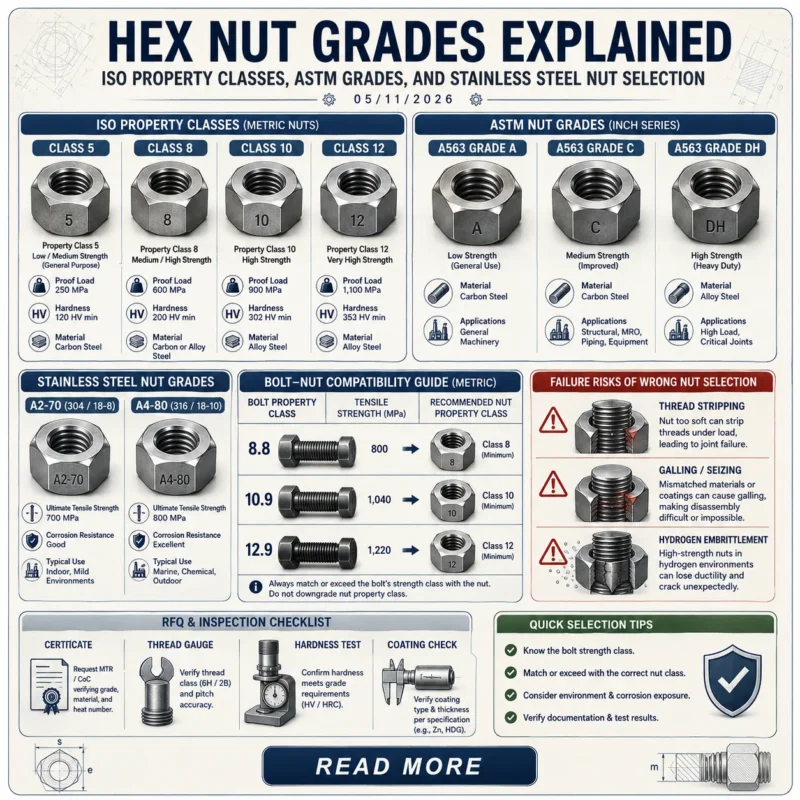
You achieve leak-free instrumentation tube fittings by strictly controlling four variables: tube hardness/geometry, precise make-up (1-1/4 turns rule), stress-free alignment, and post-installation verification.
In my 30 years on site, I’ve learned that “leak-free” isn’t about strength—it’s about the physics of plastic deformation. Double ferrule compression fittings (like Sunhy’s design) create a gas-tight seal only when the front ferrule seals against the fitting body and the rear ferrule grips the tubing. This system fails the moment you treat it like a tapered pipe thread.
Field data shows that 85% of leaks in instrumentation tube fittings are caused by installation errors, not manufacturing defects. The root causes usually trace back to:
- Tube Prep Failure: Using a hacksaw (creates chips) instead of a tube cutter, or ignoring ovality on soft tubing rolls.
- The “Torque” Myth: Tightening by “feel” instead of “turns.” Under-tightening leaves the ferrules un-set; over-tightening crushes the ID, restricting flow.
- Side-Load Stress: Forcing a misaligned tube into the body. This prevents the tubing from bottoming out on the shoulder, creating a dead volume and leak path.
- The “Intermix” Hazard: Mixing a Swagelok nut with a Parker ferrule (or vice versa). The tolerances differ by thousandths of an inch, compromising the seal.
You prevent costly shutdowns by standardizing a repeatable procedure. Below is the engineering standard for installation, inspection, and troubleshooting.
Preparation for Instrumentation Tube Fittings
Tubing and Fitting Storage

Tubing hardness and surface finish define the seal quality.
Even the best fitting cannot seal on damaged tubing. Stainless steel tubing works hardens; if you drag it across a concrete floor or store it uncovered, you increase the surface hardness and introduce scratches that gas molecules (like Helium or Hydrogen) can escape through.
- Hardness Limit: For stainless steel (ASTM A269), tubing hardness must be lower than the ferrule hardness (typically HRB 80-90 max) to allow the “bite.”
- Segregation: Never store copper tubing with carbon steel or stainless to avoid galvanic corrosion triggers before installation.
- Protection: Keep end-caps on until the moment of installation. A single grain of sand on the seating surface causes a leak that tightening cannot fix.
Centralize your accessories. Installers should have dedicated gauges and deburring tools in their Instrumentation Fittings & Valves toolkit, not shared shop tools that may be contaminated with oil or filings.
Tube Cutting and Deburring

The “Hacksaw Hazard”: Why cutting style matters.
In critical systems, hacksaws are forbidden. They produce irregular cuts and loose chips that foul downstream valves. Use a sharp wheel cutter or a dedicated tube facing tool.
- Square Cut: The tube end must sit flat against the body shoulder. A slanted cut creates a gap where turbulence and particle traps form.
- Deburring (ID/OD): This is non-negotiable. An OD burr prevents the ferrule from sliding into position. An ID burr creates flow restriction.
- The “Polishing” Mistake: Do not use sanding cloth on the tube end. It creates an axial (lengthwise) scratch pattern—a perfect highway for gas leaks.
Field Case Study: The “Mystery” Analyzer Leak
Issue: A refinery analyzer shelter had persistent Helium leaks on 1/4″ lines.
Root Cause: The installer used a dull cutter wheel, which pressed the tube into an oval shape instead of cutting it cleanly. The ferrules swaged onto the oval tube, leaving microscopic gaps on the flat sides.
Fix: Re-cut tubing with a sharp wheel, verify roundness with a caliper, and re-terminate. Leaks vanished.
Inspection Before Assembly
Don’t build on a bad foundation. Verify the Tubing Spec.
For general service, tubing should meet ASTM A269 or ASTM A213. Wall thickness determines your pressure safety factor. A common error is using thin-wall tubing (e.g., 0.028″ wall on 1/2″ OD) for high-pressure gas—it may collapse under ferrule stress, leading to tube ejection.
Material Selection & Compatibility
Matching the tube material to the environment is as critical as the installation itself.
Many field failures are electrochemical, not mechanical. Below is a compatibility guide for common instrumentation scenarios.
| Fitting & Tube Material | Best Application | Key Engineering Constraint |
|---|---|---|
| 316/316L Stainless Steel | General Process, H2S (Sour Gas), Chemical Injection. | Standard choice. Must use ASTM A269 tubing. Avoid in stagnant seawater >60°C (Pitting risk). |
| Brass | Instrument Air, Pneumatic Controls, Inert Gases. | Low pressure only. Never use with Ammonia or Acetylene (Stress Corrosion Cracking risk). |
| Alloy 400 (Monel) | Seawater, Hydrofluoric Acid (HF), Marine environments. | Excellent resistance to salt. Expensive. Ensure tubing is fully annealed. |
| Alloy C-276 (Hastelloy) | Severe Sour Gas (NACE MR0175), Aggressive Acids. | Critical service. Verify heat numbers and MTCs. Do not mix with 316SS parts. |
Galvanic Rule: Generally, the tubing should be the same material as the fitting. If mixing is unavoidable (e.g., Monel fitting on SS tube), ensure the tubing is the “cathode” (more noble) to prevent rapid corrosion of the pressure boundary, though identical materials are always the safest engineering choice.
Tube Fitting Installation Steps
Inserting and Aligning Tubing

The “Bottoming Out” Rule.
The most critical tactile feedback during installation is the tube hitting the shoulder of the fitting body. If you don’t bottom out, the ferrules engage the tube end (or air), and the fitting will blow off under pressure.
- Insert tubing. If it binds, don’t force it—check for ovality or burrs.
- Finger-Tight: Rotate the nut until you feel the ferrules contact the tubing. This is your “Zero” point.
- Mark the Nut: Use a permanent marker at the 6 o’clock position. This is the only way to visually verify turns.
Pro Tip: Never “pull” the tubing into the fitting using the nut threads. This creates residual stress (side-load). The tubing must sit neutrally in the fitting before tightening begins.
Nut Tightening Procedure (The 1-1/4 Rule)

Standard installation for tubing > 1/4″ (6mm) is 1-1/4 turns.
For smaller tubing (1/8″, 3/16″), the standard is typically 3/4 turn. Always verify the datasheet.
- Stabilize: Use a backup wrench on the fitting body. Failing to do this transmits torque into your tube run, twisting and stressing the system.
- Rotate: Turn the nut 1 full revolution (6 o’clock to 6 o’clock), then add 1/4 turn (to 9 o’clock).
- Feel: You will feel the “solid stop” as the ferrules set.
| Error | Consequence |
|---|---|
| Under-tightening | The rear ferrule fails to grip. The tube may eject under pressure (Safety Incident). |
| Over-tightening | The tube ID constricts (flow loss) and ferrules deform elastically, making reassembly impossible. |
Using a Gap Gauge (Go/No-Go)

The Gap Gauge is your primary QC tool for initial installation.
It checks the distance between the nut and the body shoulder. It confirms you have advanced the nut enough to swage the ferrules.
- How to use: Attempt to slide the gauge into the gap.
- No-Go: If the gauge cannot enter the gap, the fitting is properly tightened.
- Go: If the gauge fits, you must tighten more.
Critical Note: Gap gauges are valid ONLY for initial installation. Once a fitting has been loosened and re-tightened, the gauge is no longer an accurate indicator. For reassembly, rely on torque/position marking.
| Relevant Standard | Application Context |
|---|---|
| ASME B31.3 | Process Piping Code: Defines the pressure testing and material requirements for industrial tubing systems. |
| ISO 20485 | Tracer Gas Testing: The standard for high-sensitivity leak detection (Helium) used in semiconductor and hydrogen applications. |
Post-Installation Checks
Leak Testing Methods

Verification builds trust. Choose the method that matches your media risk.
- Liquid Leak Detectors (Snoop): Good for compressed air and inert gases.
Constraint: Not sensitive enough for Hydrogen or hazardous gases. Ensure the solution is compatible with your temperature (freezing risk). - Pressure Decay Test: Pressurize the line, isolate it, and watch the gauge.
Constraint: Requires temperature stability. A temperature drop can look like a leak (Gay-Lussac’s Law). - Helium Mass Spectrometer: The gold standard for vacuum and hazardous gas systems. Can detect leaks as small as $1 \times 10^{-9}$ std cc/sec.
Engineering Advice: Never use a “lighter” (flame) to test for leaks. I have seen this cause fires in “assumed inert” lines that had residual hydrocarbons.
Inspecting Fit and Alignment
A “stressed” system is a leaking system.
Check the run after tightening. If the tubing bows or twists, you have introduced side-load.
| Visual Check | Pass Criteria |
|---|---|
| Tube Support | Clamps must be installed within strict intervals (e.g., every 1 meter for 1/2″ tube) to prevent vibration fatigue. |
| Nut Contact | The nut should not contact the body hex unless designed to do so (check gap gauge). |
| Thread Exposure | Consistent thread exposure across similar sized fittings indicates consistent process. |
Step-by-Step: Troubleshooting & Diagnosing Leaks
Systematic troubleshooting saves parts and time. Don’t just tighten it more!
Panic-tightening often converts a minor weep into a destroyed fitting body. Use this flowchart logic:
- Phase 1: Visual (Non-Intrusive)
- Is the nut bottomed out against the body? (If yes, it’s over-tightened; replace).
- Is the tube entering at an angle? (Side-load; fix supports).
- Is there a gap? (Check with gap gauge if it’s a new install).
- Phase 2: Depressurization & Disassembly
- Safety First: Bleed all pressure. Never wrench on a pressurized fitting.
- Mark the nut and body position. Back off the nut.
- Inspect the Tube: Look for a “shiny line” where the ferrule bit. If the tube is indented, good. If it’s smooth, it was under-tightened.
- Phase 3: Component Analysis
- Ferrules: Are they active? The rear ferrule should grip the tube (you shouldn’t be able to pull it off easily). The front ferrule should be free of deep scratches.
- Body Seat: Shine a light inside. Is the cone surface pitted or scratched? If yes, the body is dead. Replace it.
| Symptom | Likely Root Cause | Corrective Action |
|---|---|---|
| Leak at body seal | Scratched tube or dirt on seat | Clean seat; if scratched, cut back tube and re-install. |
| Leak at nut thread | Galling or intermixed parts | Replace fitting; use proper lubricant on threads (if permitted). |
| Tube ejects | Under-tightened / Wrong Wall Thickness | Verify wall thickness matches pressure; re-train on 1-1/4 turns. |
Safety and Reassembly Tips
Safety Precautions
Treat High Pressure like High Voltage.
A hydraulic pinhole leak can inject fluid into your skin (injection injury), leading to amputation. A gas leak can cause asphyxiation.
- Bleed Pressure: Verify zero energy state before touching a wrench.
- PPE: Safety glasses are mandatory. High-velocity gas carrying metal particles is blinding.
- Exclusion Zone: Keep personnel away during the initial hydrotest/pneumatic test.
Refer to our pneumatic fittings selection guide for specific air-system safety protocols.
Reassembly Procedures
Double ferrule fittings are reusable—if you do it right.
Because the ferrules are permanently swaged to the tube, you cannot “replace” them without cutting the tube. However, the connection can be broken and remade many times.
- Insert the tube with swaged ferrules into the fitting body.
- Rotate the nut by hand until you feel resistance (the ferrules hitting the seat).
- Using a wrench, tighten slightly past the original position (typically 1/8 to 1/4 turn). Do not use the 1-1/4 turn rule for reassembly! You will destroy the fitting.
For a detailed visual guide, see our SOP: A Complete Walkthrough for Tube Fitting Installation.
Summary Checklist:
- Tube: Square cut, deburred, proper hardness.
- Install: Bottomed out, marked nut, 1-1/4 turns.
- Verify: Gap gauge (initial), Leak test (final).
FAQ
Why do tube fittings leak even when tightened?
Usually due to tube defects or side-load, not lack of torque.
If the tube has a longitudinal scratch, the ferrule cannot seal the gap. If the tube enters at an angle (side-load), the ferrules deform unevenly. Simply tightening more often crushes the tube, making the leak worse.
Can I use Teflon tape on instrumentation tube fittings?
Absolutely NOT on the ferrules/nut.
Teflon tape is only for tapered pipe threads (NPT). Placing tape on the compression nut threads alters the torque-friction ratio, leading to unpredictable swaging. Placing tape on the ferrules interferes with the metal-to-metal seal.
Can I mix Swagelok, Parker, and Sunhy parts?
No. This is dangerous “Intermixing”.
While they look compatible, the internal angles and tolerances differ. Mixing parts voids warranties and creates a high risk of blowout under pressure. Always keep the nut, ferrules, and body from the same manufacturer.
How many times can a tube fitting be reassembled?
It depends on the condition, typically 10-20 times in benign service.
Inspect the sealing surfaces each time. If the body seat is pitted or the threads are galled, replace the component. Proper lubrication of threads (but not the seal area) extends reassembly life.
What is the difference between “Instrument” and “Hydraulic” fittings?
Tolerance and Sealing Method.
Instrumentation fittings (Double Ferrule) prioritize gas-tight sealing on thin-wall tubing. Hydraulic fittings (often DIN 2353 or Flare) prioritize holding massive pressures on heavy-wall pipe/tube under high vibration.
When should I use a Gap Gauge?
Only during the initial installation.
It confirms the nut has traveled the required distance to set the ferrules. It is accurate for the first pull-up only. Do not use it for reassembly checks.
What tubing material should I use with stainless fittings?
Use fully annealed 304 or 316 Stainless Steel Tubing (ASTM A269/A213).
The tubing must be softer than the fitting material (typically HRB < 90) to ensure the ferrules can bite into it. Do not use plastic or copper tubing with standard stainless steel ferrules without a soft-tube insert.