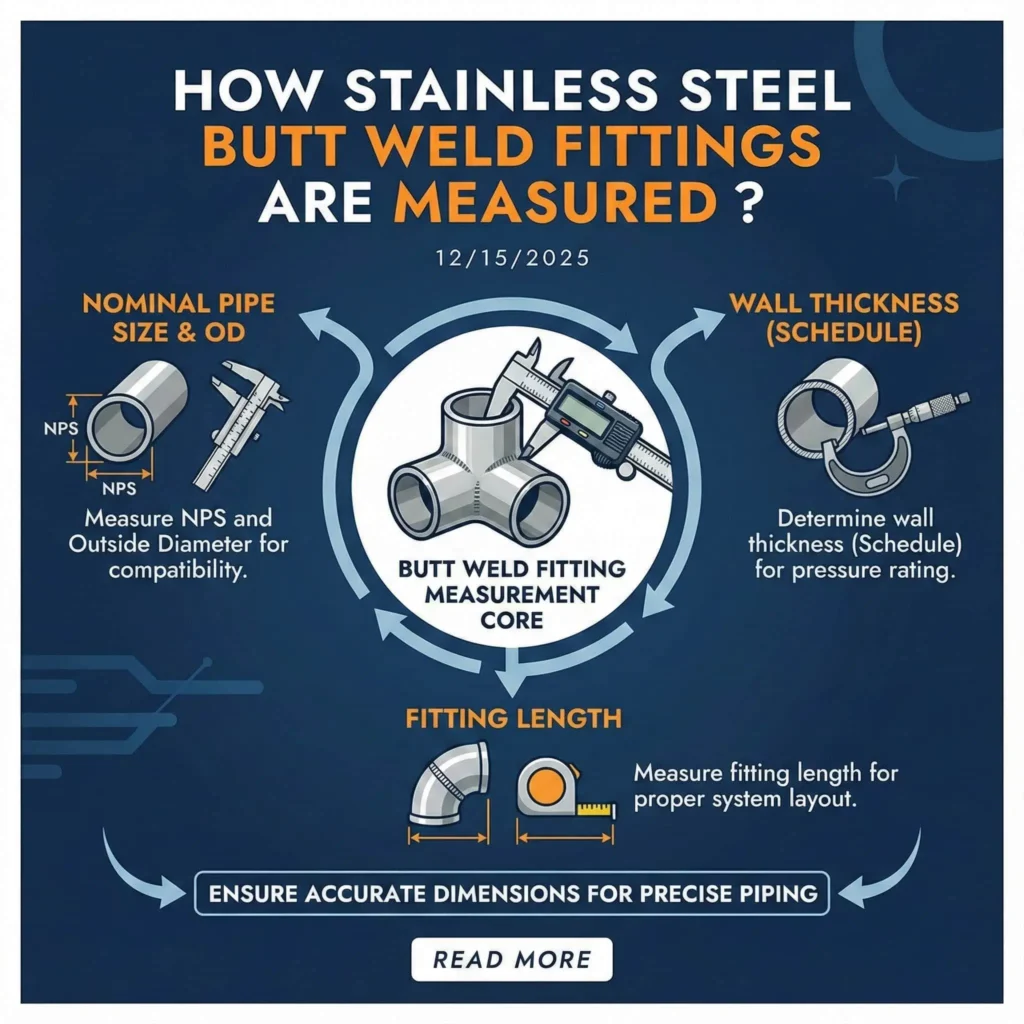
Stainless steel butt weld fittings are measured by nominal pipe size, outside diameter, wall thickness (schedule), and fitting length. These dimensions determine how butt weld fittings are measured and ensure the correct fit in piping systems. Accurate measurement protects safety and supports compliance with ASME B16.9 standards. Sunhy uses advanced manufacturing and quality control, including:
- Radiographic and ultrasonic testing for wall thickness
- Hydrostatic pressure testing
- Dimensional checks with coordinate measuring machines
- Non-destructive testing for system integrity
These steps help guarantee each fitting meets strict industrial requirements.
Key dimensions of stainless steel butt weld fittings
Nominal pipe size (NPS)
NPS is the standard way to identify pipe fittings and their compatibility.
Nominal pipe size refers to the approximate inside diameter of the pipe. It helps match fittings to pipes in a system. For stainless steel butt weld fittings, NPS ranges from 1/2 inch to 48 inches. The NPS affects the outside diameter and the wall thickness, which are both critical for proper fit.
| Nominal Pipe Size (NPS) | Outside Diameter (OD) | Inside Diameter (ID) Variation |
|---|---|---|
| 12 inches and smaller | Fixed for each size | Decreases with thicker walls |
| Above 14 inches | Aligns more closely | Varies less significantly |
Outside diameter (OD)
OD is the actual measured diameter of the pipe or fitting.
The outside diameter ensures that the fitting will fit correctly with the pipe. ASME B16.9 sets the standard OD for each NPS. For example, NPS 1/2 has an OD of 0.840 inches, while NPS 4 has an OD of 4.500 inches. The OD remains constant for each NPS, even if the wall thickness changes.
- Standard OD sizes include:
- NPS 1/2 (DN 15): 0.840 inches
- NPS 1 (DN 25): 1.315 inches
- NPS 4 (DN 100): 4.500 inches
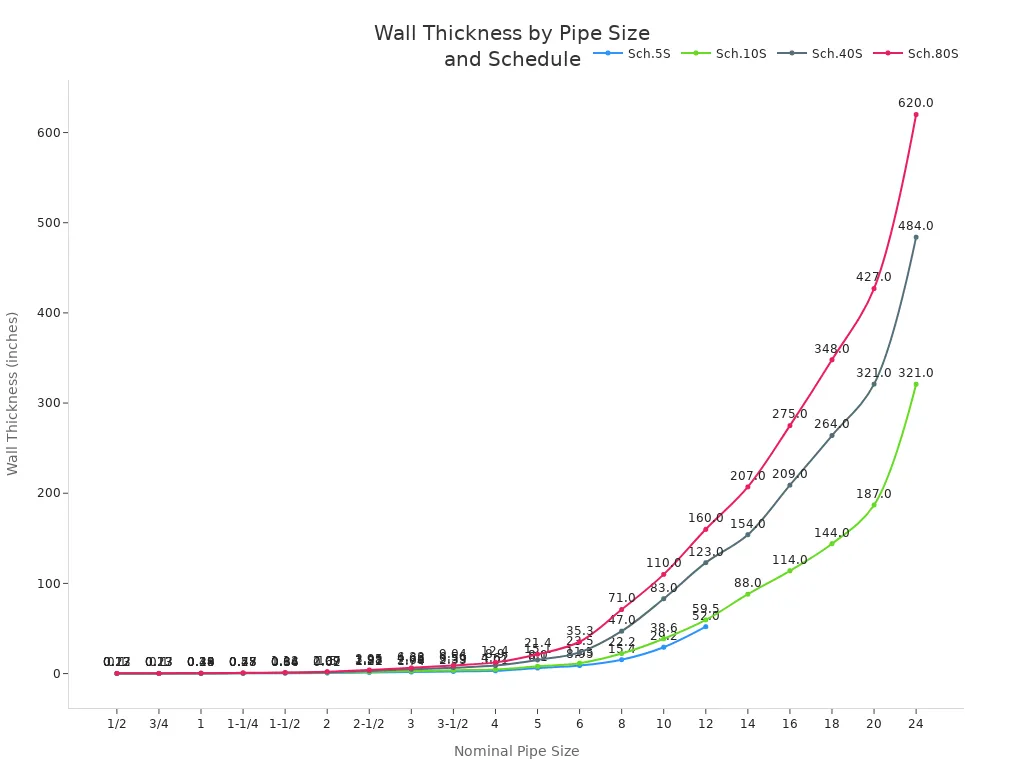
Wall thickness (Schedule)
Wall thickness, or schedule, determines the pressure rating and strength of the fitting.
A thicker wall allows the fitting to handle higher pressure. The schedule number (like Sch.40S or Sch.80S) shows the wall thickness for each NPS. Wall thickness is a key measurement for safety and compliance.
End-to-end and center-to-end
These measurements define the length and shape of the fitting.
End-to-end is the total length from one end of the fitting to the other. Center-to-end is the distance from the centerline to the end of the fitting, important for elbows and tees. These dimensions help ensure the piping system fits together as designed.
| Nominal Pipe Size | O.D. (inches) | Center to Face A (inches) |
|---|---|---|
| 1/2 | 0.840 | 1-1/2 |
| 1 | 1.315 | 1-1/2 |
| 2 | 2.375 | 3 |
| 4 | 4.500 | 6 |
| 8 | 8.625 | 12 |
Additional measurements (bevel angle, ovality)
Bevel angle and ovality affect weld quality and fit.
- The bevel angle for the weld should be at least 45°.
- The bevel height should be at least 0.7 times the wall thickness.
- Ovality, or how round the fitting is, should not exceed 0.03–0.1 mm for high accuracy.
Typical dimensions by fitting type
Different fittings have specific size ranges and measurements.
ASME B16.9 covers a wide range of stainless steel butt weld fittings. The table below shows the typical size ranges for common fittings:
| Types of Fittings | Size Range (NPS) |
|---|---|
| 45°/90° Long Radius Elbows, Tees, Crosses, Caps | 1/2 – 48 |
| Reducing Elbows, Returns, Reducers, Stub Ends | 1/2 – 24 |
Accurate measurements for all these dimensions ensure that pipe fittings meet safety standards and fit perfectly in industrial systems. Sunhy follows these standards closely to deliver reliable products.
How to measure pipe fittings accurately
Tools for measurement
The best tools for measuring pipe fittings are digital calipers, tape measures, micrometers, and thread gauges.
Digital calipers provide high accuracy and help verify component dimensions before shipping. Even a small error, such as 0.1 mm, can cause assembly problems in stainless steel butt weld fittings. Sunhy uses digital calipers, coordinate measuring machines, and thread gauges in their quality control process. These tools ensure every fitting meets exact specifications.
Common tools include:
- Digital calipers (for outside diameter, wall thickness, and length)
- Tape measure (for longer dimensions)
- Micrometer (for precise wall thickness)
- Thread gauge (for thread pitch and type)
- Circumference tape (for large diameters)
Step-by-step process to measure pipe fittings
Follow these steps to measure pipe fittings accurately:
- Identify the fitting type.
Check if the fitting is male or female and note the connection style. - Measure the outside diameter (OD).
Place the caliper jaws on the widest part of the fitting. Read the value on the digital display. - Check the wall thickness.
Use a micrometer or caliper to measure the wall at several points. Record the thickest and thinnest values. - Determine the fitting length.
Use a tape measure or caliper to measure end-to-end or center-to-end, depending on the fitting type. - Assess the thread dimension and pitch (if applicable).
For threaded fittings, use a thread gauge to measure the pitch and a caliper for the OD. - Calculate diameter using circumference (for large fittings).
Wrap a string or circumference tape around the fitting. Divide the measured circumference by 3.14 to get the diameter. - Consult a nominal pipe size chart.
Match your measurements to the chart to confirm the correct NPS.
Tip: Always measure at multiple points to check for ovality or irregularities.
Ensuring measurement accuracy
Accurate measurement depends on using the right tools, following a consistent process, and double-checking results.
Sunhy’s quality control team uses digital calipers and coordinate measuring machines to verify every dimension. They check each fitting at several points to detect any variation. They also compare results with ASME B16.9 standards before approving the product for shipment.
To ensure accuracy:
- Calibrate tools before use.
- Clean the fitting surface to remove debris.
- Measure at room temperature to avoid expansion or contraction.
- Record all measurements for traceability.
Common measurement mistakes to avoid
The most frequent mistakes include using the wrong tool and ignoring thread pitch.
- Using inappropriate tools can lead to inaccurate measurements, causing leaks or poor connections. Always select tools designed for the specific fitting.
- Overlooking thread pitch can result in mismatched fittings. Use a thread gauge to measure pitch and ensure compatibility.
Other mistakes to avoid:
- Measuring only one point on the fitting
- Failing to consult a nominal pipe size chart
- Not calibrating tools before use
Note: Careful measurement prevents costly errors and ensures that pipe fittings fit and perform as expected.
Standards and tolerances for stainless steel butt weld fittings
ASME B16.9 and ASTM standards
ASME B16.9 and ASTM A403 set the main rules for stainless steel butt weld fittings.
These standards give clear instructions for size, material, and testing. They help ensure fittings work safely and fit together in piping systems.
| Standard | Key Requirements |
|---|---|
| ASTM A403 | Sets rules for making, inspecting, and testing stainless steel fittings. Covers chemical makeup, strength, heat treatment, and surface finish. |
| ASME B16.9 | Lists exact sizes, tolerance, pressure ratings, testing steps, and marking rules for butt weld fittings. Makes sure fittings are uniform and can be swapped in projects. |
- Covers grades like 304, 316, and 316L.
- Classifies fittings by material, size, and pressure.
- Requires strict checks during manufacturing.
Tolerance ranges and compliance
Tolerances control how much a fitting’s size can vary from the standard.
ASME B16.9 gives limits for wall thickness, outside diameter, and fitting length. ASTM A403 checks the material’s chemical and mechanical properties. These rules help fittings stay safe under pressure and fit well in pipelines.
| Standard | Description |
|---|---|
| ASME B16.9 | Sets limits for wall thickness and outside diameter. |
| ASTM A403 | Checks chemical makeup and strength of the steel. |
Sunhy follows these standards by using advanced machines and regular inspections. They test each fitting for size, shape, and strength before shipping.
Marking and documentation
Markings and documents prove that fittings meet all standards.
Each fitting gets a mark showing its size, material, and standard. Sunhy provides paperwork that lists test results and checks. This helps customers trace each fitting and trust its quality.
Tip: Always ask for markings and test reports when buying stainless steel butt weld fittings. This ensures the product meets industry standards.
Importance of accurate measurement
Fit and weld integrity
Precise measurement guarantees a perfect fit and strong welds.
Accurate dimensions in stainless steel butt weld fittings ensure that each component aligns correctly and forms a reliable joint. When manufacturers follow standards like ASME B16.9, they achieve:
- Correct fitting orientation and placement
- Reliable, durable connections that minimize leaks
- Seamless integration with existing pipe fittings
- Consistent dimensions for easy installation and maintenance
These factors help maintain the structural integrity of the entire piping system.
Safety and operational reliability
Exact measurements protect safety and keep systems running smoothly.
Properly measured pipe fittings reduce the risk of leaks, failures, and unexpected downtime. Reliable fittings help prevent accidents and product loss. For example:
A tube with the wrong outer diameter will not seal properly, which can cause a hidden leak and lead to significant product loss or a safety incident.
Accurate specifications also ensure that the system can handle high pressure and harsh environments. This reliability is essential for industries like oil and gas, chemical processing, and water treatment.
Avoiding costly errors
Accurate measurement prevents expensive mistakes during installation and operation.
Incorrectly sized stainless steel butt weld fittings can cause leaks, weak welds, and structural instability. These issues often result in:
- Costly repairs and downtime
- Increased scrap and maintenance costs
- Delays in project completion
Choosing a reputable manufacturer like Sunhy reduces these risks. Sunhy uses rigorous quality control, supplier certifications, and thorough inspections to ensure every fitting meets industry standards and project requirements.
Accurate measurement supports cost efficiency, global compatibility, and long-term system performance.
Main steps for measuring stainless steel butt weld fittings:
Accurate measurement requires checking nominal pipe size, outside diameter, wall thickness, and fitting length. Use calibrated tools and follow industry standards.
Quick checklist for best results:
- Select the correct tool for each dimension
- Measure at multiple points
- Compare results with ASME B16.9 charts
- Double-check all measurements
- Request documentation from the manufacturer
Choosing a trusted supplier like Sunhy helps ensure reliable fit and compliance.
FAQ
How does Sunhy ensure the accuracy of fitting measurements?
Sunhy uses advanced testing and calibrated tools.
They perform dimensional checks, hydrostatic pressure tests, and non-destructive inspections. Quality control teams verify each fitting against ASME B16.9 standards.
What tools work best for measuring stainless steel butt weld fittings?
Digital calipers and micrometers provide the highest accuracy.
Tape measures help with longer dimensions. Thread gauges check thread pitch. Circumference tapes measure large diameters.
Why do standards like ASME B16.9 matter?
Standards guarantee safety and compatibility.
They set rules for size, material, and testing. Fittings that meet these standards fit properly and perform reliably in industrial systems.
What is the difference between NPS and OD?
NPS refers to nominal pipe size; OD means outside diameter.
NPS identifies pipe and fitting size. OD is the actual measured diameter. Both help select the correct fitting.
How can buyers verify fitting quality before installation?
Check markings and request test reports.
Markings show size, material, and standard. Test reports confirm compliance. Buyers should review both before installation.

