








Guía técnica del sensor de oxígeno
Comprenda los factores de costo del reemplazo del sensor de oxígeno, los factores de mano de obra, los pasos de instalación segura y las verificaciones de ajuste necesarias antes de realizar el pedido.

Respuesta rápida
El reemplazo del sensor de oxígeno implica más que retirar una pieza roscada. Primero confirme el circuito averiado y la posición exacta, luego coincida con la referencia OE, la tecnología del sensor, el conector y el enrutamiento del cable. El costo total varía según el acceso al vehículo, el tipo de sensor, la corrosión, las tarifas de mano de obra locales y si una falla subyacente en el cableado, escape, control de combustible o catalizador también requiere reparación.
Antes del reemplazo: verifique la dirección de reparación
Registre los códigos y los datos de congelación, identifique el Banco 1 o Banco 2 y el Sensor 1 o Sensor 2, inspeccione el arnés y verifique si hay fugas de escape. Para fallas del calentador, pruebe la alimentación, tierra y circuito de control del lado del vehículo. Para códigos de respuesta o mezcla, compare los trim de combustible y el comportamiento del sensor con la información de servicio. Reemplazar un sensor sin estas comprobaciones puede dejar la falla original sin cambios.
¿Qué cambia el costo de reemplazo del sensor de oxígeno?
| Factor de coste | Por qué es importante |
|---|---|
| Tecnología de sensores | Los sensores de banda ancha/A/F y los conjuntos de ajuste directo específicos de la aplicación pueden costar más que los diseños básicos de banda estrecha. |
| Ubicación de acceso | Un sensor de colector accesible y un sensor detrás de protectores o componentes debajo de la carrocería requieren diferente tiempo de mano de obra. |
| Corrosión y estado de la rosca | Los ciclos térmicos y la corrosión pueden dificultar el desmontaje o requerir reparación de roscas. |
| Diagnóstico del vehículo | Las pruebas del sistema eléctrico, de escape o de combustible añaden tiempo pero evitan una sustitución de piezas no justificada. |
| Daños relacionados | Un arnés fundido, una fuga de escape o un catalizador contaminado pueden requerir trabajo adicional. |
| Tarifa de mercado y mano de obra | Los canales de piezas, impuestos y tarifas de taller varían según la región. |
Utilice los rangos de costos en línea solo como referencias de planificación. Un presupuesto útil debe identificar la posición exacta del sensor, la base de la pieza, la asignación de diagnóstico y cualquier condición que pueda cambiar la mano de obra.
¿Cuánto tiempo lleva el reemplazo?
No existe un tiempo de mano de obra universal fiable. El acceso, la corrosión, la temperatura de escape, los requisitos de elevación del vehículo y el enrutamiento del conector son importantes. El procedimiento de servicio puede requerir la extracción de protectores u otros componentes. El diagnóstico y la verificación del monitor posterior a la reparación deben incluirse al comparar presupuestos.
Secuencia de instalación segura
- Deje que el escape se enfríe y soporte el vehículo con equipo aprobado.
- Desconecte el conector correcto sin tirar de los cables.
- Retire el sensor con la herramienta especificada mientras protege las roscas de escape.
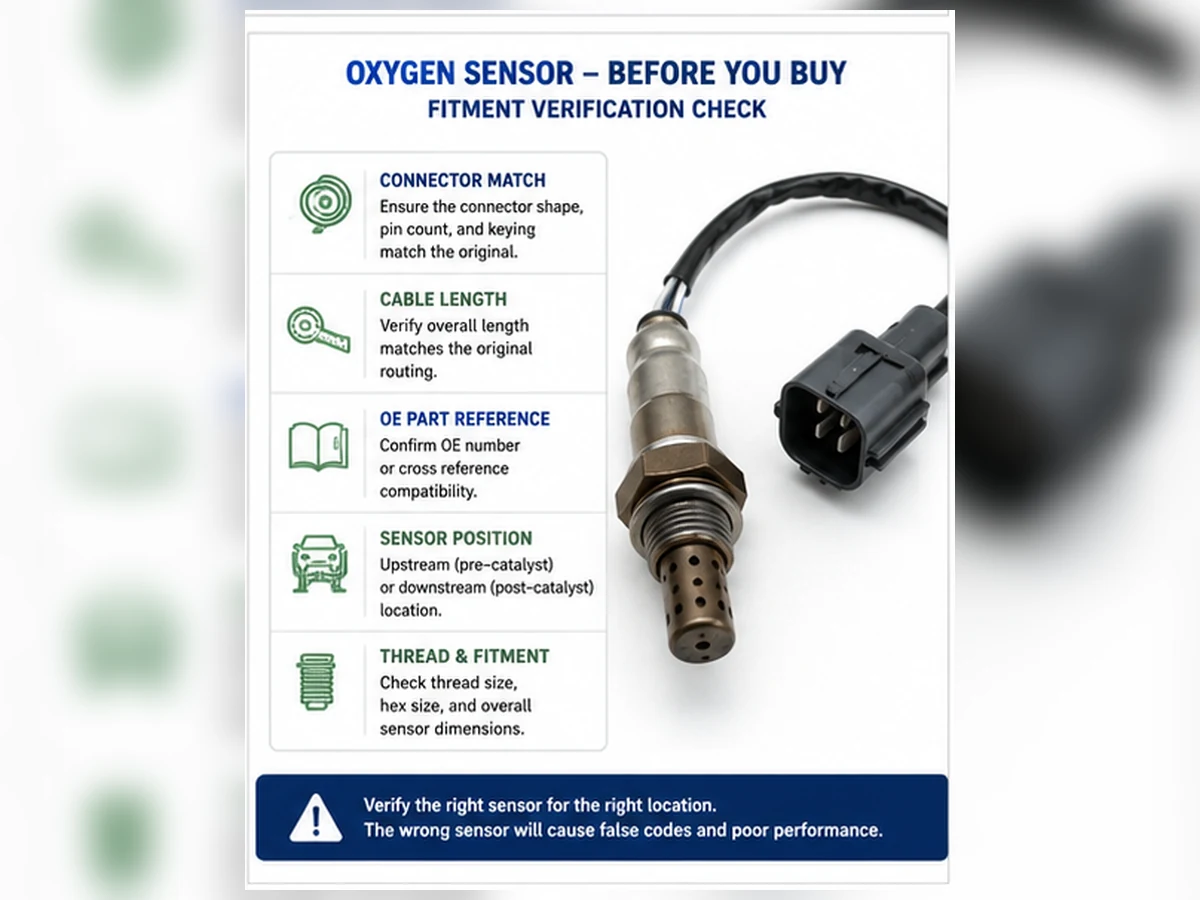
- Compare las piezas viejas y de reemplazo: rosca, hexágono, protector, conector, codificación y longitud del cable.
- Enrute el arnés lejos del calor, bordes afilados y piezas móviles.
- Use las instrucciones de par del producto o vehículo. No invente un valor de par universal.
- Siga las instrucciones del proveedor sobre el antiagarrotamiento; muchos sensores se suministran con roscas tratadas.
Verificación posterior a la reparación
Vuelva a conectar todos los clips retenidos, verifique si hay fugas de escape, confirme los datos del sensor y del calentador, y complete el procedimiento de verificación legal del fabricante. No asuma que borrar el código prueba la reparación. Los monitores de preparación pueden necesitar condiciones de funcionamiento definidas antes de que un resultado esté disponible.
Cuándo el reemplazo profesional es la mejor opción
Utilice un reparador cualificado cuando no se disponga de equipos de elevación seguros, el sensor esté agarrotado, se requiera diagnóstico del cableado, el catalizador pueda estar sobrecalentándose o la información de servicio requiera pruebas especializadas. Las averías de control de emisiones deben repararse, no ocultarse con un espaciador, simulador o cambio de software.
Decida qué se está reemplazando realmente
Un código de sensor de oxígeno puede describir el circuito de detección, el circuito del calentador, la velocidad de respuesta o una señal no plausible. La reparación puede ser el sensor, pero también puede ser un conector, arnés, fusible, fuga de escape o una avería subyacente de aire-combustible. Escriba la dirección de reparación propuesta antes de realizar el pedido: banco y posición exactos, evidencia de que el circuito del vehículo funciona, evidencia de que el escape está sellado y la prueba de respuesta que el sensor falló. Este registro evita que una suposición diagnóstica se convierta en un pedido de piezas sin fundamento.
| Hallazgo | Dirección de reparación probable | Evidencia aún requerida |
|---|---|---|
| El calentador no tiene alimentación del lado del vehículo | Diagnóstico de fusible, cableado o control | Diagrama correcto, tensión con carga y prueba de masa/control |
| La señal permanece sesgada después de las comprobaciones de mezcla y circuito | El reemplazo del sensor puede estar justificado | Procedimiento de respuesta específico de la tecnología y condiciones de operación |
| Cambios en la indicación de mezcla pobre después de reparar una fuga de admisión | Reparación de fuga de aire | Verificación de la respuesta del sensor y del ajuste de combustible |
| P0420/P0430 con funcionamiento plausible del sensor | Continuar con el diagnóstico del sistema de catalizador | Evaluación de fallos de encendido, control de combustible, fugas de escape y catalizador |
Cómo comparar presupuestos de reemplazo
Un presupuesto bajo y uno alto pueden no describir el mismo trabajo. Pregunte si la estimación incluye diagnóstico, el sensor directo exacto, trabajo de acceso, riesgo de restauración de rosca, corrección de fugas de escape y verificación del monitor posterior a la reparación. Los impuestos y las tarifas locales también varían. Esta página no proporciona un rango de precios universal porque un rango desvinculado del vehículo, la posición y el mercado puede ser más engañoso que útil.
Identificación de la pieza en el presupuesto
El presupuesto debe identificar el número de pieza de referencia y si es aguas arriba o aguas abajo, de banda estrecha o banda ancha, de ajuste directo o universal. Una referencia cruzada OE es un mapeo candidato, no una prueba de ajuste hasta que se reconcilie con los datos completos del vehículo y las emisiones. Si la cotización dice solo “sensor de O2”, el alcance está incompleto.
Mano de obra de diagnóstico y acceso
El tiempo de diagnóstico establece si la sustitución está justificada. La mano de obra de acceso puede incluir escudos, bandejas inferiores u otras operaciones específicas de la aplicación. Un sensor agarrotado puede aumentar el tiempo de extracción y crear la necesidad de restaurar la rosca. El reparador debe explicar las contingencias sin prometer que cada pieza corroída se liberará con normalidad.
Verificación después de la instalación
Un presupuesto completo incluye inspección de fugas, comprobaciones de circuito y datos en vivo, y el procedimiento de monitor aplicable. Una luz de advertencia que se borra manualmente no es evidencia de que el monitor haya pasado. Los códigos permanentes pueden permanecer hasta que el módulo de control observe un resultado exitoso del monitor.
Rutas de instalación directa y universal
| Punto de decisión | Sensor de ajuste directo | Sensor universal de empalme |
|---|---|---|
| Conector | Se suministra conector de aplicación | Se requiere un procedimiento aprobado de transferencia o terminación del conector |
| Riesgo principal | Aplicación, posición o enrutamiento de cable incorrectos | Identificación de circuito, calidad de empalme o sellado ambiental incorrectos |
| Regla de instalación | No corte ni modifique el arnés de ajuste directo | Siga exactamente las instrucciones del fabricante del sensor |
| Prueba de selección | Coincidencia verificada con el catálogo y datos OE/aplicación | Tecnología verificada, compatibilidad de circuitos y método de empalme aprobado |
Universal no significa compatible con todos los vehículos. Los colores de los cables no son un estándar de pinout universal. Si el circuito no puede identificarse positivamente a partir de instrucciones fiables, deténgase en lugar de experimentar en un circuito de control de emisiones.
Gestione los riesgos de extracción y roscado
Enfríe y soporte el vehículo
Los componentes del escape pueden causar quemaduras graves. Permita un enfriamiento adecuado y use puntos de elevación, soportes o equipos de elevación profesionales aprobados. Un gato solo no es un soporte de trabajo. Organice la iluminación y el acceso a las herramientas antes de aplicar fuerza para que el arnés, las líneas cercanas y el conector del sensor permanezcan protegidos.
Proteja el bung y el escape circundante
Utilice la herramienta y el método de acceso especificados para la aplicación. La fuerza excesiva, el impacto o el calor incontrolado pueden dañar el tapón, el colector, la carcasa del catalizador o los componentes cercanos. Si las roscas comienzan a agarrotarse o el tapón se mueve, el trabajo ha pasado de ser un reemplazo rutinario a una reparación del escape y debe reevaluarse.
Siga las instrucciones del producto para el compuesto de rosca y el par de apriete.
Algunos sensores de reemplazo llegan con roscas tratadas. Agregar más compuesto puede contaminar el elemento sensor o cambiar el comportamiento de apriete. El par depende del sensor y la aplicación; use la especificación del producto o del vehículo, no un valor copiado de una pieza diferente.
El enrutamiento del mazo forma parte de la reparación
Coincida con las ubicaciones originales de los clips y la alivio de tensión. El cable debe mantenerse alejado del escape, ejes, dirección, suspensión y bordes afilados en todo el rango de movimiento. No estire un cable corto ni deje un bucle de cable largo sin soporte. Confirme el bloqueo del conector y el asiento del terminal en lugar de confiar solo en un clic audible.
Matriz de verificación posterior al reemplazo
| Verificar | Evidencia de aprobación | Lo que sugiere una falla |
|---|---|---|
| Instalación física | Sin fugas, conector seguro, clips correctos y espacio libre para el calor | Problema de rosca, sello, enrutamiento o conector |
| Circuito calefactor | Suministro/control especificado y corriente o resistencia plausible | Problema en el circuito del vehículo, conector o pieza nueva |
| Respuesta del sensor | Respuesta específica de la tecnología en condiciones de funcionamiento válidas | Pieza incorrecta, fallo de mezcla no resuelto, fuga o problema del sensor |
| Control de combustible | Los ajustes de combustible y el estado comandado son plausibles | La causa raíz de aire, combustible, encendido o mecánica persiste |
| Resultado del monitor | El monitor aplicable se completa sin que el fallo regrese | El diagnóstico o la reparación requiere una revisión adicional |
Registre los valores antes y después. Si el mismo código regresa, no reemplace piezas repetidamente. Reabra la ruta de prueba original, verifique la posición física y compruebe si se pasó por alto un circuito compartido o una condición del sistema no resuelta.
Escenario compuesto: el reemplazo no repara la falta de potencia del calentador
Escenario de ingeniería compuesto: Un código de calentador de sensor aguas abajo lleva a un reemplazo inmediato del sensor. El código regresa porque un arnés dañado había abierto la alimentación protegida. Una prueba de circuito cargado, la reparación del arnés y el restablecimiento de la ruta segura de calor corrigen la condición. Este escenario combina patrones de diagnóstico comunes; no es un caso de cliente ni una prueba de producto de Sunhyings.
Investigue la contaminación y la falla repetida
Un sensor retirado puede contener evidencia de otro problema del sistema. Hollín abundante puede acompañar a una operación rica o fallo de encendido; depósitos aceitosos pueden indicar consumo de aceite; depósitos relacionados con refrigerante pueden indicar una fuga interna; productos de silicona inadecuados pueden envenenar algunos elementos sensores. La apariencia por sí sola no es un diagnóstico completo, pero reemplazar un sensor contaminado sin encontrar la fuente puede exponer la pieza nueva y el catalizador a la misma condición.
Documente los depósitos con fotos claras, revise el consumo de aceite y refrigerante, inspeccione el funcionamiento del combustible y encendido y siga el procedimiento del vehículo. No limpie un elemento sensor con solventes o abrasivos a menos que el fabricante proporcione explícitamente dicho método. La mayoría de los intentos de limpieza en campo no pueden restaurar una respuesta calibrada y pueden crear un comportamiento engañoso a corto plazo.
Elabore un plan de trabajo de reemplazo antes de aflojar el sensor
Un plan de reemplazo de alta calidad identifica por qué se cambia la pieza, dónde está instalada, cómo se creará el acceso, qué podría dañarse durante la extracción y cómo se verificará la reparación. Esto evita la situación común en la que el sensor viejo se retira antes de que se haya reconciliado el nuevo conector, la longitud del cable o la tecnología.
| Elemento de planificación | Información requerida | Por qué cambia el costo o el riesgo |
|---|---|---|
| Base de diagnóstico | Prueba de circuito o respuesta fallida y causas competidoras verificadas | Un diagnóstico erróneo genera mano de obra repetida y puede dañar el catalizador |
| Posición exacta | Banco, número de sensor y ubicación en el flujo de escape | El acceso y la identificación de la pieza pueden diferir en el mismo vehículo |
| Tecnología de sensores | Sistema de banda estrecha, titania o banda ancha/A/F | Controla la compatibilidad eléctrica y el método de verificación |
| Método de acceso | Puntos de elevación, protectores, bandejas inferiores y componentes cercanos | La mano de obra y la seguridad dependen del acceso real |
| Estado de corrosión | Condición de la rosca, tapón, colector y escape circundante | Las roscas agarrotadas pueden convertir el reemplazo en una reparación del escape |
| Ruta del arnés | Ubicación del conector, clips, espacio libre para el calor y movimiento | Un cable de longitud incorrecta puede fundirse, estirarse o entrar en contacto con piezas móviles |
| Monitoreo posterior a la reparación | Condiciones de funcionamiento requeridas y proceso de verificación legal | Los códigos borrados por sí solos no establecen una reparación exitosa |
Un modelo de costos útil tiene más que pieza y mano de obra
Los rangos de precios publicados son amplios porque combinan diferentes vehículos, posiciones, tecnologías de sensores, mercados laborales y alcances de reparación. Un sensor de banda ancha aguas arriba de ajuste directo en un compartimento del motor restringido no es el mismo trabajo que un sensor de banda estrecha aguas abajo accesible. En lugar de presentar un total universal, compare estimaciones utilizando el mismo alcance.
| Componente de costo | Preguntas para hacer | Advertencia de riesgo excluido |
|---|---|---|
| Diagnóstico | ¿Qué pruebas respaldan la sustitución y están documentados los resultados? | Una lectura de código gratuita no es un diagnóstico completo |
| Pieza de repuesto | ¿Qué referencia OE, posición, tecnología y base de garantía? | “El ”sensor de O2' no define la pieza |
| Mano de obra de acceso | ¿Están incluidas las protecciones, bandejas inferiores o desmontajes específicos de la aplicación? | La estimación baja puede asumir acceso ideal |
| Contingencia por corrosión | ¿Cómo se manejan las roscas agarrotadas o un tapón dañado? | Ningún taller puede garantizar que todo sensor corroído se libere limpiamente |
| Reparación relacionada | ¿El cableado, las fugas de escape o las fallas de causa raíz son independientes? | Un reemplazo de sensor no puede reparar esas condiciones |
| Verificación | ¿Se incluyen datos en vivo, verificación de fugas y finalización del monitor? | Apagar la luz no es lo mismo que pasar el monitor |
| Impuestos y logística | ¿Están incluidos los impuestos, el flete, el servicio móvil o la recuperación del vehículo? | El precio de la pieza en línea rara vez representa el costo total del trabajo |
Inspeccione el reemplazo antes de que la pieza vieja se convierta en la plantilla
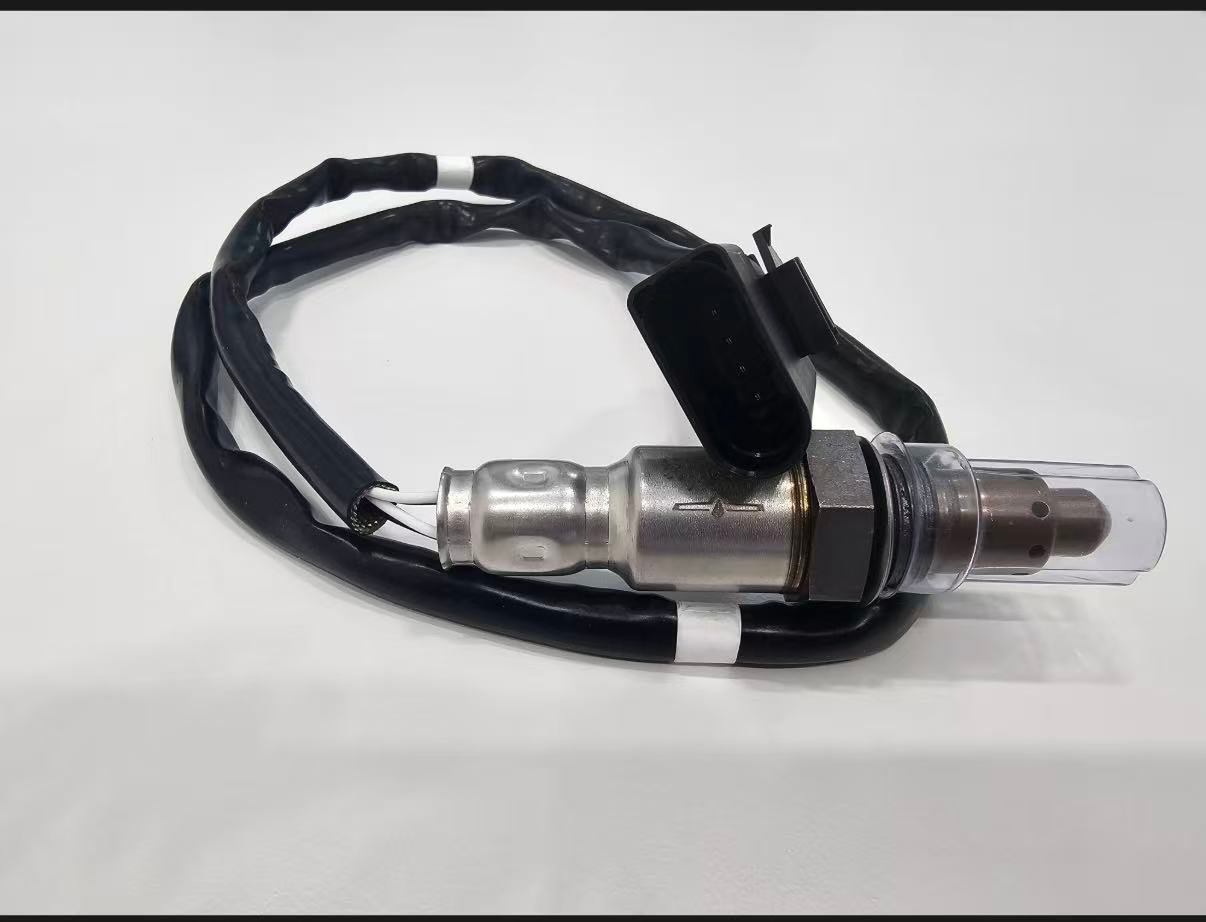
Mantenga ambas piezas limpias y compárelas antes de la instalación. Use el registro de aplicación verificado como autoridad, luego use la comparación física para detectar un conflicto de catálogo o empaque. No asuma que un sensor nuevo es correcto porque la rosca comienza o la carcasa del conector se ve similar.
| Característica | Comparación | Condición de rechazo o parada |
|---|---|---|
| Identidad de la pieza y la etiqueta | Pieza del proveedor, referencia OE candidata, revisión y paquete | Pieza suelta sin marcar o conflicto de etiqueta |
| Tecnología de detección | Catálogo y especificación eléctrica | Seleccionado solo por número de hilos o apariencia |
| Rosca y asiento | Diámetro, paso, asiento e interfaz instalada | Resistencia, hombro incorrecto o desajuste de sellado |
| Geometría del blindaje | Longitud, aberturas y espacio libre | Contacto con escape o conflicto de aplicación |
| Conector | Carcasa, llaves, cerradura, pasadores y disposición de terminales | Enganche forzado, llaves alteradas o conflicto de pasadores |
| Cable | Longitud, aislamiento, alivio de tensión y clips | Estiramiento, bucle sin soporte o interferencia por calor/movimiento |
| Tratamiento de rosca | Instrucciones del producto y estado de suministro | Añadir compuesto contrario a las instrucciones o contaminar el blindaje |
Secuencia de desmontaje y puntos de decisión
- Conservar evidencia. Registrar códigos, congelar imagen, preparación, datos en vivo y la posición identificada antes de la pérdida de alimentación o borrado.
- Enfriar y soportar. Deje que el escape se enfríe y soporte el vehículo en puntos aprobados con equipo clasificado para el vehículo.
- Desconectar sin tirar del cable. Libere el bloqueo del conector y los clips utilizando el método de servicio. Inspeccione los terminales y anote el enrutamiento.
- Elija acceso controlado. Utilice el zócalo o la llave correcta del sensor y evite la fuerza descontrolada sobre el colector, el catalizador o el soporte.
- Deténgase si la junta cambia. Si el tapón se mueve, las roscas se agarrotan o el escape circundante se agrieta, reevalúe como reparación de escape en lugar de forzar la finalización.
- Inspeccione las pruebas retiradas. Fotografíe los depósitos y compare la identidad, pero no afirme que la apariencia por sí sola demuestre la causa raíz.
- Instale siguiendo las instrucciones exactas. Siga las indicaciones de par y compuesto para roscas del producto o del OEM; aquí no se proporciona un valor universal.
- Restablezca el enrutamiento. Vuelva a colocar cada protector térmico y clip, preserve la protección contra la tensión y verifique el espacio libre durante el movimiento del componente.
La verificación posterior a la instalación es parte del reemplazo
| Paso de verificación | Evidencia de aprobación | Si falla |
|---|---|---|
| Comprobación visual y de fugas | Posición correcta, conector asegurado, clips restaurados y escape sellado | Instalación correcta antes de interpretar los datos |
| Circuito calefactor | Suministro/control especificado y comportamiento de calentamiento plausible | Verificar el circuito del vehículo, el conector y la identidad de la pieza |
| Respuesta del sensor | Respuesta técnicamente correcta en condiciones válidas | Comprobar pieza incorrecta, mezcla no resuelta, fuga o fallo de circuito |
| Control de combustible | Los ajustes y el estado comandado son plausibles para la condición de funcionamiento | Continuar con el diagnóstico de aire, combustible, encendido o mecánico |
| Supervisar la finalización | Ejecuciones de monitoreo aplicables sin que la falla regrese | Revisar la ruta de prueba original; no cambiar piezas repetidamente |
| Revisión de carretera y seguridad | Sin contacto de arnés, ruido de escape o nueva preocupación de manejo | Detener y corregir la instalación física o la falla no resuelta |
Caso de piezas compuestas: familia correcta, posición de escape incorrecta
Escenario de ingeniería compuesto: Un listado en línea agrupa dos sensores bajo un mismo modelo y año. La pieza pedida comparte tamaño de rosca y un conector similar, pero tiene un cable más corto y diferentes ubicaciones de clip. En lugar de extender el cable, el instalador verifica el motor, la configuración de emisiones y la posición del banco/sensor, y descubre que el listado asignó la otra posición de escape. El pedido se corrige antes de la instalación.
El costo evitado no se cuantifica porque no se proporcionaron datos reales de pedidos. La lección de decisión es concreta: el ajuste del catálogo, la interfaz física y la posición exacta deben coincidir. Este es un escenario compuesto, no una afirmación sobre un envío de Sunhyings.
Caso de reparación repetida compuesta: la fuente de contaminación sigue activa
Escenario de ingeniería compuesto: Se reemplaza un sensor de respuesta lenta, pero la nueva pieza desarrolla posteriormente depósitos similares y problemas de respuesta. La revisión encuentra un consumo continuo de refrigerante que no se incluyó en el alcance original de la reparación. La condición del motor se diagnostica y corrige antes de tomar otra decisión sobre el sensor y el catalizador.
Un sensor retirado puede proporcionar una pista, pero el color de los depósitos no es un análisis químico completo. El aceite, el refrigerante, el funcionamiento rico y los selladores inadecuados pueden afectar a los sensores y catalizadores. Documente el consumo y la evidencia del motor, corrija la fuente y siga las instrucciones de servicio. Este escenario es compuesto y no implica un intervalo de falla universal.
Registre la reparación para que se pueda investigar una reclamación futura
- VIN o YMME completo, configuración de motor y emisiones utilizada para la selección
- Posición exacta del banco/sensor y base de referencia cruzada verificada OE o controlada
- Número de pieza del proveedor, etiqueta del paquete, lote/fecha y registro de compra
- Códigos, congelación de trama y pruebas de diagnóstico antes del reemplazo
- Fotografías del conector, pieza antigua, pieza nueva y ruta instalada
- Fuente de par/tratamiento de rosca y cualquier complicación de acceso o rosca
- Circuito posterior a la reparación, respuesta, control de combustible y resultados de monitoreo
Decisión de reemplazo de ajuste directo versus universal
Un sensor de ajuste directo incluye un conector de aplicación y debe seleccionarse según datos de aplicación verificados. No corte su arnés para superar un conector o longitud de cable incorrectos. Un sensor universal requiere un método aprobado por el fabricante para identificar y unir los circuitos correctos, preservando el sellado ambiental y la resistencia al calor. Universal no significa que una calibración o distribución de pines se adapte a todos los vehículos.
| Área de decisión | Ruta de ajuste directo | Ruta universal | Condición de parada |
|---|---|---|---|
| Prueba de aplicación | Coincidencia de catálogo actual para vehículo y posición exacta | Tecnología verificada y compatibilidad de circuito | Solo se conoce el número de hilos o la rosca |
| Conector | Conector con llave suministrado que acopla sin modificación | Instrucciones aprobadas de terminación o transferencia de conector | Llave forzada, distribución de pines adivinada o unión retorcida/encintada |
| Cable conductor | Provisión de longitud correcta y enrutamiento de estilo original | Longitud y aislamiento adecuados para la ruta aprobada | Plomo estirado o sin soporte cerca del escape/movimiento |
| Registro de instalación | Registro de pieza y aplicación | Registro de pieza, mapa de circuito, método de empalme y sellado | Sin fuente de instrucción trazable |
| Verificación reglamentaria | Función de emisiones diseñada conservada | Función diseñada conservada según las reglas aplicables | Cualquier derivación, simulador o anulación del monitor |
Analice un código repetido sin asumir que la pieza nueva falló
Si el mismo código vuelve a aparecer, compare las pruebas de antes y después. Un retorno inmediato del circuito del calentador apunta más hacia un circuito no resuelto, una pieza incorrecta o un problema de conector que hacia el envejecimiento normal del sensor. Un código de respuesta o de mezcla que solo vuelve a aparecer bajo cierta carga puede requerir nuevas pruebas de fugas, combustible o motor. Un código diferente puede indicar una condición cambiada en lugar de la misma falla de reparación.
| Patrón de retorno | Primera revisión | Evidencia del producto a conservar |
|---|---|---|
| El código regresa inmediatamente al encender o en frío | Identidad de la pieza, distribución de pines, circuito abierto/corto y circuito del calentador | Fotos del paquete, lote, resistencia/corriente y conector |
| El código regresa solo en caliente | Movimiento del arnés relacionado con el calor, fuga de escape y comportamiento del circuito | Lecturas de ruta instalada, holgura y condición en caliente |
| La queja de control de combustible persiste | Diagnóstico original de aire/combustible/encendido/mecánico | Datos de respuesta y ajustes de combustible antes/después |
| Aparece un nuevo código de catalizador | Ruta de mezcla, fallo de encendido, contaminación, escape y catalizador | Identidad correcta de la pieza y posición aguas arriba/aguas abajo |
| Daño físico o plomo fundido | Recorrido, abrazaderas, movimiento del escape y longitud de aplicación | Fotos completas de la instalación, no solo de la sección dañada |
El reemplazo debe preservar el monitoreo de emisiones
La sustitución de un sensor no está completa si el arnés se altera para ocultar una señal, el sensor se saca del flujo de escape o se utiliza software para desactivar el monitor. Los espaciadores, anuladores, simuladores y eliminadores pueden enmascarar la evidencia sin corregir el motor, el circuito o el catalizador y pueden violar la ley de emisiones. Utilice una pieza legal y restaure la configuración diseñada.
No prometa que un solo sensor hará que un vehículo pase la inspección. El resultado de la inspección depende del vehículo completo, la preparación, la normativa aplicable y el procedimiento de prueba. La promesa defendible es más limitada: suministre la identidad verificada de la pieza, instálela correctamente, corrija la causa raíz diagnosticada y documente la verificación a nivel de monitor.
Tres alcances de estimación que no deben compararse como el mismo trabajo
Los ejemplos a continuación son comparaciones de alcance, no cotizaciones de precios ni registros de servicio de Sunhyings. Muestran por qué un precio de sensor en línea no se puede convertir en un costo de instalación confiable.
Reemplazo directo accesible aguas abajo
El diagnóstico identifica un elemento calefactor abierto dentro del sensor aguas abajo exacto después de que las comprobaciones de suministro y control cargado pasen. El conector y el orificio son accesibles, la corrosión es limitada y el reemplazo es una pieza de ajuste directo verificada. La estimación puede ser limitada, pero aún debe incluir soporte seguro, restauración del recorrido, inspección de fugas y verificación del calefactor/monitor.
Reemplazo restringido de banda ancha aguas arriba
El sensor de relación aire-combustible aguas arriba se encuentra detrás de protectores con acceso limitado al conector. El diagnóstico requiere datos específicos de la tecnología, y el acceso puede requerir la extracción de componentes definidos por la aplicación. El precio de la pieza, el tiempo de diagnóstico y la mano de obra de acceso pueden diferir del trabajo aguas abajo incluso en el mismo vehículo. Una suposición genérica de “sensor de O2 de una hora” no es evidencia.
Sensor corroído con riesgo en el bung
El sensor y el escape circundante muestran corrosión severa. El taller define qué incluye la extracción de rutina y qué sucede si las roscas se pelan, el bung se mueve o el escape se agrieta. Esta contingencia no es un cargo automático; es una rama divulgada en el alcance del trabajo. Autorizar la rama antes de aplicar fuerza no controlada protege a ambas partes.
Lo que un comprador profesional debe solicitar a la fuente de reemplazo
| Capa de evidencia | Registro útil | Afirma que respalda | Afirma que no respalda por sí solo |
|---|---|---|---|
| Datos de aplicación | Mapeo controlado de OE/YMME/motor/emisiones/posición con revisión | Base de selección de catálogo | Diagnóstico del vehículo o intercambiabilidad universal |
| Identidad del producto | Dibujo/especificación para tecnología, conector, cable, rosca y blindaje | Interfaz de reemplazo definida | Rendimiento en cada vehículo referenciado |
| Validación | Resultados eléctricos, de respuesta, térmicos, de vibración y de sellado definidos | Características probadas para muestras identificadas | Toda producción futura sin control de cambios |
| Control de producción | Plan de inspección, pruebas de fin de línea y registros de medición | Cómo se controlan las características especificadas | Cero defectos o una tasa de fallos inventada |
| Trazabilidad | Vinculación de revisión de pieza, lote/fecha y envío | Capacidad para investigar una reclamación | Causa de una queja de campo sin evidencia del vehículo |
| Certificado de calidad | Emisor, entidad legal, sitio, alcance, norma y validez | Alcance del sistema de gestión indicado en el certificado | Aprobación de pieza, relación OEM o ajuste exacto |
Sunhyings puede revisar la OE/aplicación presentada, la posición, la cantidad y los requisitos de aprobación para evaluar la viabilidad de abastecimiento. La disponibilidad exacta, el ajuste, el precio, el MOQ, el plazo de entrega y la certificación siguen siendo específicos del proyecto hasta que se confirmen. Este límite permite que la página respalde una consulta comercial sin convertir la evidencia interna del proveedor en una promesa pública sin respaldo.
Prepare una solicitud de ajuste o abastecimiento
Envíe el número OE, año/marca/modelo, detalles del motor o VIN, mercado y paquete de emisiones, posición exacta del banco/sensor, fotos del conector y de la pieza antigua, cantidad y cualquier requisito de embalaje o aprobación. Sunhyings revisará los datos proporcionados para determinar la capacidad y viabilidad de abastecimiento; el ajuste no se confirma hasta que se coteje la evidencia de aplicación.
Preguntas frecuentes
¿Cuánto cuesta reemplazar el sensor de oxígeno?
El total depende del sensor exacto, la tecnología, el acceso, la corrosión, el diagnóstico, la mano de obra local y las fallas relacionadas. Obtenga un presupuesto vinculado al vehículo y la posición del sensor.
¿Cuánto tiempo se tarda en reemplazar un sensor de O2?
El acceso y la corrosión generan grandes diferencias. Incluya el diagnóstico y la verificación posterior a la reparación en lugar de comparar únicamente el tiempo de eliminación.
¿Necesito desconectar la batería?
Siga el procedimiento de servicio del vehículo. Los requisitos varían, y desconectar la alimentación puede borrar valores aprendidos o requerir otros procedimientos de reinicio.
¿Se debe aplicar antiagarrotamiento a un sensor nuevo?
Siga las instrucciones del sensor y del vehículo. Muchos sensores nuevos llegan con roscas tratadas, y el exceso de compuesto puede contaminar el elemento sensor.
¿La luz de verificación del motor se apagará inmediatamente?
No siempre. La falla debe corregirse y el monitor debe funcionar en las condiciones requeridas. Borrar un código por sí solo no verifica la reparación.