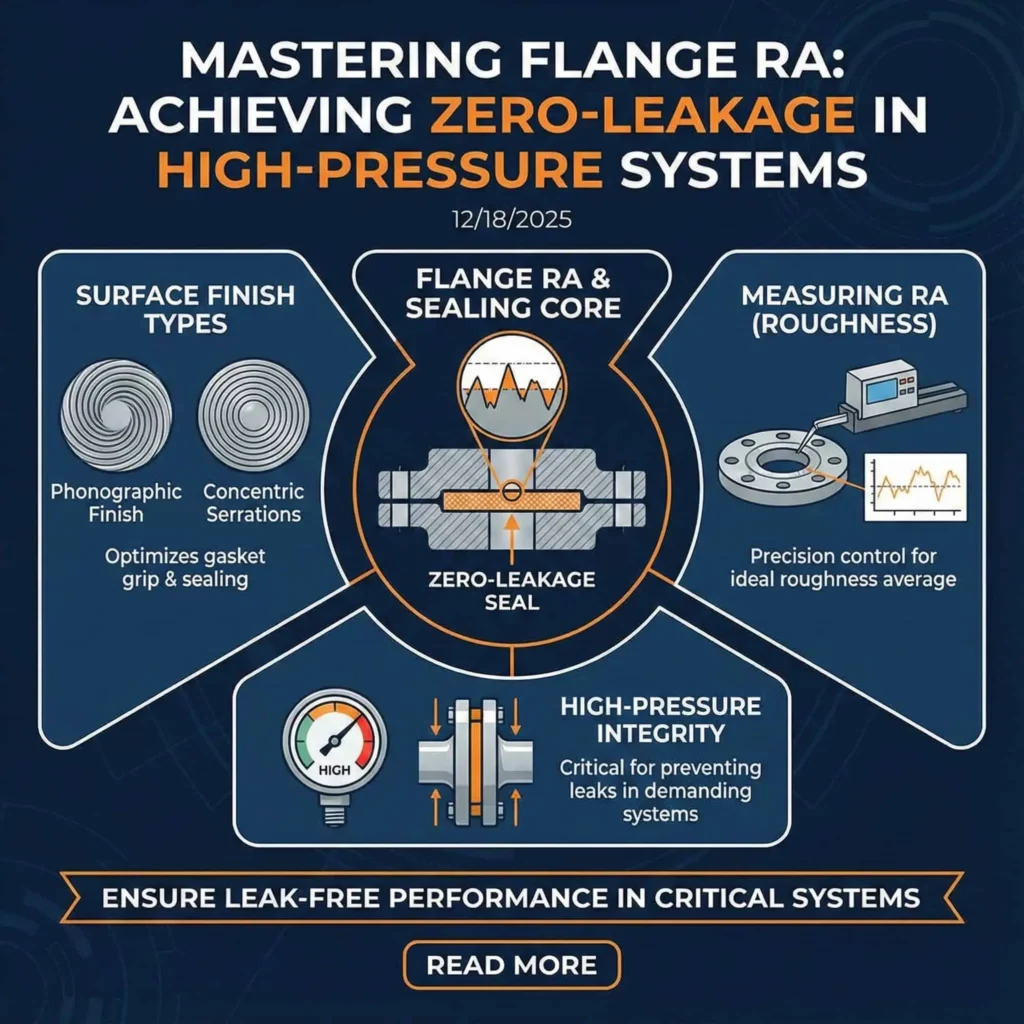
Flange surface finish is one of the most important controls in gasket sealing.
When engineers discuss flange face finish, they are usually talking about roughness values such as Ra, the serration pattern on the sealing band, and whether the face condition matches the gasket type and assembly method. In real piping systems, leakage is rarely caused by one factor alone. It usually happens when surface finish, gasket construction, and bolt preload do not work together under pressure, temperature cycling, and vibration.
For many ASME raised-face flanges using spiral-wound gaskets, a common working range is around Ra 3.2–6.3 µm (125–250 µin AARH). For many RTJ applications, the finish is usually tighter, often around Ra 1.6–3.2 µm (63–125 µin), although the final requirement depends on the ring style, groove condition, material, and service severity. If you are also reviewing the joint as a whole, it helps to cross-check what the function of a flange is before locking the sealing specification.
Two practical rules used in the field:
- Flange roughness controls “bite” versus “leak path.” Too rough can leave valleys that behave like micro-leakage channels. Too smooth can reduce gasket grip and make creep or slip more likely during thermal cycling.
- Ra is not the whole story. Lay direction, waviness, flatness, corrosion pitting, and handling damage often decide whether a joint seals, even when the measured Ra is technically within range.
Adequate contact pressure is essential for sealing because it plastically deforms the real contact points at the interface and blocks micro leakage paths. That is why face finish and bolt preload must be treated together, not as separate checks.
In high-pressure systems, leak-tight performance comes from the full combination of flange face finish, gasket choice, lubrication practice, tightening pattern, and verification—not from Ra alone.
Engineers rely on correct flange face finish to keep joints tight under real loads: pressure, thermal cycling, vibration, handling damage, and corrosion exposure.
Flange Surface Finish and Leak-Proof Pipeline Connections
What Is Flange Surface Finish and Ra?
Flange surface finish describes the texture of the sealing face, and Ra is one of the most common numbers used to quantify that texture.
Ra is the arithmetic mean of absolute profile height deviations from the mean line over a defined evaluation length. In flange engineering, Ra is used as a practical control value for the gasket contact band, especially on RF, FF, and RTJ sealing surfaces. It helps indicate whether the face is rough enough for gasket bite but not so rough that it creates leakage channels.
Engineering note: Measurement conditions matter. If the drawing, PO, or inspection report does not specify the standard, cutoff, filter, and evaluation method, the same flange face can be reported differently by different instruments or inspectors. In practice, many legacy drawings still use ISO 4287/4288 terminology, while newer surface texture requirements may reference updated ISO methods.
| Term | Definition |
|---|---|
| Ra | The arithmetic mean of the absolute values of the profile height deviations from the mean line, commonly used to define flange face roughness in sealing applications. |
How Flange Surface Roughness Affects Gasket Sealing
Flange roughness directly affects whether a gasket seals or leaks.
- Surface finish guidance for sealing surfaces explains why both over-rough and over-smooth faces can fail in service.
- Too rough: high peaks prevent stable gasket contact, and deep valleys can become micro-leakage channels.
- Too smooth: reduced friction and insufficient bite can promote gasket creep, slip, extrusion, or blow-out under pressure or thermal cycling.
- Ra plus Rz is a better control pair: Ra reflects average texture, while Rz highlights extreme peaks and valleys that often drive real leak paths.
- Lay direction matters: radial scratches that cut across the gasket contact path are a common root cause even when the average Ra passes.
- Gasket compliance matters: softer gaskets can conform to rougher faces, while semi-metallic and metallic gasket systems usually need tighter face control and cleaner sealing bands.

| Observed condition | What you see on-site | Common outcome | Corrective action |
|---|---|---|---|
| Over-rough face | Visible tool marks, pitting, high Rz | Weep or leak at hydrotest; unstable preload response | Re-face or lap to spec, replace gasket, and verify bolt-up method |
| Over-smooth face | Mirror-like finish, low friction | Gasket slip, creep relaxation, blow-out risk | Restore controlled serration and confirm gasket type |
| Wrong lay or scratches | Radial scratches across gasket line | Leak path even when Ra is technically “in range” | Blend, re-machine, or replace and protect the face during handling |
Typical Flange Face Finish for RF, FF, and RTJ Flanges
Typical flange face finish ranges depend on the flange type, gasket type, and service severity.
The values below are common engineering ranges used in practice. Final acceptance should always match the project standard, gasket manufacturer recommendation, and service conditions.
| Flange Face Type | Typical Ra Range (µin) | Typical Ra Range (µm) |
|---|---|---|
| Raised Face (RF) | 125 – 250 | 3.2 – 6.3 |
| Flat Face (FF) | 125 – 250 | 3.2 – 6.3 |
| Ring Type Joint (RTJ) | 63 – 125 | 1.6 – 3.2 |
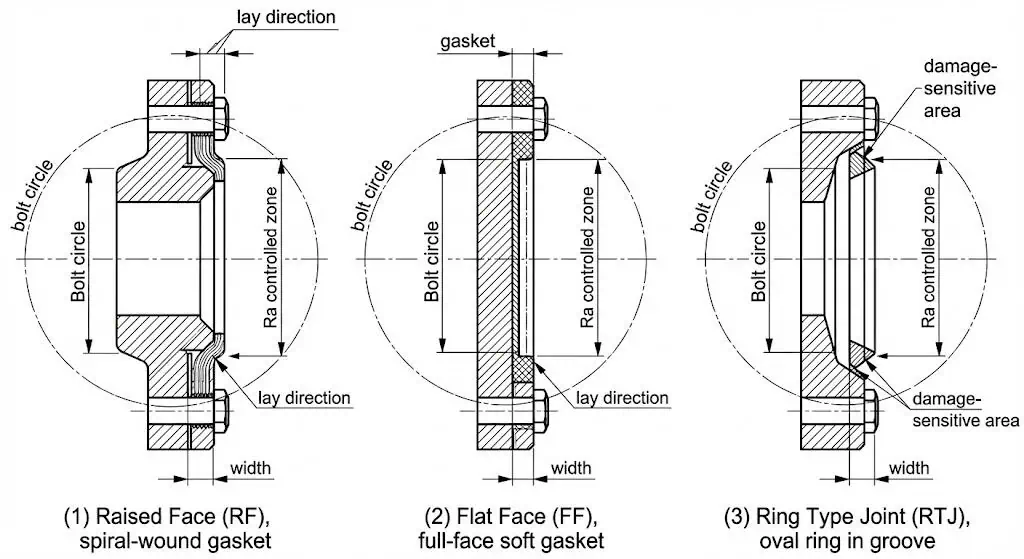
These values are only meaningful when paired with the correct gasket construction, face lay, face condition, and controlled assembly procedure. If gasket selection is part of the problem, it is worth reviewing common causes of flange leakage together with the face finish data.
Common Leakage Problems Caused by Incorrect Flange Finish
Incorrect flange face finish is a common cause of sealing failure in both new and repaired joints.
- Too rough a face creates valleys that behave like leak paths and reduces the effective gasket contact area.
- Overly smooth surfaces can reduce gasket grip and increase creep relaxation or blow-out risk under pressure and temperature cycling.
- Inconsistent finish or mixed lay across one face can create uneven torque response and uneven gasket compression.
Tip: Always verify flange face finish and face condition during incoming inspection and again before assembly, especially after blasting, storage, coating, or field repair.
Field case: A Class 600 RF joint passed dimensional checks but leaked during hydrotest. Profilometer readings showed the face had been over-lapped to below 1.0 µm Ra, and the spiral-wound gasket showed slip marks. The practical fix was to restore a controlled serrated finish within the project range, replace the gasket, lubricate the fasteners correctly, and re-tighten in a documented multi-pass cross pattern.
Flange Surface Finish Standards and Specification
Standards That Define Flange Face Finish
Flange standards define the flange type and joint basis, while surface texture standards define how finish is measured and reported.
For sealing work, the most useful references usually include flange standards, bolt-up guidance, and surface metrology standards.
- ASME B16.5: Widely used for pipe flange types, pressure classes, and basic facing expectations.
- ASME PCC-1: Practical guidance for bolted flange joint assembly, preload consistency, and joint integrity.
- EN 1092-1: Common European flange standard, often used with EN-based procurement and inspection documents.
- ASME B46.1: Defines surface texture terminology and parameters such as Ra.
Standards tell you what to specify and how to inspect. Leak-tight performance still depends on using the correct gasket and controlling assembly in the field.
Recommended Flange Finish for RF, FF, and RTJ Applications
Each flange face style has a roughness range that supports stable gasket or ring contact.
The table below summarizes common working ranges used in engineering practice:
| Flange Face Type | Ra Range (µin) | Ra Range (µm) | Typical Application |
|---|---|---|---|
| Raised Face (RF) | 125–250 | 3.2–6.3 | General process service with gasketed joints |
| Flat Face (FF) | 125–250 | 3.2–6.3 | Lower-pressure service, often with full-face gaskets |
| Ring Type Joint (RTJ) | 63–125 | 1.6–3.2 | High-pressure, high-integrity ring-seal joints |
These values support predictable gasket seating and torque-to-tension response only when the sealing band is free of damage, waviness, corrosion pitting, and wrong lay direction.
How to Specify Flange Face Finish on Drawings and Purchase Orders
A good flange face finish specification must say more than “stock finish.”
To avoid supply-chain disputes, drawings, datasheets, and purchase orders should all use the same finish language. That normally includes face type, lay type, roughness range, and the standard basis.
Flange Face Finish: Spiral serrated (phonographic) finish, Ra 125–250 µin (3.2–6.3 µm),
per ASME B16.5; assembly per ASME PCC-1.
If the project also needs serration geometry or additional controls, state them directly:
Optional (if required): Lay type, serration pitch/depth, Rz limit, measurement direction,
minimum 3 readings in the gasket contact band per flange face.
Tip: Put the same flange finish language on the drawing, datasheet, and PO. Many leakage disputes begin because one document says “stock finish” while another expects a specific AARH range.
How to Measure Flange Surface Finish in Practice
Ra, Rz, and Other Roughness Parameters Explained
Ra and Rz are both useful, but they tell you different things about the sealing face.
Ra reflects the average texture. Rz is more sensitive to extreme peaks and valleys, which often correlate better with scratches, pits, chatter marks, or localized damage that creates leak paths. For sealing work, a face that “passes Ra” can still fail if Rz, waviness, or radial damage is not controlled.
| Parameter | Definition | Measurement Method | Application |
|---|---|---|---|
| Ra | Average roughness of a surface | Overall average of surface asperities | General roughness control |
| Rz | Height difference between major peaks and valleys | Sensitive to extremes in the profile | Flags potential leak-driving defects |
- For gasket sealing: Ra helps control the general sealing texture, while Rz helps catch extreme face damage that average values may hide.
- For coatings or overlays: roughness affects both adhesion and gasket contact behavior, so finish requirements may need to be tightened.
Measurement Tools and Setups for Flange Faces
Use the right instrument setup if you want surface-finish data you can trust.
Portable roughness testers, stylus profilometers, and optical systems are commonly used to inspect flange faces. For repeatable results, clean the sealing band, use consistent cutoff and filter settings, measure in the correct direction relative to the groove lay, and record multiple readings around the gasket contact band.
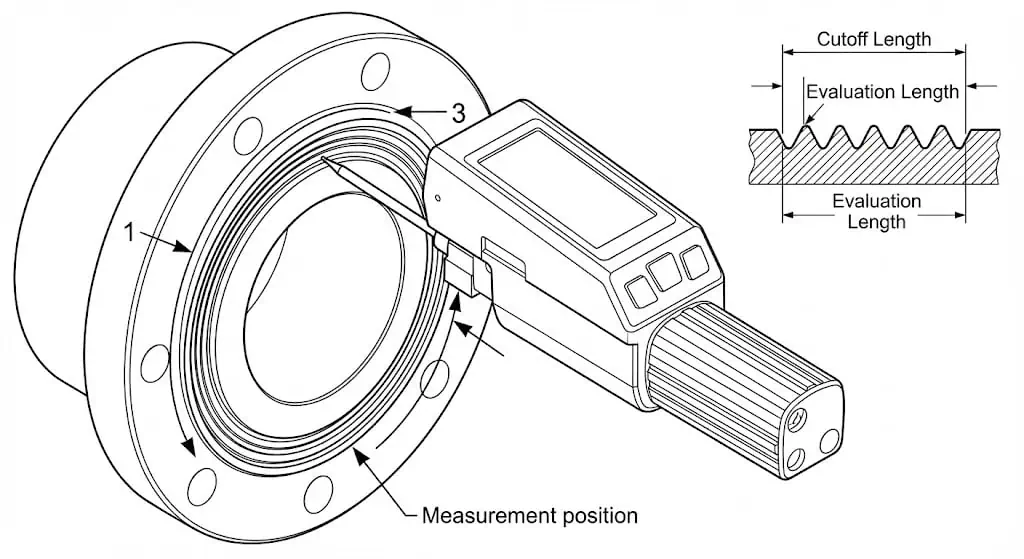
Tip: Measure at several points around the sealing band, not just one easy location. Handling damage often appears at localized positions and does not always show up in a single reading.
Sampling Plans, Inspection Frequency, and Acceptance Criteria
Inspection frequency should match the sealing risk of the service.
Higher pressure class, cyclic duty, corrosive service, and critical hydrocarbon systems all justify tighter inspection control. In ordinary shop flow, first-piece, last-piece, and random sample checks may be enough. In critical service, many buyers require 100 percent verification of the sealing face or ring groove condition.
- Record the instrument type, measurement settings, direction, and locations.
- Define what happens if a reading is out of range, including segregation, rework, and re-test.
Field case: One flange batch passed Ra on average, but several pieces showed high Rz caused by tool-insert chatter. The joints leaked during commissioning. The fix was to add an Rz control limit, enforce tool-life replacement, and measure a minimum of three positions in the sealing band on each critical flange.
Controlling Flange Face Finish in Manufacturing
Machining and Finishing Processes That Set the Final Surface Finish
The final sealing performance starts with how the flange face is machined.
Controlled facing operations produce spiral or concentric serrations in the gasket band. Grinding or lapping may be used for special sealing conditions, but over-finishing is a known failure mode if it removes the intended sealing texture and reduces gasket bite.
- Turning or facing creates the intended serration lay in the sealing band.
- Feed rate, tool geometry, and tool wear strongly influence Ra and Rz consistency.
- Light lapping may remove minor damage, but should not erase the required finish unless the sealing design specifically calls for it.
| Finish Type | Roughness (Ra) | Application/Notes |
|---|---|---|
| Serrated finish (spiral or concentric) | 125 – 500 µin (≈ 3.2 – 12.7 µm) | Common for gasketed joints; exact range depends on gasket type and service |
| Controlled smooth finish | 125 – 250 µin (≈ 3.2 – 6.3 µm) | Often used for many RF joints with spiral-wound gaskets |
| RTJ seating surface | 63 – 125 µin (≈ 1.6 – 3.2 µm) | High-integrity joints; ring groove damage control is critical |
A good finish is not “the smoothest possible finish.” It is the finish that creates stable gasket seating and preload retention for the actual service.
Achieving Consistent Finish Across Batches and Sizes
Consistent flange finish across batches depends on process control, inspection, and face protection.
Tool wear, feed consistency, handling damage, and packaging all affect the sealing band. Many leakage problems blamed on gasket quality are actually face-condition changes that happened after machining.
- Verify the lay direction and inspect for cross-scratches in the sealing band.
- Use face covers and proper packaging during storage and shipment.
- Specify flatness tolerance separately where the project requires it.
| Key Aspect | Details |
|---|---|
| Surface Finish Requirements | The sealing band must meet the specified Ra range and any additional Rz requirement. |
| Face Protection | Protect serrations from impact, abrasion, corrosion, and contamination. |
| Quality Control Measures | Combine dimensional checks, surface-finish verification, and visual damage inspection. |
| Testing Procedures | Apply project-specific testing such as PMI, NDE, or hydrotest per the ITP. |
MTRs, Inspection Records, and Third-Party Verification
Good documentation helps prove that the delivered flange matches both the material specification and the sealing-face requirement.
MTRs should trace the heat or lot and confirm chemistry and mechanical properties against the specified forging or material standard. For critical service, third-party inspection can also verify the sealing-face readings, ring groove condition, marking, and packing protection.
If traceability is part of your approval process, it is useful to review how to interpret a flange material certificate together with the surface-finish report.
Tip: For critical service, request a face roughness report with measurement locations and settings, plus photos showing face protection at packing.
Flange Sealing Techniques for Leak-Tight Performance
Matching Gasket Type to Flange Face Finish
The gasket must match the flange face finish if you want stable sealing performance.
The same flange finish will not behave the same way with every gasket. Semi-metallic and metallic gasket systems generally demand better face condition and more disciplined preload control. Softer gaskets can tolerate a broader range, but they still fail when the face is damaged, pitted, or assembled under poor alignment.
- The face finish directly affects how well the gasket seats and holds preload.
- Metallic and semi-metallic gasketed joints generally need tighter face-condition control.
- Nonmetallic gaskets can tolerate more roughness variation, but they still fail if the sealing band is damaged or contaminated.
- Always check the gasket manufacturer’s finish and seating-stress recommendations before freezing the specification.
Field case: A low-pressure FF joint leaked intermittently after thermal cycling. The flange face had light corrosion pitting that raised Rz, and the gasket had been reused. The practical fix was to replace the gasket, repair or re-face the sealing band, protect the flange during shutdown storage, and re-check preload after the first thermal cycle if the site procedure allowed it.
Bolt Torque, Lubrication, and Tightening Patterns
Correct flange finish does not help much if the preload is inconsistent.
Lubrication, tightening sequence, and verification strongly affect how much of the applied torque turns into useful bolt load. Mixed lubricants, dirty threads, or one-pass tightening can easily create large preload scatter.
| Recommendation | Description |
|---|---|
| Torque Sequence | Use a controlled multi-pass approach such as 30%, 60%, and 100% with a cross pattern and final circular pass. |
| Surface Finish | Keep the flange finish within the gasket-appropriate roughness range and protect the sealing band from damage. |
| Lubrication | Use a compatible lubricant on threads and nut-bearing surfaces to reduce friction scatter and improve preload repeatability. |
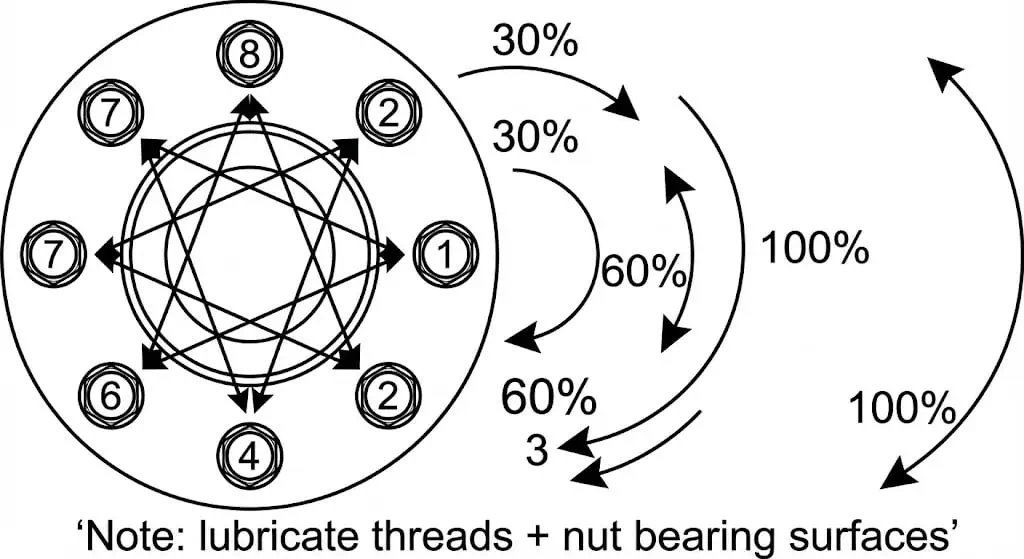
- Guidance such as ASME PCC-1 is commonly used to standardize bolted-joint assembly practices.
- Lubrication affects torque-to-tension conversion directly. Changing lubricant without changing the procedure can change preload significantly.
Assembly Best Practices for High-Pressure Flange Joints
Leak-tight performance depends on disciplined assembly from start to finish.
- Train assembly personnel on gasket handling, face inspection, lubrication practice, and tightening verification.
- Clean flange faces and fasteners thoroughly. Remove paint, corrosion products, debris, and gasket residue from the sealing band.
- Align flanges correctly before tightening. Do not use bolt-up to force piping into position.
- Use calibrated tools and documented tightening sequences.
- Test the joint appropriately before commissioning and investigate any weeping immediately.
Common Installation and Handling Errors to Avoid
Many sealing failures are really handling or assembly failures.
| Error Type | Description |
|---|---|
| Improper Gasket Selection | Wrong gasket type or a reused gasket compromises sealing and preload stability. |
| Inadequate Surface Prep | Dirty, painted, corroded, or scratched faces create leak paths. |
| Misalignment | Off-center flanges introduce bending loads and uneven gasket compression. |
| Incorrect Torque Application | Uncontrolled friction or single-pass tightening causes preload scatter. |
| Incompatible Materials | Corrosion, galling, or thermal mismatch can damage the joint over time. |
- Corrosion pitting and contamination are frequent leak drivers and often show up as high Rz or obvious face damage.
- Using the correct gasket and protecting the sealing band are both essential for reliable sealing.
Troubleshooting Flange Finish-Related Leaks
How to Diagnose Whether Flange Finish Is the Root Cause
Surface finish should be diagnosed systematically, not guessed.
A reliable troubleshooting sequence separates face-condition problems from preload, gasket, or misalignment problems. Start with the sealing band and the gasket witness marks, then measure the face if finish is suspected.
| Diagnostic Method | Description |
|---|---|
| Visual Inspection | Check the sealing band for scratches, pitting, corrosion, coating damage, and debris imprinting. |
| Surface Roughness Measurement | Measure Ra and, where needed, Rz using multiple locations and consistent settings. |
| Replication Techniques | Create a surface imprint for closer review when scratches or pits are difficult to confirm directly. |
Tip: If the gasket shows uneven crush or burnishing, suspect misalignment or preload scatter first, then confirm face finish with measurement.
Repair Options for Damaged or Over-Rough Flange Faces
Repair strategy depends on how severe the damage is and whether the sealing geometry can still be restored.
Minor face damage may be corrected by in-situ machining or controlled lapping. Severe damage may require weld build-up and re-machining or full replacement. Polymer repair systems may be used in some services if the project and code basis allow them.
- In-situ machining or lapping can reduce downtime when site conditions allow it.
- Weld build-up plus machining may be needed for deeper local damage.
- Full flange replacement may be the safest option if the damage compromises the ring groove or required geometry.
- Remove and replace the flange when repair is not acceptable under the project or code basis.
- Machine the sealing face or RTJ groove back into tolerance.
- Use controlled weld build-up and re-machining where permitted.
- Apply qualified repair materials only when supported by the site procedure and service requirements.
When to Re-Machine, Lap, or Replace the Flange
Re-machine or replace the flange when the sealing band cannot reliably meet the specified finish and condition.
Typical triggers include out-of-range Ra or Rz, radial scratches, corrosion pitting, chatter marks, waviness that affects gasket seating, or RTJ groove damage that cannot be corrected safely in place.
Preventive Maintenance and Re-Inspection Intervals
Flange finish control does not stop at incoming inspection.
Re-inspection intervals should reflect pressure, thermal cycling, media severity, shutdown conditions, and external corrosion environment. Protective covers, dry storage, and good shutdown practices often make the difference between a face that seals and a face that needs repair.
Note: Good finish at purchase does not guarantee good finish at installation. Corrosion, handling, and poor storage often damage the sealing band before assembly.
Practical Flange Finish Checklists and Engineering Tips
Pre-Fabrication Checklist for Engineers and Buyers
A good pre-fabrication checklist reduces leakage risk before the flange ever reaches site.
| Item | Description |
|---|---|
| Face finish report | Ra and, if required, Rz; measurement locations; instrument settings; acceptance basis. |
| Face condition | No radial scratches, pitting, or visible damage in the sealing band; face cover installed. |
| MTR / certificate | Heat or lot traceability; chemistry and mechanical properties per the specified material standard. |
| NDE (if required) | Apply PT, MT, UT, or other project-specific NDE per the ITP. |
| Marking & traceability | Correct stamping or marking tied back to the documentation. |
| Packaging | Sealing faces protected from impact, moisture, and corrosion during shipment and storage. |
Tip: If the PO says only “stock finish,” tighten the requirement before release. A finish range without measurement details is one of the most common sources of quality disputes.
Site Installation and Commissioning Checklist
Good commissioning results begin with good face inspection and controlled assembly.
- Inspect the sealing band for corrosion, coating overspray, impact damage, and contamination.
- Measure Ra and, if required, Rz when the service is critical or the face has been repaired or reworked.
- Clean contact surfaces and verify lubrication is per procedure.
- Install the correct new gasket and confirm it is undamaged.
- Apply controlled multi-pass tightening using the approved sequence.
- Test the joint and investigate any weeping before release to service.
Record the tightening method, lubricant, and verification data. Those details are often the fastest way to resolve a leak investigation later.
Working With SUNHY for Flanges with Controlled Face Finish
Sunhy supports flange supply with controlled face finish, documentation, and traceability for engineering projects.
For critical service, buyers can request face roughness reports, traceable material certificates, protected sealing-face packaging, and third-party inspection support where required. The goal is not “cosmetic smoothness,” but a sealing surface that matches the gasket type and assembly procedure.
Sunhy focuses on controlled, documented flange face finish so the sealing band delivered to site matches the sealing method required by the project.
Mastering flange surface finish improves leak-tight performance in high-pressure systems.
The main engineering controls are straightforward:
- Specify the correct face type, lay type, and roughness range for the gasket and service.
- Inspect for the real leak drivers such as damage, wrong lay, high Rz, torque scatter, and corrosion—not just the average Ra value.
- Control the full system of gasket choice, lubrication, bolt-up method, and verification.
Traceability and measurable quality control support long-term joint reliability.
Material documentation, flange face finish reports, and disciplined assembly are what reduce lifecycle leakage risk in real service.
A practical checklist for leak-tight flange joints includes:
| Checklist Item | Description |
|---|---|
| Clear specification | Face type, lay, roughness range, measurement method, and acceptance locations are all defined. |
| Corrosion protection | Sealing faces are protected in storage and shipment and kept free of moisture and contaminants. |
| Controlled assembly | Use a documented multi-pass tightening procedure with lubrication control and verification. |
Ongoing inspection and disciplined assembly practices based on references such as ASME PCC-1 support repeatable joint integrity and lower leakage risk over the life of the system.
FAQ
What flange surface finish is common for raised-face flanges?
A common range for many raised-face gasketed joints is around Ra 125 to 250 µin, or about 3.2 to 6.3 µm.
That range is widely used for many RF flanges with spiral-wound gaskets, but the final requirement still depends on gasket type, service conditions, and the project standard.
What is the difference between Ra and AARH on a flange face?
Ra is a modern roughness parameter, while AARH is an older flange-finish expression still used in many drawings and specifications.
In flange work, AARH values are often used interchangeably with roughness ranges such as 125 to 250 microinch, but the measurement basis should still be confirmed in the project documents.
How does flange face roughness affect gasket sealing?
If the face is too rough, it can create leak channels. If it is too smooth, the gasket may not develop enough grip and can creep or slip in service.
That is why flange face roughness, gasket type, and bolt preload must be evaluated together rather than separately.
What tools are used to measure flange surface finish?
Portable roughness testers, stylus profilometers, and optical systems are commonly used.
Reliable results require consistent settings, correct traverse direction, and multiple readings across the sealing band.
When should a flange face be re-machined?
Re-machine or replace the flange when the sealing band cannot meet the specified finish or when damage such as scratches, pitting, chatter marks, or groove defects creates likely leak paths.
For RTJ flanges in particular, groove condition and geometry are just as important as the measured roughness value.

