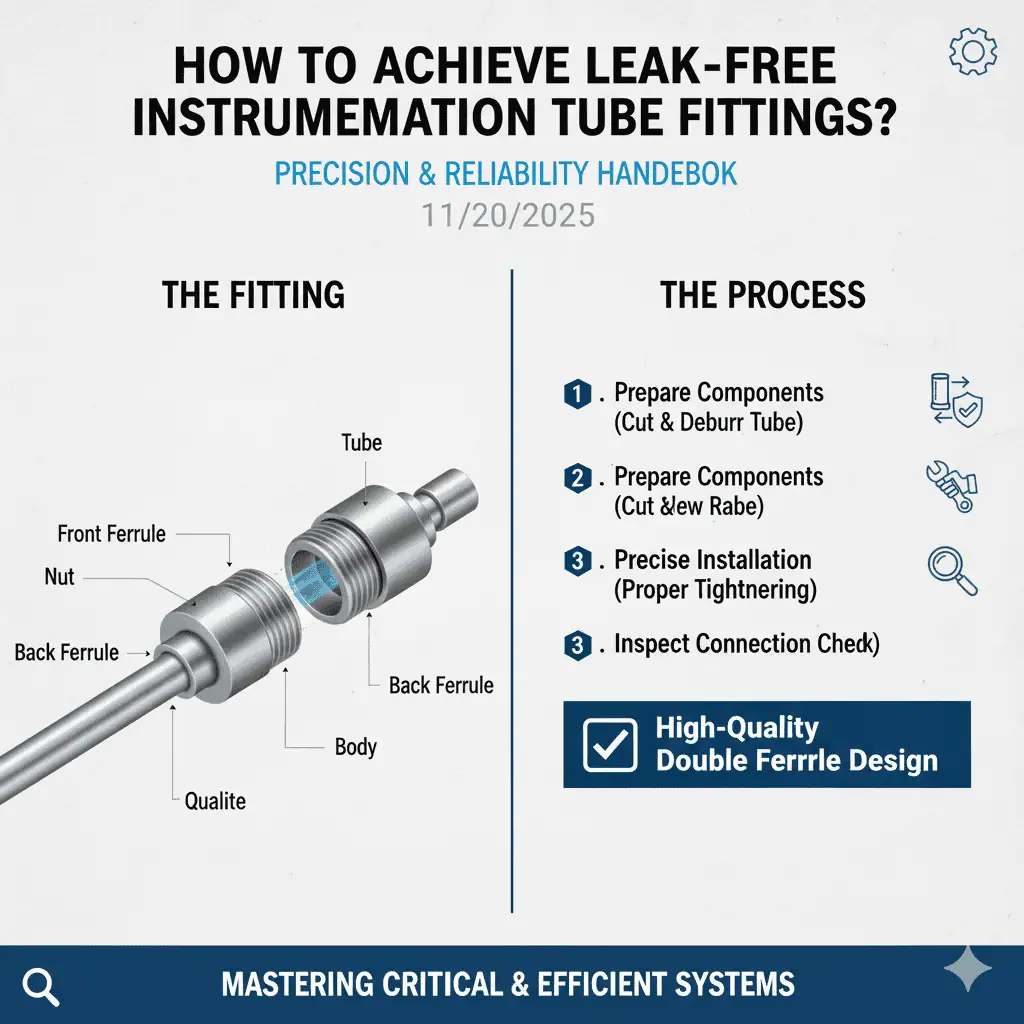
You achieve leak-free instrumentation tube fittings by preparing your components, installing with precision, and inspecting every connection.
Using high-quality instrumentation tube fittings like Sunhy’s double ferrule compression technology ensures reliable performance in critical instrumentation applications. Leaks in instrumentation tube fittings can lead to serious risks, including inconsistent sealing surfaces, overtightening, fatigue failure, and ineffective sealing from tolerance or material issues.
- You prevent problems by following step-by-step guidance for instrumentation tube fittings.
- You protect your instrumentation process and maintain safety when you use proven installation techniques.
- You troubleshoot leaks confidently when you know what to look for in your instrumentation connections.
Preparation for Instrumentation Tube Fittings
Tubing and Fitting Storage
Store tubing and fittings in a clean, dry environment to prevent contamination and damage.
You protect your components from corrosion and physical damage when you keep them in sealed containers or racks. Always separate different materials to avoid unwanted reactions. Sunhy’s double ferrule design and high-pressure rating depend on the integrity of each part, so proper storage is essential.
Tube Cutting and Deburring
Cut and deburr tubing with precision to ensure leak-free connections.
You minimize fluid system failures when you use specialized tools for square, burr-free cuts. Follow these best practices:
- Use a proper tube cutter to make a clean, square cut.
- Deburr both the inner and outer edges with suitable tools.
- Inspect for scratches, nicks, or dents before installation.
- Ensure the tube end is smooth to enhance sealing performance.
These steps help you meet tube fitting specifications and maintain the quality required for Sunhy’s instrumentation tube fittings.
Inspection Before Assembly
Inspect tubing and fittings for cleanliness, damage, and correct specifications before assembly.
You ensure reliable performance when you check material compatibility, wall thickness, and hardness. Follow this checklist:
- Confirm the tubing material matches the fitting and the contained media.
- Make sure the tubing is softer than the fitting for proper sealing.
- Verify wall thickness to handle working pressures.
- Adjust for elevated temperatures if needed.
Before assembly, clean all surfaces thoroughly. Use the following cleaning procedures:
| Step | Procedure Description |
|---|---|
| 1 | Avoid grooving surfaces during cleaning. |
| 2 | Wipe with a clean, lint-free white cloth after abrasion. |
| 3 | Visually check tubes, fittings, and valves for contamination or obstructions. |
| 4 | If contamination occurs, reclean with a hot water-alkaline solution. |
| 5 | Do not install contaminated materials. |
| 6 | Complete brazing within 8 hours after cleaning. |
You maintain the high standards of Sunhy’s instrumentation tube fittings when you follow these preparation steps.
Tube Fitting Installation Steps
Inserting and Aligning Tubing
You must insert and align tubing precisely to achieve a leak-free connection.
Start by preparing the tubing and fitting according to standard instructions for tube fitting installation. Follow these steps for proper tube fitting installation:
- Insert the prepared tubing into the fitting until it seats firmly against the body shoulder.
- Make sure the nut is finger-tight. Do not force the tubing if it does not slide in easily.
- Mark the nut at the 6 o’clock position. This helps you track the rotation during installation.
- Remove any obstructions from the tubing and fitting. Check for scratches or debris.
- Adjust the alignment so the tubing sits straight and centered in the fitting.
- Confirm the tubing is not oval and the end is smooth.
Tip: Always check alignment using a taut wire or visual markers. This ensures the tubing remains centered and reduces the risk of leaks.
Nut Tightening Procedure
You must tighten the nut according to manufacturer’s torque and alignment guidelines.
Proper installation guidelines help you avoid common errors like overtightening or under-tightening. Use the following steps for tube fitting installation:
- Hold the fitting body steady with a backup wrench.
- Tighten the nut 1 1/4 turns from the finger-tight position for sizes up to 1 inch or 25mm. For smaller sizes (1/16″, 1/8″, 3/16″, 2mm, 3mm, 4mm), tighten only 3/4 turn.
- Use the mark at 6 o’clock to track the rotation. After tightening, the mark should move to the 9 o’clock position.
- Do not rely on feel alone. Always follow the standard instructions for tube fitting installation.
| Consequence | Description |
|---|---|
| Leaks | Poor installation may cause fluid escape, loss of pressure, and increased costs. |
| System Failures | Incorrect installation can cause fittings to detach under pressure, leading to costly repairs. |
| Safety Hazards | Leaks can create slippery surfaces and expose personnel to hazardous substances. |
Note: Over-tightening can damage the fitting and tubing. Under-tightening can cause leaks. Always use proper installation guidelines.
Using a Gap Gauge
You must use a gap gauge to confirm the fitting is tightened to the correct specification.
A gap gauge improves tube fitting installation accuracy and reduces the risk of leaks. Here is how it helps:
- The gap gauge checks if the nut is tightened to the correct position.
- It provides a visual cue, so you know when the fitting is fully tightened.
- It helps you achieve a secure connection and prevents premature stopping.
- Using a gap gauge ensures proper installation and improves reliability.
Tip: Do not use the gap gauge for reassembled fittings. Only use it for initial installation.
| Standard | Description |
|---|---|
| ASME B31 | Governs the design and installation of piping systems. |
| API 570 | Covers inspection, repair, and alteration of piping systems. |
| NSF/ANSI 61 | Ensures safety for drinking water system components. |
| WRAS | Addresses water regulations in the UK. |
You must consult with manufacturers to specify design requirements and determine inspection needs.
Testing protocols such as HCT traceability and PMI testing help you meet industry standards and ensure proper tube fitting installation.
Common Installation Errors:
- Overtightening or under-tightening the nut.
- Skipping inspection of parts.
- Using scratched tubing.
- Imprecise tube cutting.
You avoid leaks and system failures by following proper installation guidelines and using Sunhy’s precision tube fitting installation process.
Post-Installation Checks
Leak Testing Methods
You must test for leaks after installation to confirm system integrity.
Leak testing helps you verify that your instrumentation tube fittings perform as expected. You can use several industry-standard methods:
- Helium vacuum integral method detects external leakage with high sensitivity.
- Flow measurement checks for leaks by monitoring fluid movement.
- Volume measurement assesses system tightness by measuring changes in volume.
- You can combine multiple methods for thorough functional and assembly verification.
These techniques apply to many industries, including plumbing, HVAC, automotive, and food processing. You ensure a secure connection and prevent costly downtime when you use proper leak testing methods.
Inspecting Fit and Alignment
You must inspect fit and alignment to guarantee reliable performance.
Visual indicators help you confirm that your installation meets quality standards. Use the table below to guide your inspection:
| Indicator | Description |
|---|---|
| Flush Fitting Appearance | The fitting nut should sit flush against the body of the fitting. |
| Even Contact | Look for even contact between the fitting and the tube. |
You avoid the potential pitfalls of not checking gaps by verifying these indicators. Proper inspection ensures that your tube fittings remain leak-free and maintain system safety.
Troubleshooting Leaks
You must troubleshoot leaks systematically to restore system reliability.
Follow these steps to identify and resolve leaks in your instrumentation tube fittings:
- Start with a visual inspection of tubing and fittings for signs of leakage.
- Isolate the system by shutting down and relieving pressure.
- Check all connections for proper tightening and alignment.
- Evaluate torque settings using a torque wrench.
- Inspect O-rings for damage or absence and replace if needed.
- Test for leaks after reassembly.
- Identify the root cause using the information you gathered.
Common causes of leaks include inadequate torque, misalignment, missing or damaged O-rings, and braze overflow on sealing surfaces. You maintain a leak-free installation when you address these issues promptly.
Tip: Always follow manufacturer’s installation guidelines and use recommended tools for each step. This practice helps you prevent leaks and ensures long-term reliability.
Safety and Reassembly Tips
Safety Precautions
You maintain a safe working environment by following strict safety precautions during tube fitting installation.
Sunhy recommends several steps to protect yourself and your system:
- Wear protective equipment such as gloves and safety glasses during repairs.
- Conduct leak testing after installation. Set up an exclusion zone with clear signs before pressurizing the system. Use clean, dry air or nitrogen for testing. Increase pressure gradually and check for leaks at each stage. Hold pressure at the design level for the required duration. Apply a leak detection solution to all joints and mark any leaks for repair.
- Inspect pneumatic fittings regularly. Look for loose, cracked, or broken hoses and connectors. Listen for hissing sounds that may signal air leaks. Replace damaged hoses before starting the system. Use an Ultrasonic Acoustic Detector to find high-frequency air leaks. Check fittings during routine maintenance.
Alert: Never use flammable substances for leak testing in pneumatic systems.
You prevent common safety incidents by following these steps. The table below shows frequent safety incidents and how you can avoid them:
| Safety Incident | Preventive Measure |
|---|---|
| Intermixing fittings of different materials | Store fittings separately and verify specifications during installation. |
| Installation of defective tubing and fittings | Inspect tubes for damage and use protective caps during transport. |
| Inadequate tubing preparation | Cut and deburr tubes properly, and inspect tube ends visually. |
| Insufficient tube installation depth | Insert the tube fully into the fitting body before tightening the nut. |
| Under-tightening or over-tightening | Tighten fittings correctly; remember that tighter does not always mean better sealing. |
You ensure the safety of properly gapped fittings by following manufacturer guidelines and using recommended tools.
Reassembly Procedures
You restore leak-free performance by following correct reassembly procedures for Sunhy tube fittings.
Use these steps to maintain system integrity:
- Depressurize the system before disassembly.
- Mark the tube along the nut and body flats to help return to the original position.
- Unscrew the nut to release the tube.
- Insert the tube with pre-swaged ferrules until the front ferrule sits flush against the fitting body.
- For fittings over one inch, lightly lubricate the threads and rear surface of the back ferrule.
- Hold the fitting body steady and turn the nut to the marked position using a wrench.
- Make sure the nut and fitting lines are in-line and the nut is against the horizontal line on the tube.
- Tighten the nut slightly to complete reassembly.
Tip: Do not use the gap gauge for reassembled fittings. Only use it for initial installation.
The table below shows the percentage of leak-free performance after reassembly compared to initial installation:
| Fitting Type | Leak-Free Performance (%) |
|---|---|
| Compression Fittings | 98.2 |
| Threaded Fittings | 97.8 |
You can improve your skills and safety by using training resources. Sunhy provides guidance on selecting and preparing tubing, and highlights the skills needed for safe installation. Training helps you avoid leaks and maintain safe working conditions in industrial environments.
You achieve leak-free tube fitting installation by following each step with care.
Choose Sunhy’s high-quality fittings to prevent leaks and increase system durability. Use precise installation techniques and inspect connections regularly. You improve reliability and reduce maintenance costs when you follow these practices.
| Checklist Item | Description |
|---|---|
| Proper Installation Techniques | Clean components, cut tubes square, align, and apply correct torque. |
| Selecting the Right Fittings | Match material, pressure, and temperature ratings. |
| Use of Sealants and Lubricants | Apply suitable sealants and lubricants during assembly. |
| Regular Inspection and Maintenance | Check for leaks and maintain fittings routinely. |
High-quality fittings help you avoid fluid loss and costly downtime. Precise installation gives you safer, more efficient operations.
FAQ
What makes Sunhy tube fittings leak-free?
High-quality design and precise installation ensure leak-free performance.
You benefit from Sunhy’s double ferrule compression technology, strict material standards, and advanced CNC machining. These features create a secure seal and reliable connection.
How do you know if a fitting is properly tightened?
Use a gap gauge for initial installation.
You check the nut position after tightening. The mark should move from 6 o’clock to 9 o’clock. The gap gauge confirms correct torque and prevents leaks.
Can you reuse Sunhy tube fittings after disassembly?
Yes, you can reassemble Sunhy fittings multiple times.
You insert the tube with pre-swaged ferrules and tighten the nut to the original position. Do not use the gap gauge for reassembly.
What should you do if you find a leak?
Inspect, isolate, and retighten the connection.
You start with a visual check, shut down the system, and retighten the nut. Replace damaged parts if needed. Test for leaks after repairs.
Which industries use Sunhy instrumentation tube fittings?
Oil & Gas, Hydrogen, Semiconductor, and more rely on Sunhy fittings.
You find Sunhy products in high-pressure, critical environments. The fittings meet strict standards for safety and reliability.