Hydraulic Adapter Failure: Causes, Warning Signs & Prevention Checklist
Most hydraulic adapter failures start long before the actual breakdown. What looks like a sudden leak or cracked fitting is usually the final result of one of three root problems: the wrong interface, the wrong load path, or the wrong cleanliness level. In practice, that means a thread or sealing-style mismatch, a joint that is carrying bending or vibration instead of only sealing pressure, or contamination that damages the sealing surface over time.
If you control those three conditions, you prevent most repeat leaks and many avoidable shutdowns. This is why experienced maintenance teams do not treat a leaking fitting as a simple tightening problem. They first identify the interface, check whether the joint is being side-loaded, and inspect the cleanliness of the threads, seat, and sealing faces. If you also need repair logic after a leak has already occurred, see our hydraulic adapter repair guide. If you are standardizing connector families across machines, our hydraulic adapter selection guide and compression fittings & adapters reference page can help reduce wrong-part selection in the field.
This page focuses on three questions: what causes hydraulic adapter failure, what warning signs appear first, and what preventive controls actually reduce repeat failures. That framing matches how most technicians and engineers troubleshoot the problem in the field.
- Wrong interface: incorrect thread form, incorrect seal style, wrong tightening method, or mixed standards.
- Wrong load path: side-load, bending, vibration, poor clamping, hose pull, or over-torque.
- Wrong cleanliness: particles, water, tape fragments, dirty seats, or uncapped maintenance practices.
Hydraulic Adapter Failure: Causes and Warning Signs
Material Fatigue and Side-Load
Material fatigue is a leading cause of hydraulic adapter failure, but fatigue rarely begins in a random location. It usually starts where stress is concentrated: thread run-outs, hex-to-body transitions, damaged sealing edges, or at a nick or scratch that becomes a crack initiator. In service, fatigue is often accelerated not by pressure alone, but by a joint carrying bending, vibration, or hose movement that it was never designed to carry.
A common field example is a straight adapter installed to “make alignment work” between a rigid port and a hose. The joint may seal at first, but the hose keeps pulling sideways every cycle. Over time, the adapter cracks at the first engaged thread or begins weeping because the load path is wrong. The correct fix is not a stronger wrench. It is correcting routing, adding clamps, and using a fitting style better suited to the real movement and connection geometry.
Use this table as a practical field checklist. These are typical indicators, but acceptance criteria should always follow your own site standard and the fitting manufacturer’s guidance.
| Sign of Material Fatigue | Description | Causes and Implications |
|---|---|---|
| Discoloration | Color changes on the adapter | Localized heating, chemical attack, or fretting; may indicate reduced surface strength |
| Loose or Misaligned Fittings | Movement or wobbling | Side-load, bending moment, vibration, or poor clamping; accelerates seal wear |
| Wear Marks and Abrasion | Scratches or grooves | Hose rub, clamp failure, or abrasive debris; creates stress risers |
| Leaking Fittings | Fluid around fittings | Loss of sealing stress, damaged seat, or cracked body; escalates quickly under spikes |
| Visible Cracks and Fractures | Fine lines or breaks | High-cycle fatigue from pulsation and vibration; replace immediately |
| Corrosion and Rust | Rust or powdery residue | Pitting reduces cross-section and can trigger fatigue cracking |
| Deformation and Warping | Bent or distorted fittings | Over-torque, impact, or using the adapter as a “handle” during hose routing |
| Worn or Damaged Threads | Stripped or uneven threads | Cross-threading, wrong thread form, or contamination during assembly |
| Unusual Noises | Hissing or grinding sounds | Leak jets, aeration, or internal wear; treat as a safety issue |
In practice, material grade matters less than many people think if the joint is being loaded incorrectly. A well-made adapter performs best when it is sealing pressure, not acting as a structural support. That is why routing and clamping decisions are often more important than simply “upgrading the fitting material.”
Wrong Interface and Improper Installation
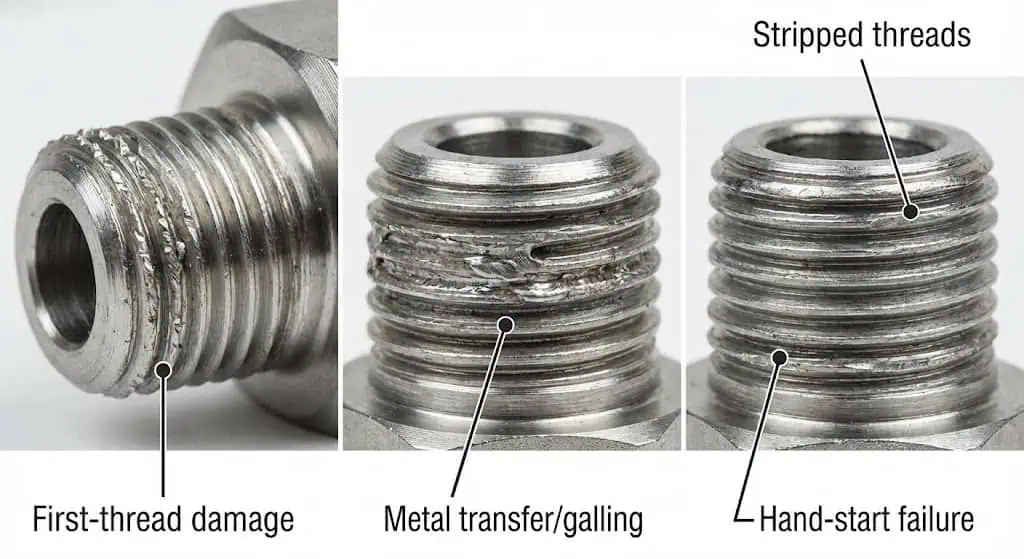
Improper installation is one of the fastest ways to turn a good adapter into a leaking adapter. The most common mistake is not simply under-tightening or over-tightening. It is using the wrong assembly method for the sealing style. Technicians in the field see this constantly: tape used on a flare or ORFS seal, a missing backup wrench, or a fitting that seemed to “fit” because the thread size looked similar even though the thread standard was different.
A familiar industry case is a fitting that tightens part-way, feels “close enough,” and then leaks under pressure. When it is checked with a thread gauge, the root cause is often a mismatched thread family or the wrong sealing interface entirely. That is why experienced technicians identify both the thread form and the sealing method before assembly, especially on fleets that use multiple standards.
- Identify the interface before assembly: thread form plus sealing method. Standards families such as ISO 8434 define common connector styles, while qualification and performance testing methods are described in references such as ISO 19879.
- Start threads by hand. If the connection does not run smoothly, stop and re-check the thread type and sealing family.
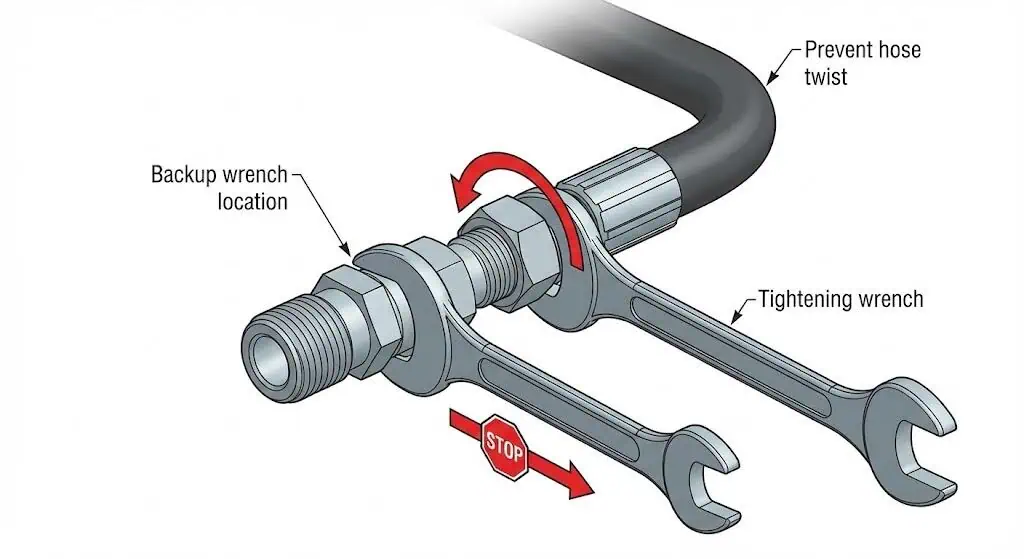
- Use a backup wrench to avoid transferring torque into the port, tube, or manifold.
- Tighten to the manufacturer method, whether torque or turns-from-finger-tight. Guidance varies by material, plating, and lubrication condition.
- Keep sealing faces clean. Paint, grit, tape fragments, and metal chips on the sealing interface are common causes of repeat leaks.
The most useful expert rule here is simple: if the sealing style is wrong, tightening will not rescue the joint. A good adapter installed incorrectly still leaks. A correct interface assembled cleanly and tightened correctly is what creates a stable seal.
Incompatible Materials and Corrosion
Using incompatible materials is a major cause of hydraulic adapter failure, especially in wet, salty, or chemically aggressive environments. When dissimilar metals are paired carelessly, galvanic corrosion can roughen sealing faces, reduce effective cross-section, and create intermittent leakage long before the fitting looks obviously damaged.
| Risk Type | Description |
|---|---|
| Corrosion | Incompatible materials can drive galvanic attack, weakening the adapter and roughening the seal seat. |
| Weakening | Loss of effective cross-section and reduced sealing stress retention over time. |
| Failure | Leaks, thread damage, or sudden fracture under pulsation or spikes. |
In field practice, corrosion-related leaks often appear only after load spikes or washdown exposure at first. For example, dissimilar metal combinations in salt-rich service may show pitting around the sealing zone, then progress from occasional seepage to continuous leakage. The correct fix is rarely “just use more sealant.” It is usually a better material pairing, better coating strategy, and better control of storage and exposure conditions.
Material compatibility is not only metal-versus-metal. It also includes fluid chemistry, elastomer compatibility, and whether the chosen material can maintain sealing quality under the real temperature and corrosion exposure of the application.
Extreme Temperatures and Seal Stress Loss
Extreme temperatures shorten the life of hydraulic adapters because temperature swings change sealing stress. Metals expand and contract, elastomers stiffen or soften, and vibration works the joint harder. In service, this often appears as a leak after cold start, hot soak, or repeated duty-cycle changes rather than as a constant leak at all times.
| Effect | Description |
|---|---|
| Material Expansion and Contraction | Thermal cycling can relax clamp load, leading to weeping and eventual leakage. |
| Reduced Flexibility | Cold increases stiffness in hoses and seals, raising the chance of micro-cracks and seal damage. |
| Changes in Fluid Viscosity | Viscosity shifts can raise pressure drop and heat generation, stressing seals and seats. |
A practical example is a unit that runs dry at operating temperature but starts to seep after shutdown. In many cases, inspection shows that the joint was assembled against a contaminated or damaged seat, and once the sealing stress relaxes during cooling, the leak path opens. That is why temperature-related leaks should be treated as a sealing-surface and assembly-quality problem, not only as a temperature problem.
Fluid Contamination and Pressure Spikes
Fluid contamination is one of the strongest predictors of repeat hydraulic adapter failure. Contamination damages sealing faces, erodes threads, accelerates wear in pumps and valves, and increases pressure ripple and aeration. Once wear begins, the system generates more debris, which then accelerates further damage. Many maintenance references treat contamination control as a primary reliability lever. For example, Schroeder Industries notes the major role contamination plays in premature machine failures.
In real maintenance work, intermittent leaks after service are often traced back to cleanliness mistakes rather than defective parts. A seat or O-ring groove that looked “clean enough” may still contain grit, moisture, or tape fragments that open a leak path once pressure and vibration return. This is one reason experienced teams treat every disconnection as a cleanliness event, not just a parts replacement event.
| Contaminant Type | Description |
|---|---|
| Built-in Contamination | Leftover particles from manufacturing and assembly |
| Environmental Contamination | Dust and dirt from outside sources |
| Generated Contamination | Wear and fluid breakdown during normal use |
| Human-induced Contamination | Introduced during maintenance if cleanliness is ignored |
Overpressure makes contamination damage worse. Short-duration spikes can exceed the steady-state pressure you see on a gauge. When that happens, seals extrude, seats deform, and marginally damaged joints begin to leak. A useful field clue is a fitting that only leaks after fast valve closure, rapid load changes, or other dynamic events. In that case, the correct order is: find and correct the spike source first, then rebuild the joint cleanly.
- Cap and plug open lines immediately during maintenance.
- Flush and filter after component replacement.
- Use a cleanliness target and measure it. ISO cleanliness coding such as ISO 4406 is commonly used to describe particle counts.
- Avoid mixing fluids unless compatibility is confirmed.
- Investigate leaks that only appear under dynamic load as possible pressure-spike problems, not only fitting problems.
Practical takeaway: if a fitting only leaks “sometimes,” suspect pressure spikes, vibration, and marginal sealing stress before assuming the adapter itself is defective.
Prevention Checklist for Hydraulic Adapter Failure
Regular Inspection and Maintenance
You can prevent most hydraulic adapter failures by using a specific inspection routine instead of a vague “check fittings” approach. A useful inspection names what to look for, where it occurs, and what action should follow if it is found. The goal is to detect wrong interface conditions, wrong load paths, and wrong cleanliness before they turn into leaks or fatigue cracks.
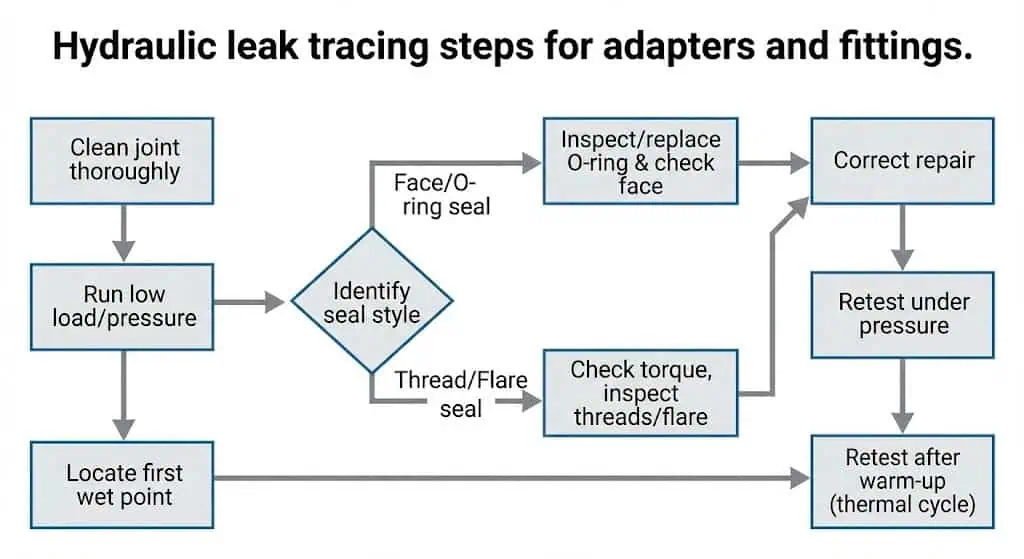
- Monthly baseline: inspect adapters, ports, and hose ends for weeping, fretting dust, cracked plating, seat damage, and rub points.
- Weekly for high-risk assets: use this for high-pressure, high-temperature, high-vibration, or safety-critical equipment.
- After any intervention: re-check after the first duty cycle and again after the next temperature swing.
| Key Element | Description |
|---|---|
| Hydraulic fluid | Check level, appearance, and contamination indicators; sample if trends are unclear. |
| Filters | Inspect differential pressure or bypass indicators and replace per condition. |
| Seals | Look for extrusion, cuts, flattening, and chemical attack; replace with the correct material. |
| System temperature | Watch for overheating and hotspots near restrictions. |
| Reservoir | Inspect for aeration, foam, and moisture ingress. |
| Leaks and frays | Address immediately; do not “wipe and watch” on high-pressure systems. |
| Electric drive motor | Check for abnormal temperature that may indicate overload or restriction. |
| Unusual sounds | Listen for aeration or cavitation; treat as a reliability and damage driver. |
| Visual inspection | Check clamp points, rub points, and exposed threads for damage. |
| Pipes and connections | Confirm routing avoids side-load and verify no joint is acting as a structural support. |
One of the clearest industry lessons is that a fitting repeatedly needing “just a little more tightening” is not a maintenance success. It is a failure investigation that has not been completed yet. Record findings, not only repairs, so you can trend repeat weeping, routing problems, or contamination-related leaks.
Tip: If you repeatedly tighten the same fitting, treat it as a failure investigation, not as a normal maintenance task. Re-torque is not a root cause.
Correct Installation Practices
Proper installation is essential for leak prevention and long-term reliability. Incorrect installation leads to leaks, pressure loss, inefficient operation, and in severe cases, hose or fitting rupture. For safety, never use your hand to search for a hydraulic leak. Use cardboard, wood, or other safe leak-detection methods and treat injection injuries as emergencies.
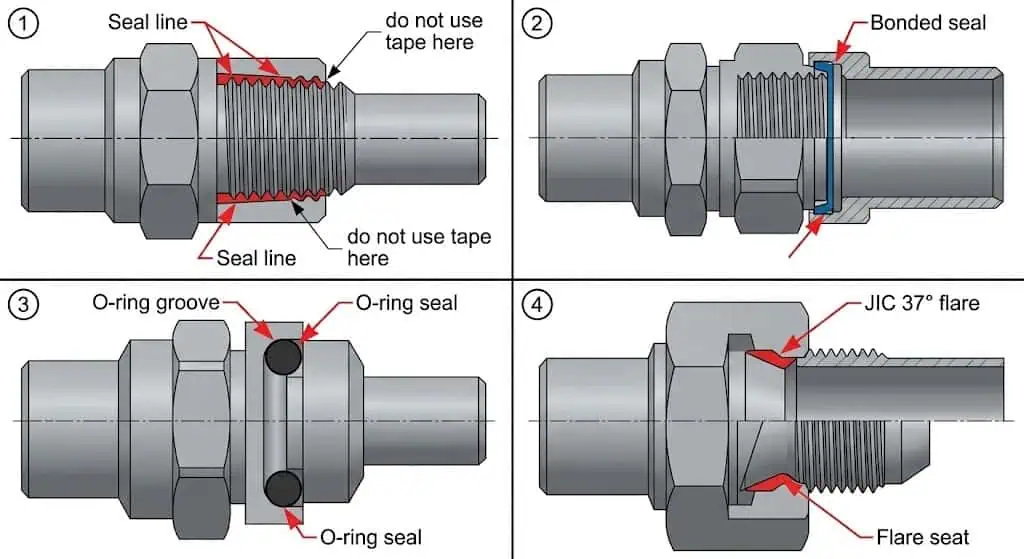
- Use only manufacturer-approved sealants where the sealing style requires them. Do not add tape to flare or face-seal connections.
- Start threading adapters by hand to prevent cross-threading.
- Tighten using the correct method: torque or turns-from-finger-tight, depending on the connector style. Published guidance such as Parker torque guidance emphasizes using manufacturer data rather than guessing.
- After installation, perform a controlled low-pressure check first, then bring the system to operating pressure while observing from a safe position.
- Store adapters in sealed containers and keep work surfaces clean to prevent contamination during assembly.
Technicians with strong assembly discipline usually get fewer repeat leaks not because they tighten harder, but because they protect the sealing faces, identify the interface correctly, and avoid twisting the joint during make-up. That is the real difference between a one-time assembly and a connection that stays sealed under vibration and pressure cycling.
Material and Component Compatibility
Choosing the right materials and components prevents corrosion, leakage, and premature system failure. Compatibility is not only about metal pairing. It also includes sealing style versus pressure pulsation, port style versus available tightening method, and fluid chemistry versus elastomer material.
- Ensure hydraulic fluid compatibility with seals and adapter materials.
- Select corrosion-resistant materials for harsh or marine environments.
- Verify that materials can handle the full operating temperature range, including transients.
- Minimize dissimilar metal connections to reduce galvanic corrosion.
- Choose the correct thread and sealing style for the actual duty, not only the nominal size.
This is where many industry “mystery leaks” begin. The joint may look dimensionally correct, but if the sealing family, material pairing, or elastomer choice does not match the application, the connection will not remain stable over time. Compatibility should be treated as a design control, not just a purchasing detail.
Addressing Environmental Challenges
Environmental factors such as moisture, chemicals, salt, and temperature swings can damage adapters even when the installation was originally correct. Most environmental failures are preventable if you keep moisture out of ports and fluids, keep abrasive grit away from the sealing interface, and match the material and coating to the exposure conditions.
- Store hydraulic fluids in sealed containers to keep out moisture.
- Maintain a controlled storage area for fluids and components.
- Schedule preventive maintenance to catch corrosion and ingress problems early.
- Use suitable surface treatments where corrosion risk is high.
- Monitor for water in oil and correct the root cause of ingress.
Note: Moisture and temperature swings can contribute to corrosion, fluid breakdown, aeration, and repeated fitting leaks. If a leak keeps returning after otherwise correct assembly, environmental exposure may be reducing seal stability.
Prevent Hydraulic Hose and Adapter Failures Together
Adapters and hoses usually fail for the same reasons, so they should be prevented together. Pulsation, bending, abrasion, temperature, contamination, and poor routing affect the whole connection, not just one part of it. That is why hose failure prevention belongs in the same maintenance conversation as adapter failure prevention.
- Inspect hoses for cracks, bulges, leaks, or abrasions.
- Route hoses to avoid sharp bends and contact with rough surfaces.
- Clamp hoses so they do not rub or apply side-load to the adapter.
- Use compatible fluids to prevent internal hose degradation.
- Install pressure relief or anti-shock controls where spikes are a known risk.
- Maintain fluid temperature within the correct range.
- Use sleeves or wraps in high-abrasion or high-vibration areas.
A useful field rule is this: if the hose is moving excessively, the adapter is already being asked to do more than seal. Correct the routing and support first, then judge the fitting condition. That sequence prevents many repeat failures that are otherwise blamed on the wrong component.
Remember: prevention is more cost-effective than emergency repairs. In most cases, the first controls to improve are interface identification, cleanliness, and load path.
FAQ
What are the most common signs of hydraulic adapter failure?
Leaks, repeat weeping after re-torque, loose joints, and damaged threads are the most common signs. Also watch for fretting dust at the joint, seat damage, corrosion around the sealing zone, and hissing that suggests a high-pressure leak jet. Treat any spray or pinhole leak as a safety hazard.
- Look for fresh fluid or dried residue around connections.
- Check for visible damage such as nicks at sealing faces, cracked plating, or thread deformation.
- Listen for hissing or grinding sounds that may indicate a leak jet or cavitation-related issue.
How often should you inspect hydraulic adapters?
Inspect adapters at least once a month as a baseline. For high-pressure, high-vibration, high-temperature, or safety-critical systems, inspect weekly and after any intervention. Add an extra check after the first duty cycle following assembly.
Tip: Use a repeatable checklist and trend “minor leaks.” A joint that “needs tightening” repeatedly is already failing.
Which materials work best for hydraulic adapters in harsh environments?
Stainless steel and appropriately coated carbon steel are common choices. The best material depends on corrosion exposure, required strength, and compatibility with the port material. If saltwater or aggressive chemicals are present, prioritize corrosion resistance and stable sealing surfaces.
| Material | Best Use Case |
|---|---|
| Stainless Steel | Marine, chemical exposure, high corrosion risk |
| Carbon Steel | Heavy-duty use where coatings and maintenance controls exist |
| Brass | Low-pressure, mild environments |
How do you prevent leaks in hydraulic systems?
Use correct interface identification, clean assembly, correct tightening, and contamination control. Leak prevention is a chain. Break any link with a wrong thread, dirty seat, side-load, pressure spike, or dirty fluid, and the joint will leak.
- Confirm thread and sealing type before assembly.
- Tighten to the correct method and use a backup wrench.
- Replace worn seals and do not reuse damaged sealing parts.
- Clean threads and sealing faces and cap open lines during maintenance.
- Train staff on consistent assembly and inspection practices.
Why should you choose Sunhy hydraulic adapters?
Sunhy adapters focus on precise fit-up, material options, and corrosion-control choices. You get consistent dimensions, multiple material selections, and surface treatment options that can support site standardization across different environments. To get the best result, pair good components with verified interface identification and clean assembly practice.
Can you use PTFE tape or thread sealant on hydraulic adapters?
Only use sealant where the thread itself is the seal, and only if the manufacturer procedure allows it. Do not add PTFE tape to flare or face-seal connections, because those systems seal at the seat or face rather than the thread. Tape fragments can also contaminate the hydraulic system. If you are unsure, stop and confirm the sealing method before assembly.
What is the fastest way to avoid wrong thread failures?
Standardize connector families and verify with gauges before assembly. Keep a thread pitch gauge and calipers in the field kit, and label common adapters by thread plus sealing style. When possible, reduce the number of thread standards used on the same asset so urgent repairs do not turn into wrong-part installations.